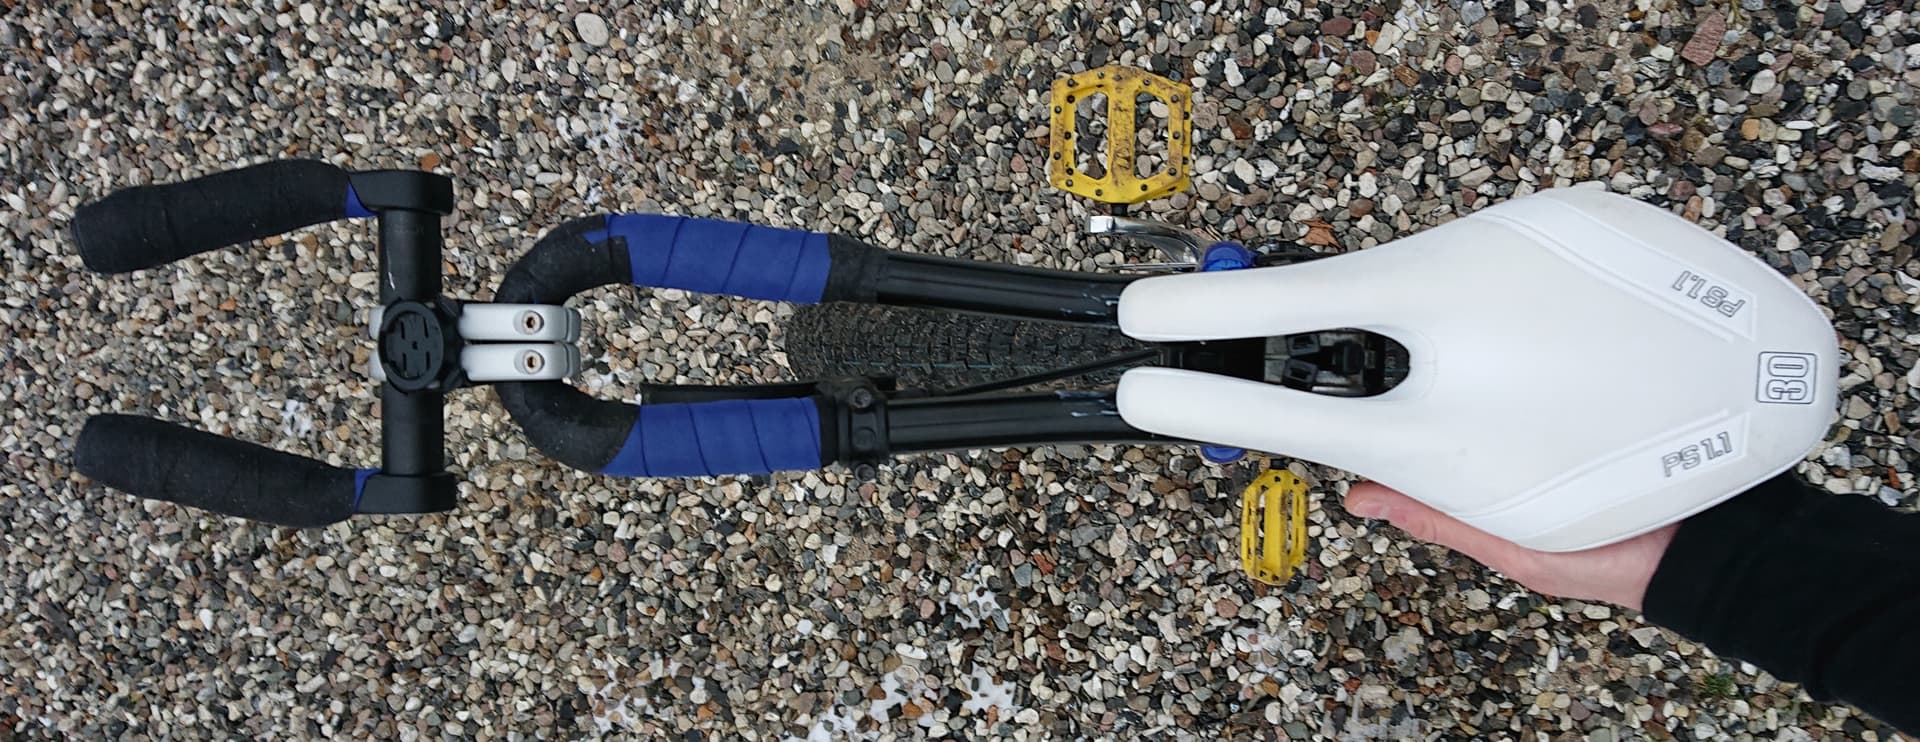
That looks like a heavily modified stadium saddle too. Is it still the original base? Clearly the foam is different to stock.
I had planned to make a return after my handlesaddle tests and then I forgot…
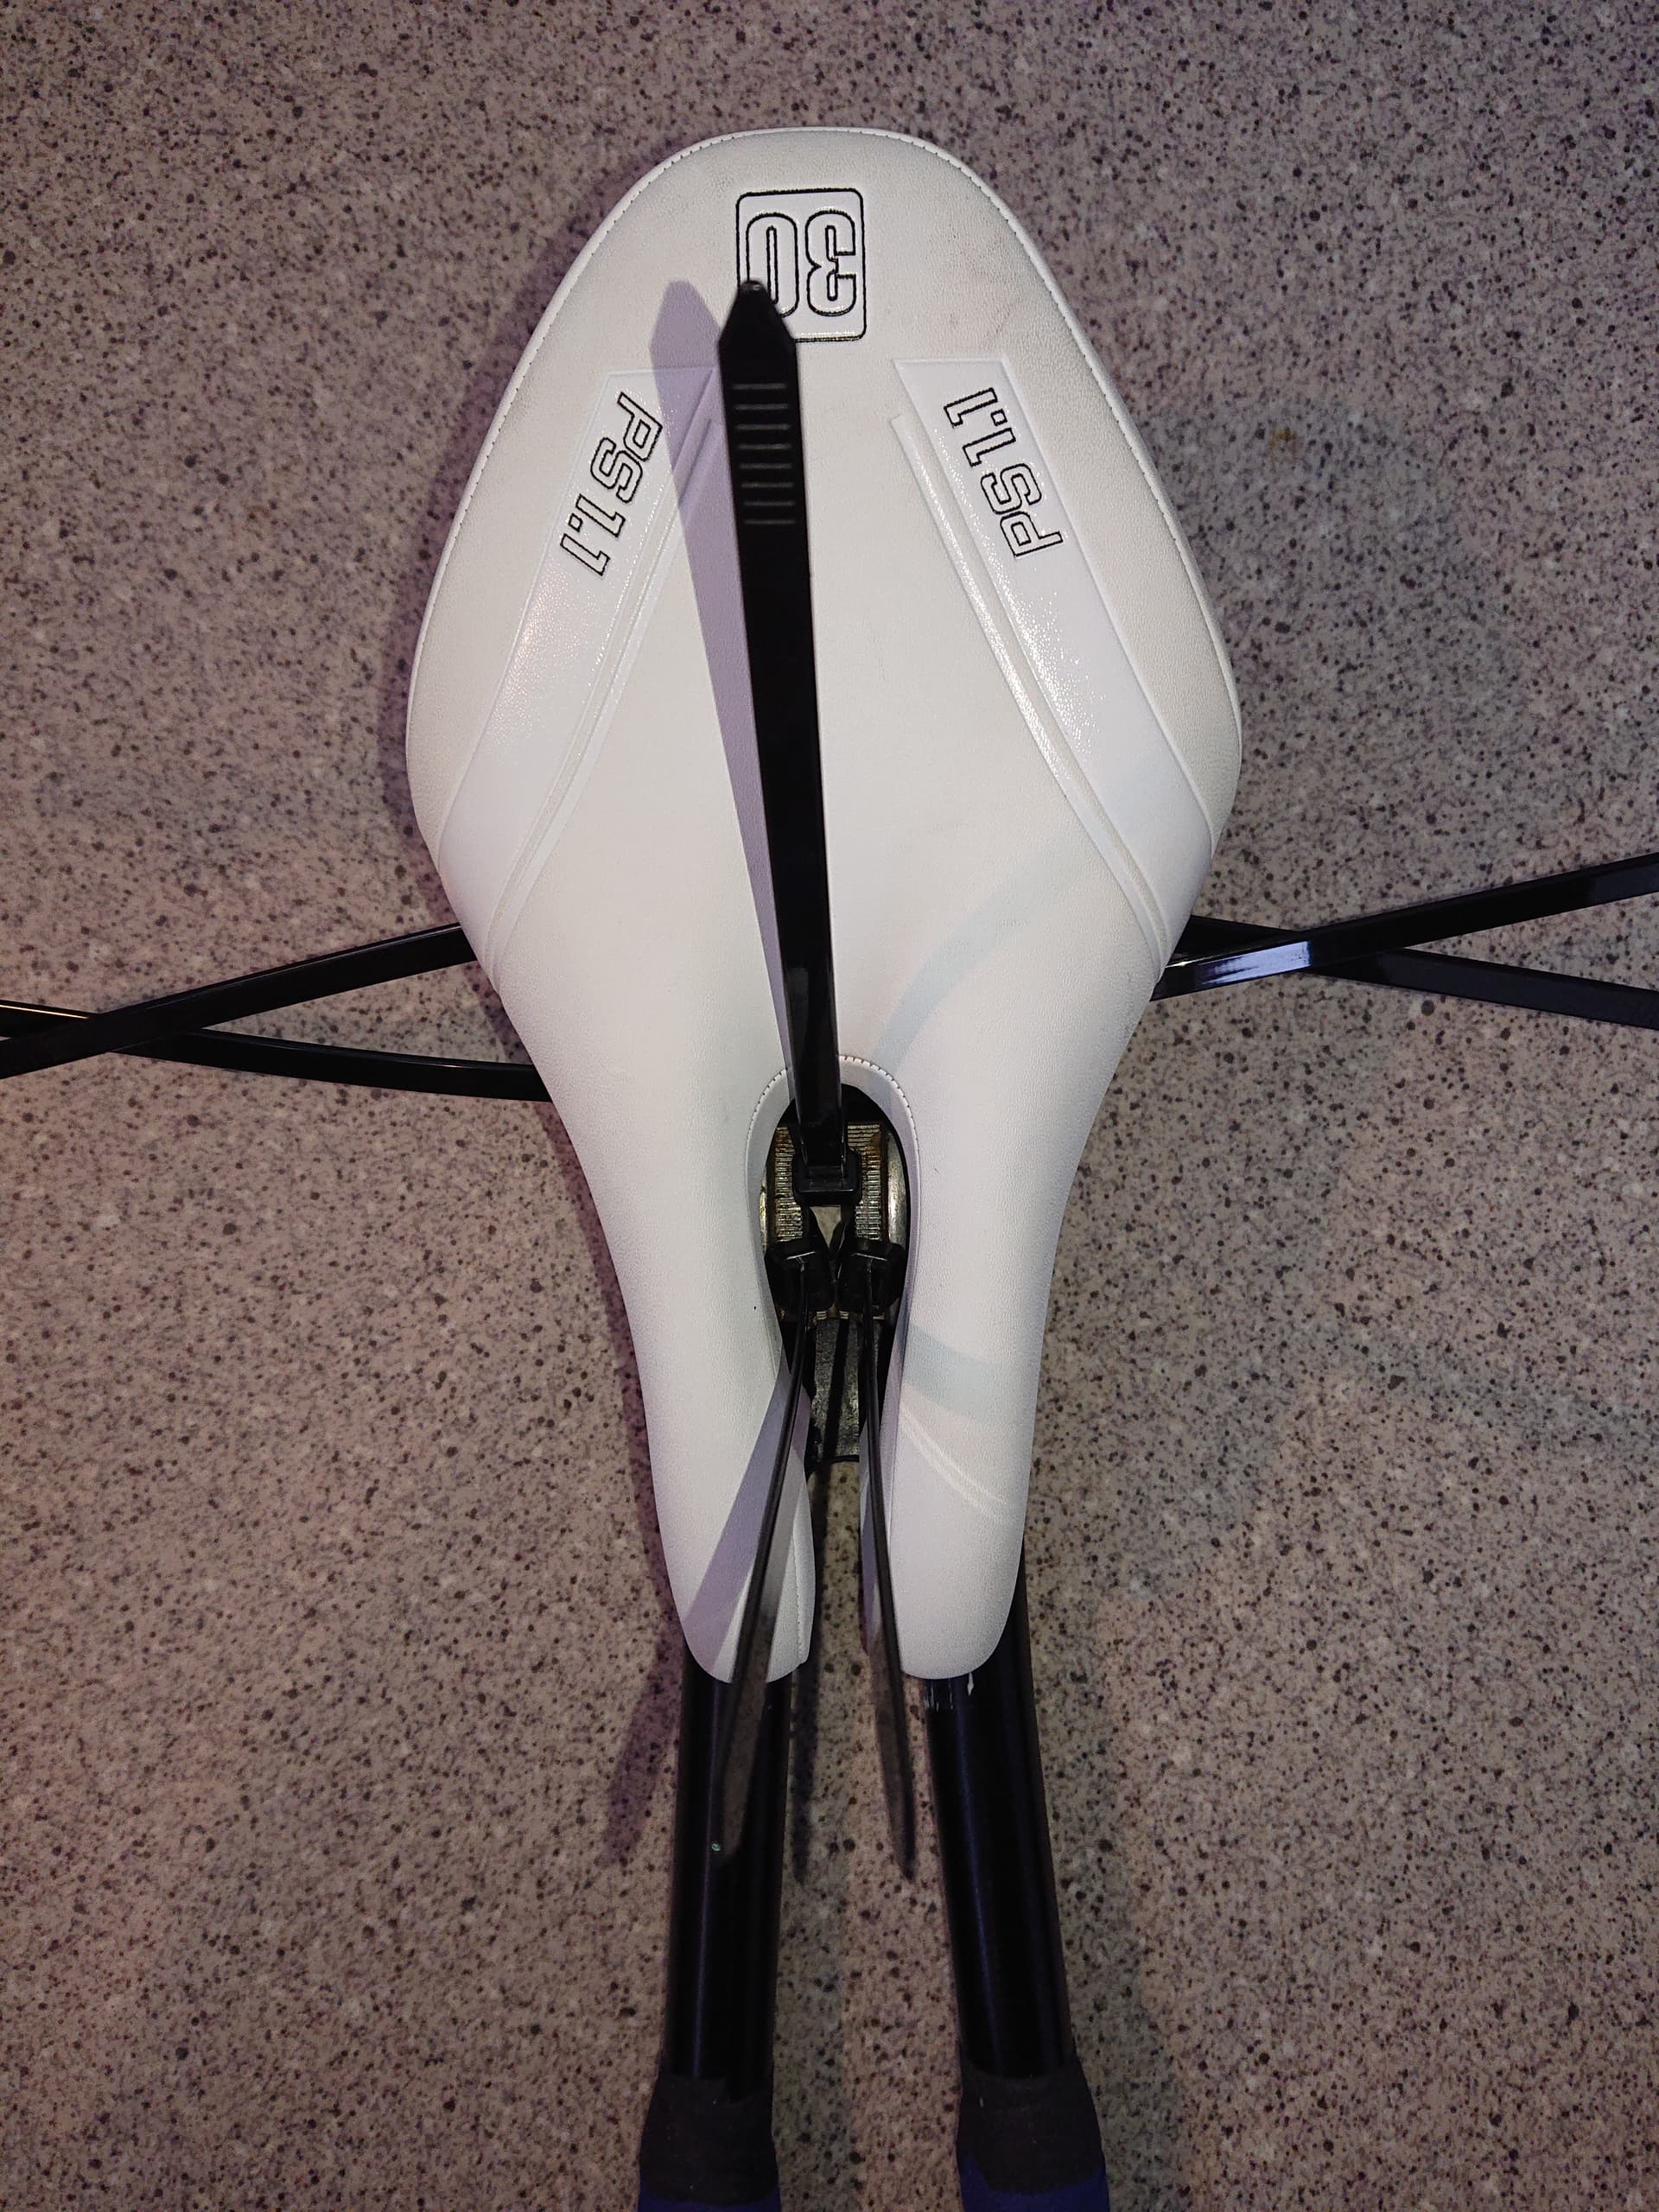
I started with the idea of adapting an ISM saddle as a @Vogelfrei80. I found that the saddle had a shape that matched the handlesaddle and moreover this brand is famous.
I didn’t have the tools and the know-how to make modifications by myself, so I first asked a friend to make holes and put inserts like vogelfrei. But the plastic of the saddle is not very thick and the screws didn’t hold well, and as far as comfort is concerned, I didn’t have the flexibility of the saddle anymore.
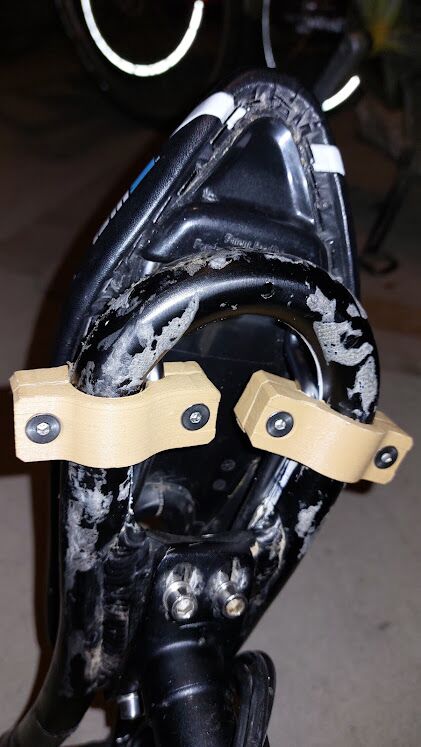
I then called another friend who does 3D printing. I had to print 4 pieces that would be placed between the saddle and the handlesaddle (glued under the saddle and aimed on the handlesaddle). But my friend didn’t like the idea. He made 2 pieces that would clamp the saddle rails and the handlesaddle at the same time. He made several versions and I thought it was great until it broke (after about 2 hours each time).
I started with the V3 then the V2 and finally the V1. And at one point, I didn’t have enough to hold my saddle on my handlesaddle anymore… I decided to use plastic clamps instead to keep riding. The saddle moved a bit, but it was much more durable.
V3 (L) + V2 (R) :
V1 :
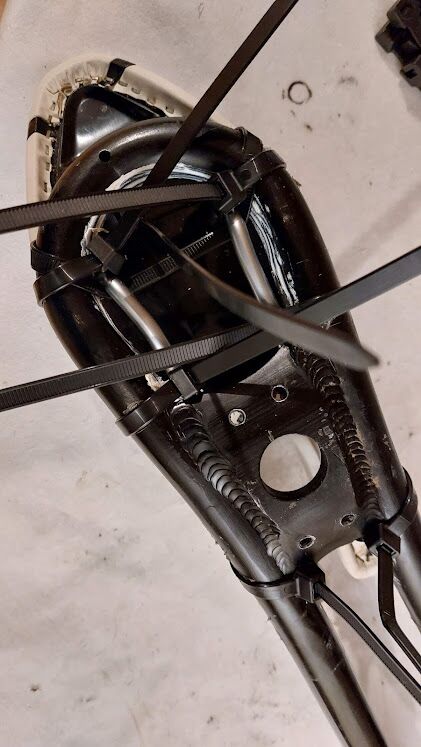
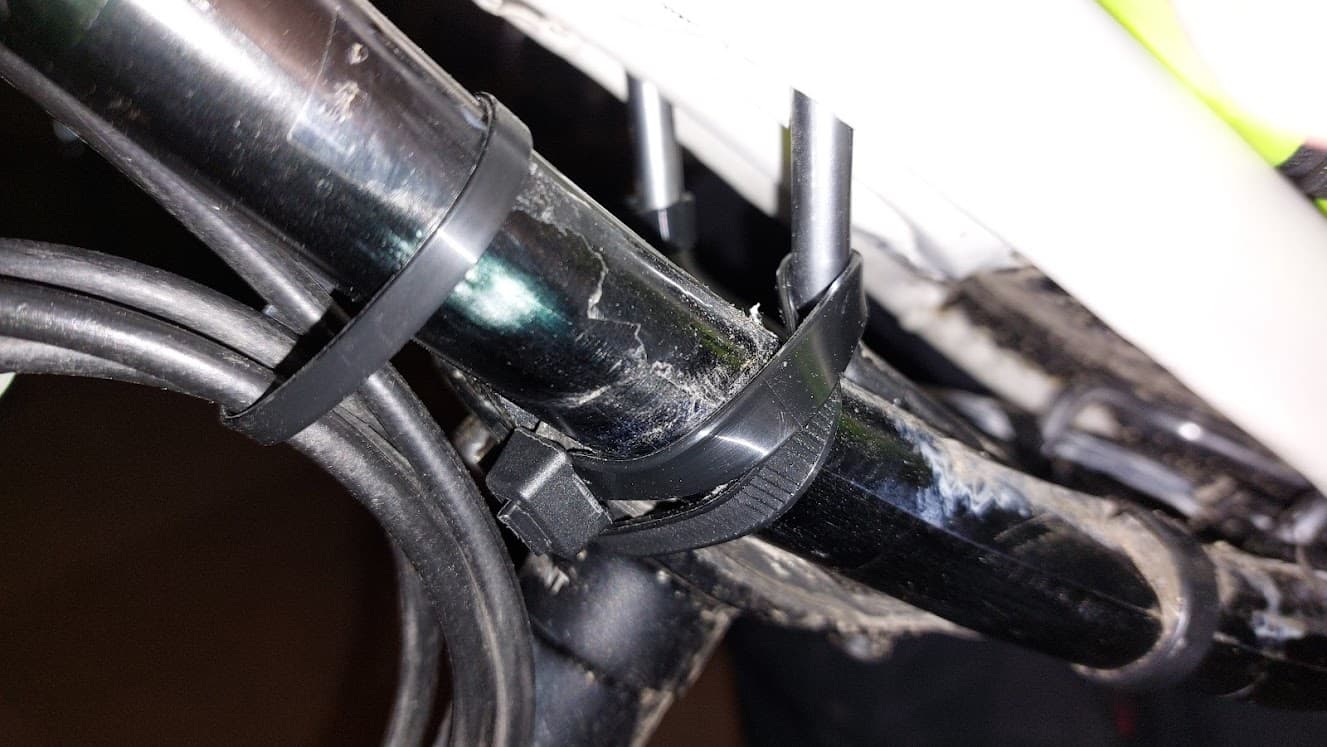
Then I mounted some more, trying to optimize the installation of the clamps.
The most important one is the first clamp, which allows the saddle to be wedged as far back as possible.
I think the placement of the other clamps is less important. In general I put 6 to 8 clamps, I had very few breakages (in several thousands of km).
Size M and L handlesaddle have the same shape in the back, it works with both. And you can do this with any bike saddle.
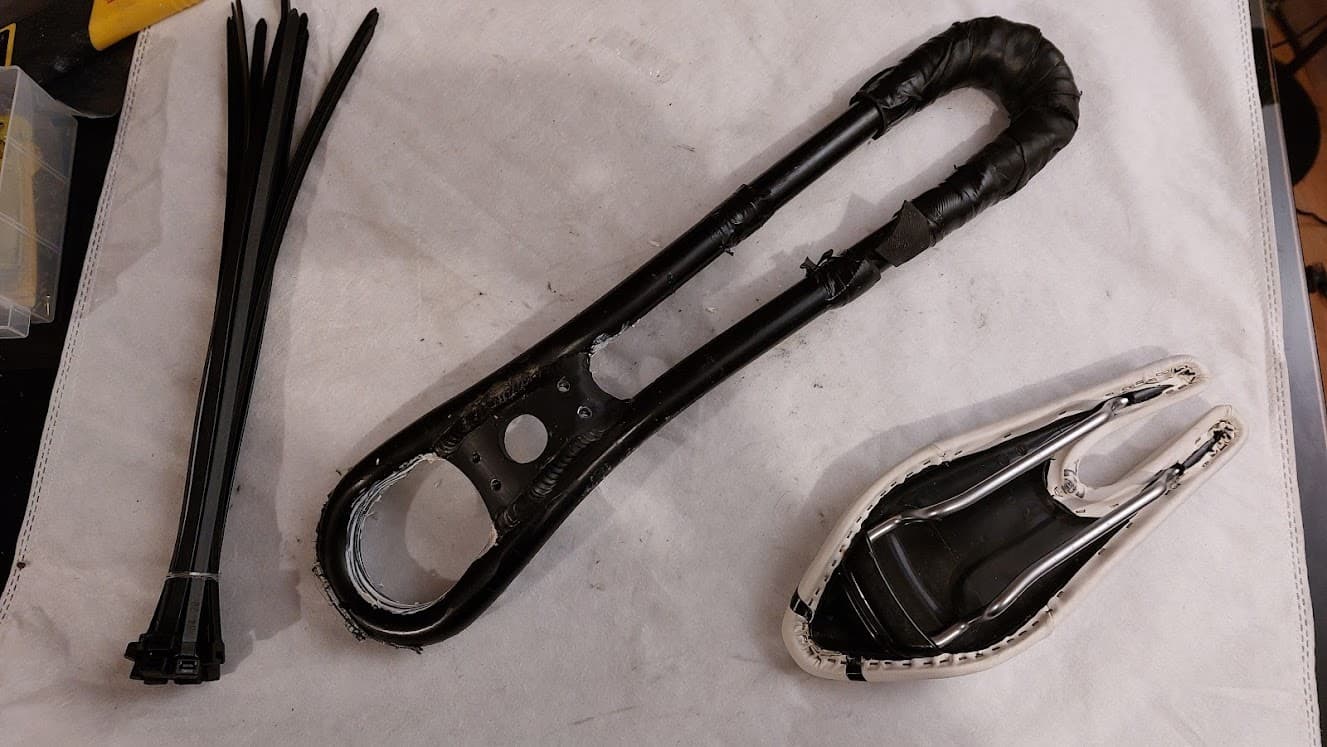
The pictures of my different tests are in this album :

6 Likes
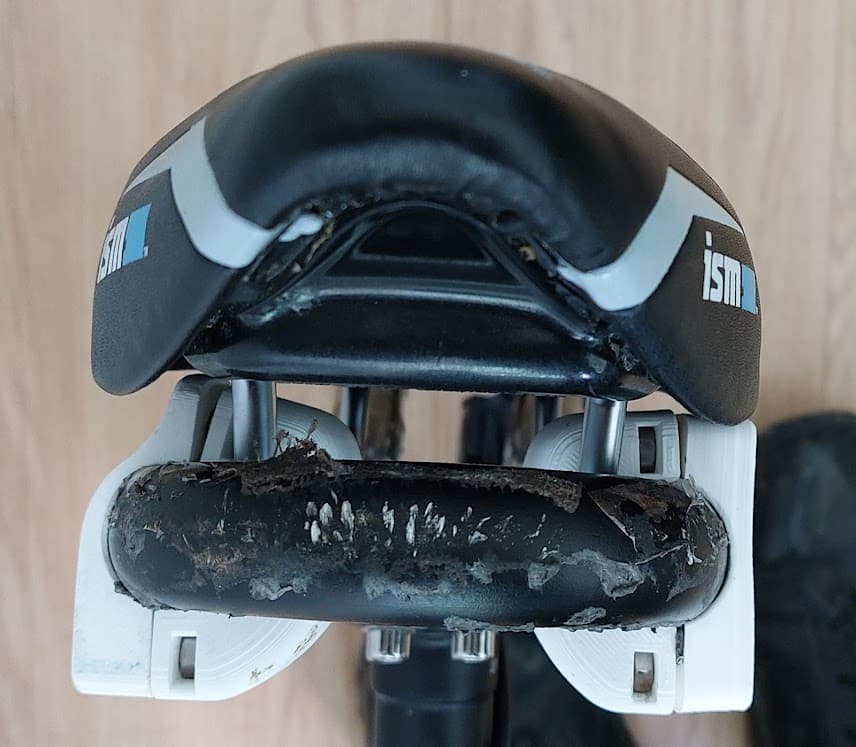
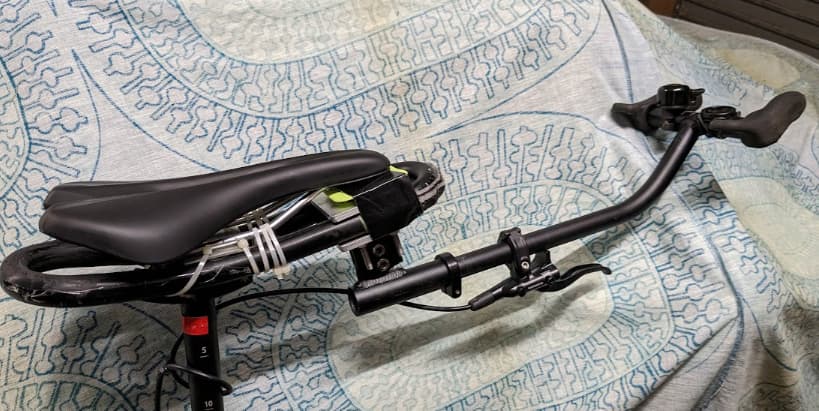
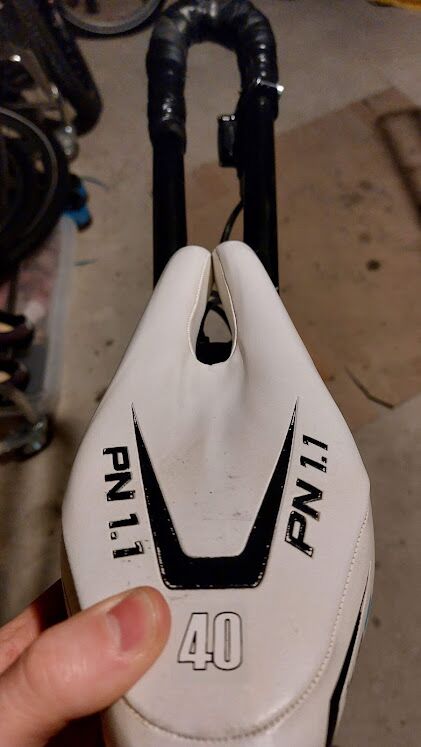
here is my take on an ISM saddle mounted on a M4O Handle saddle medium.
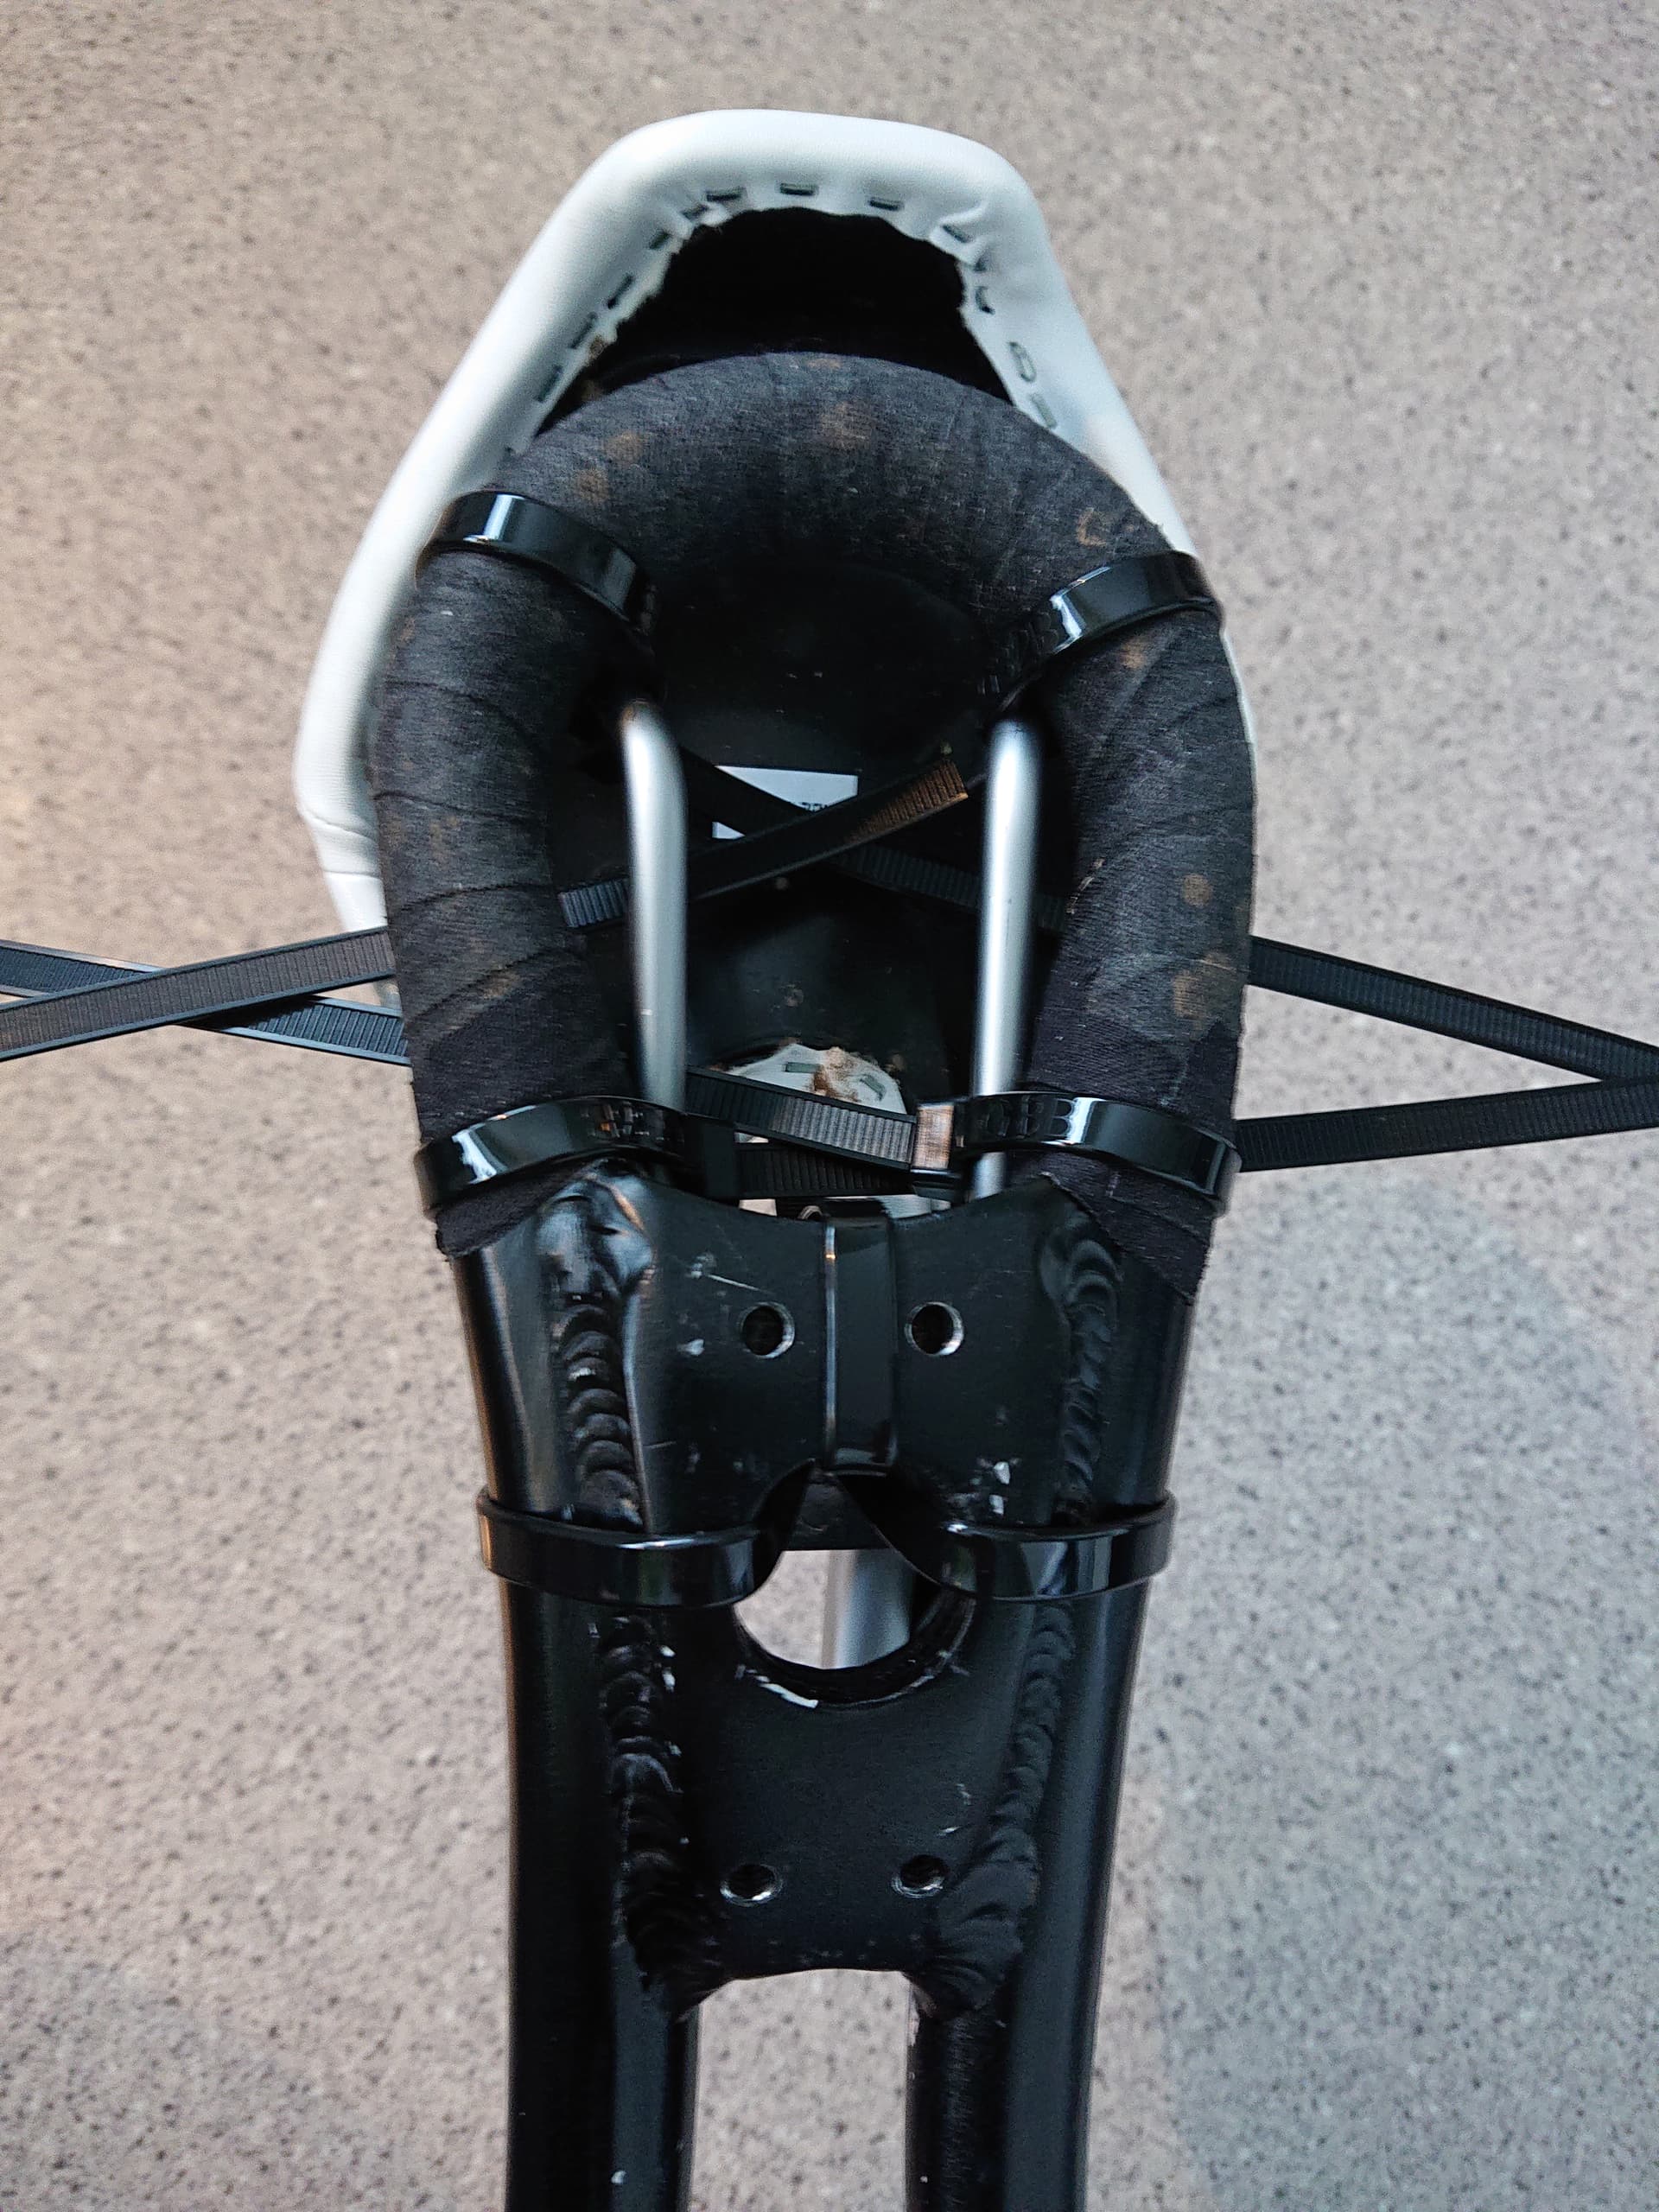
First the parts list. Note the part at the top. That is the top from a regular bike seat post. I use it to hold on to the rails similar to how it’s used on a bike.
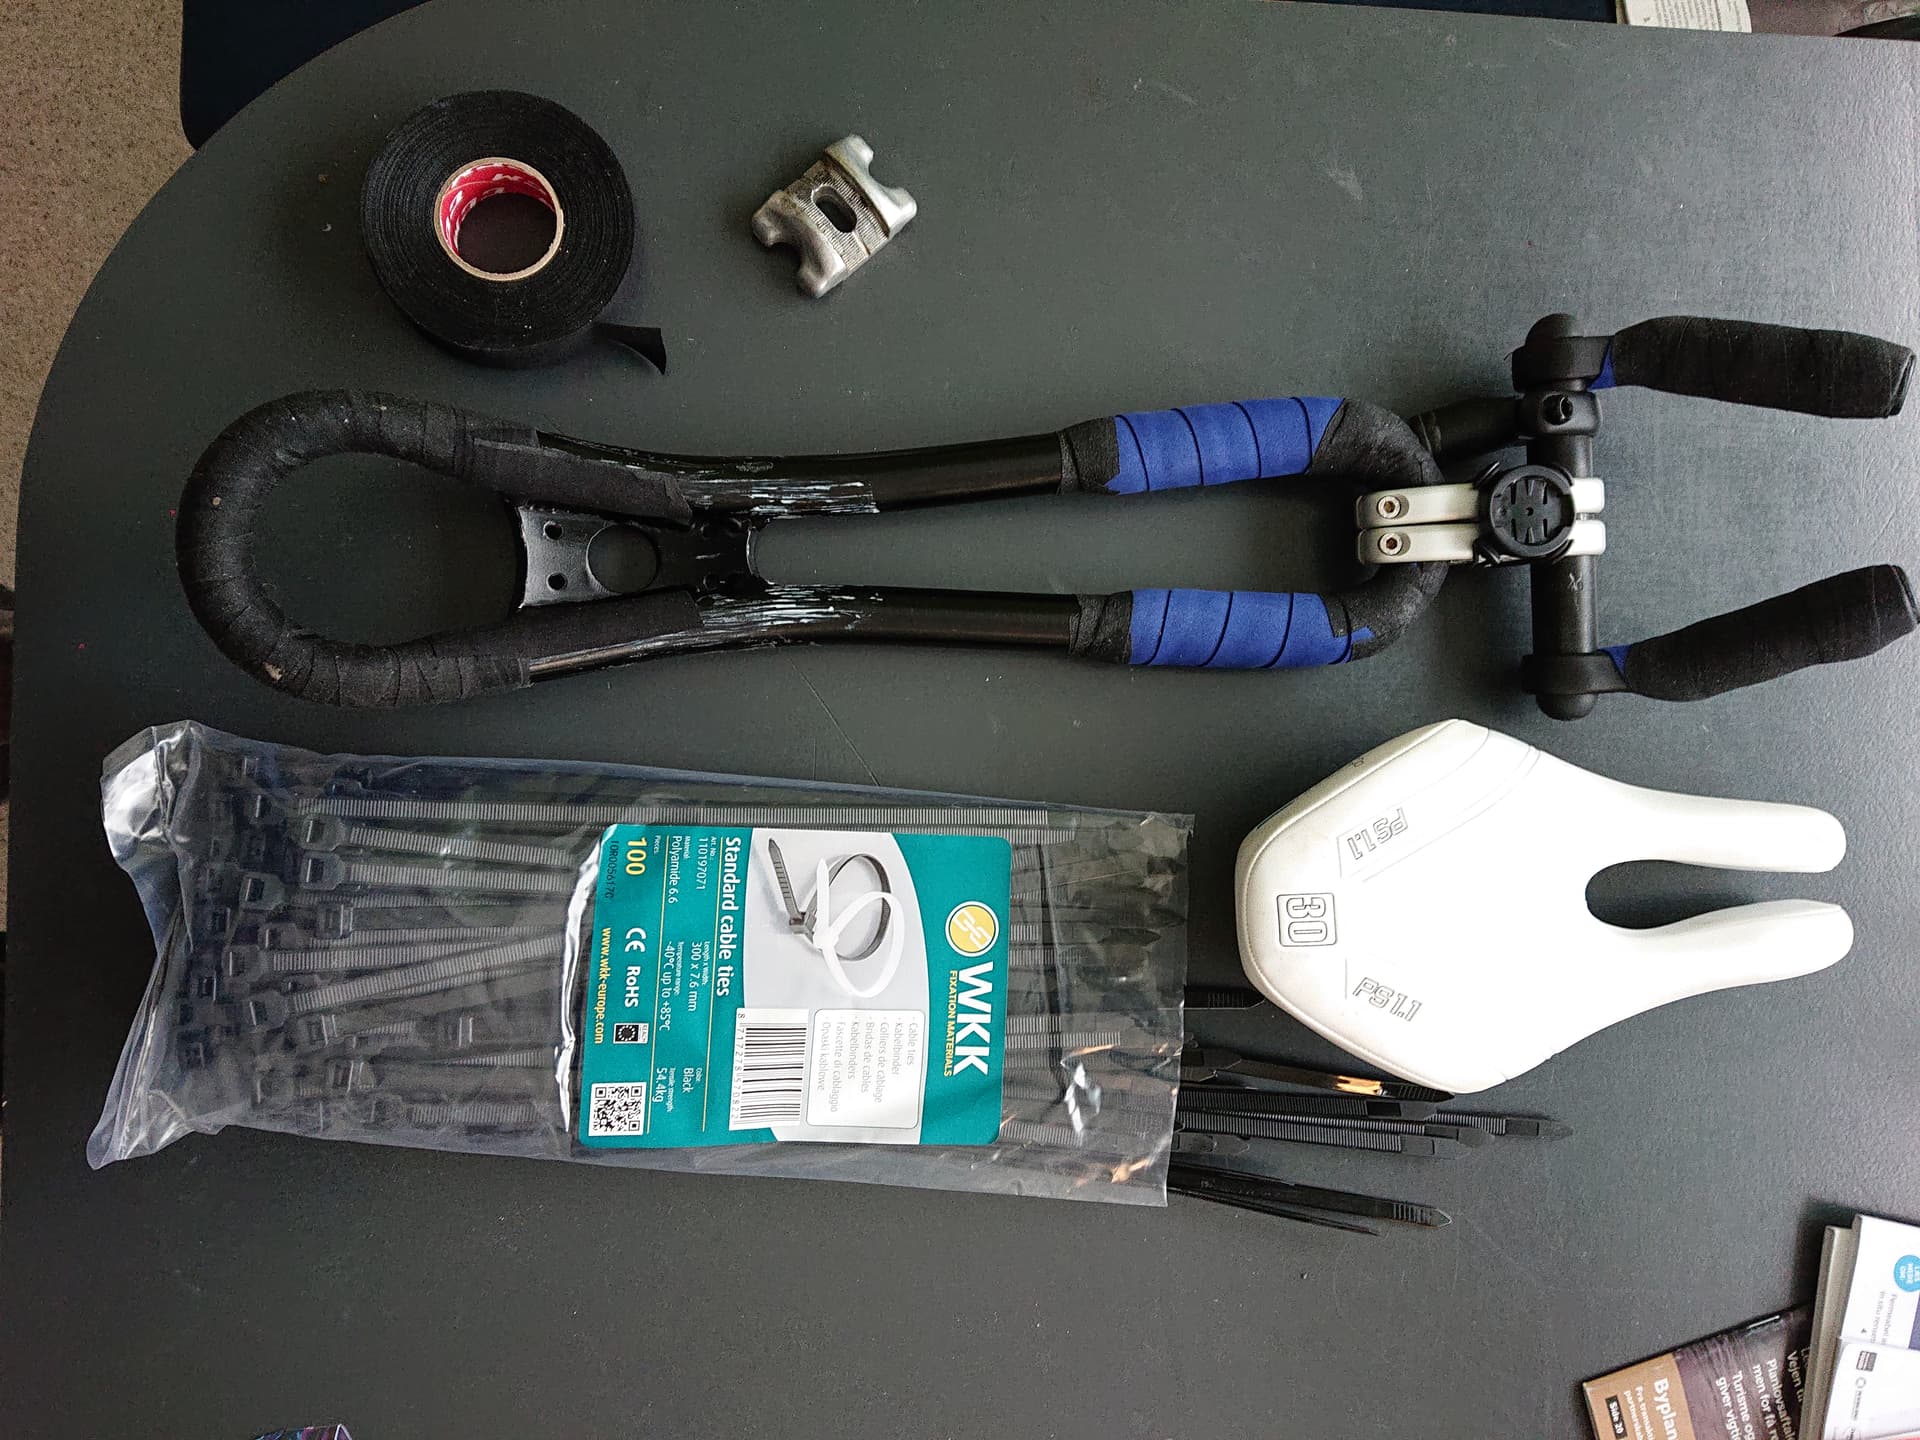
I used hockey tape to wrap the rear end to create a some friction where the rails touch the handle saddle.
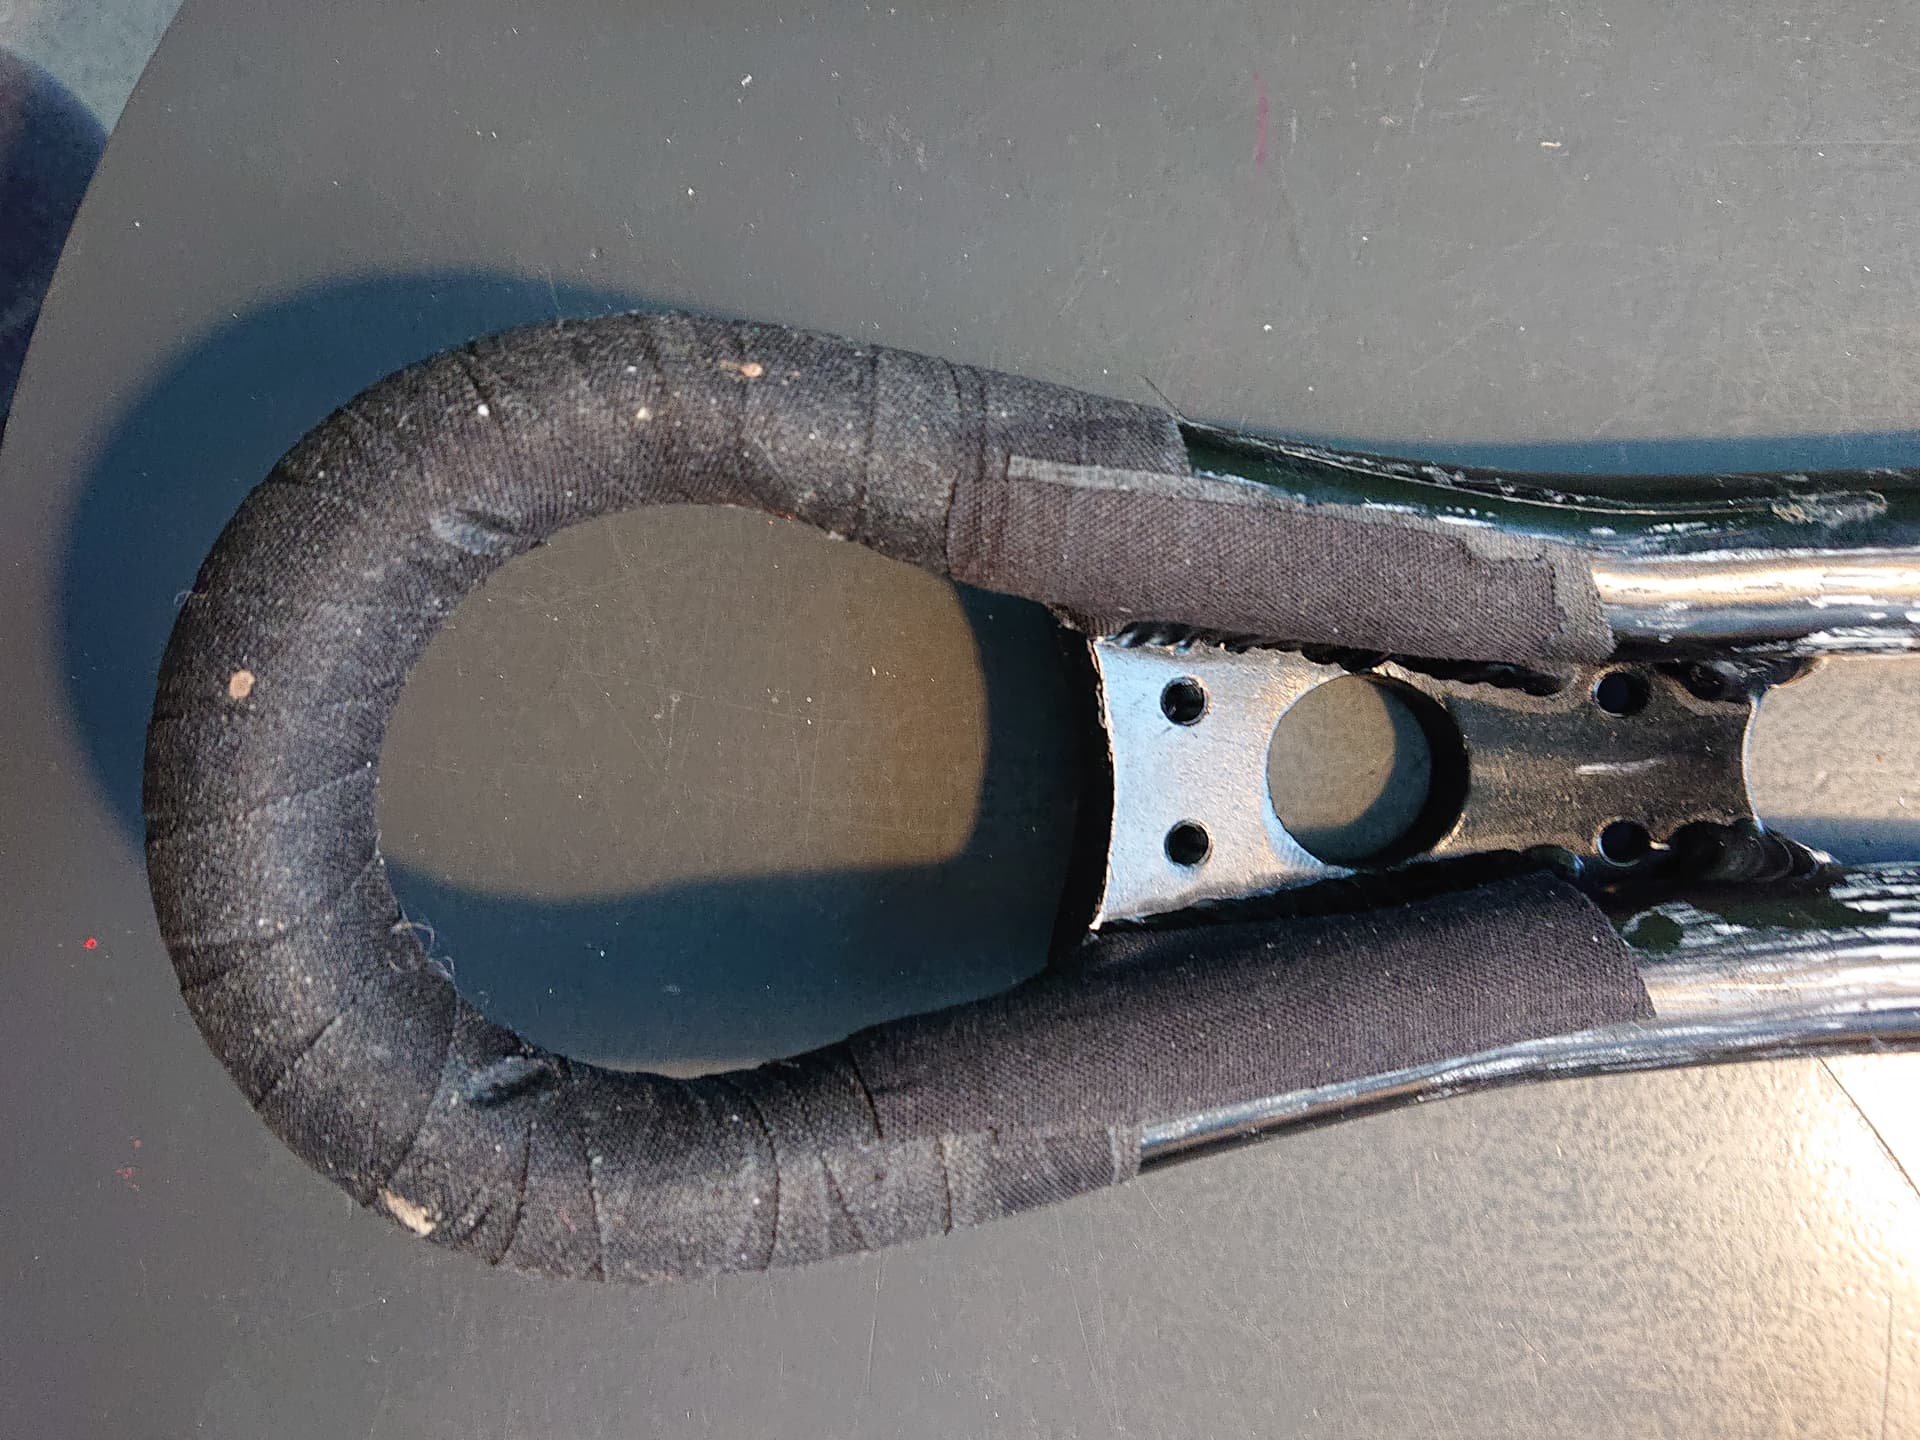
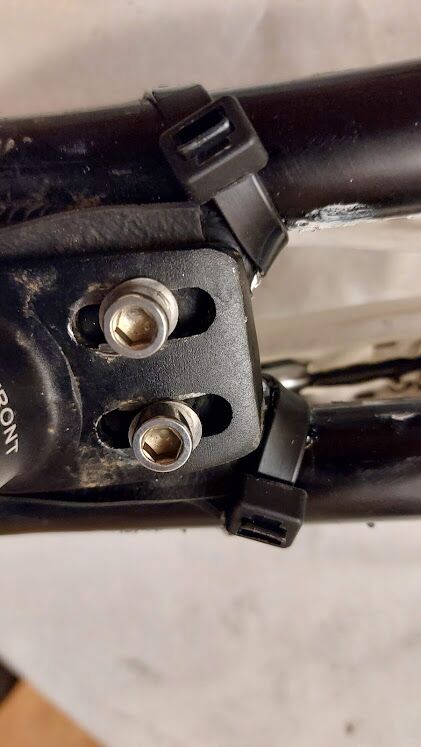
Where my setup is slightly different is that i used the top of of a regular bike seat post at the front. It’s mounted with three cable ties.
And then four cable ties at the back just grabbing the rails.
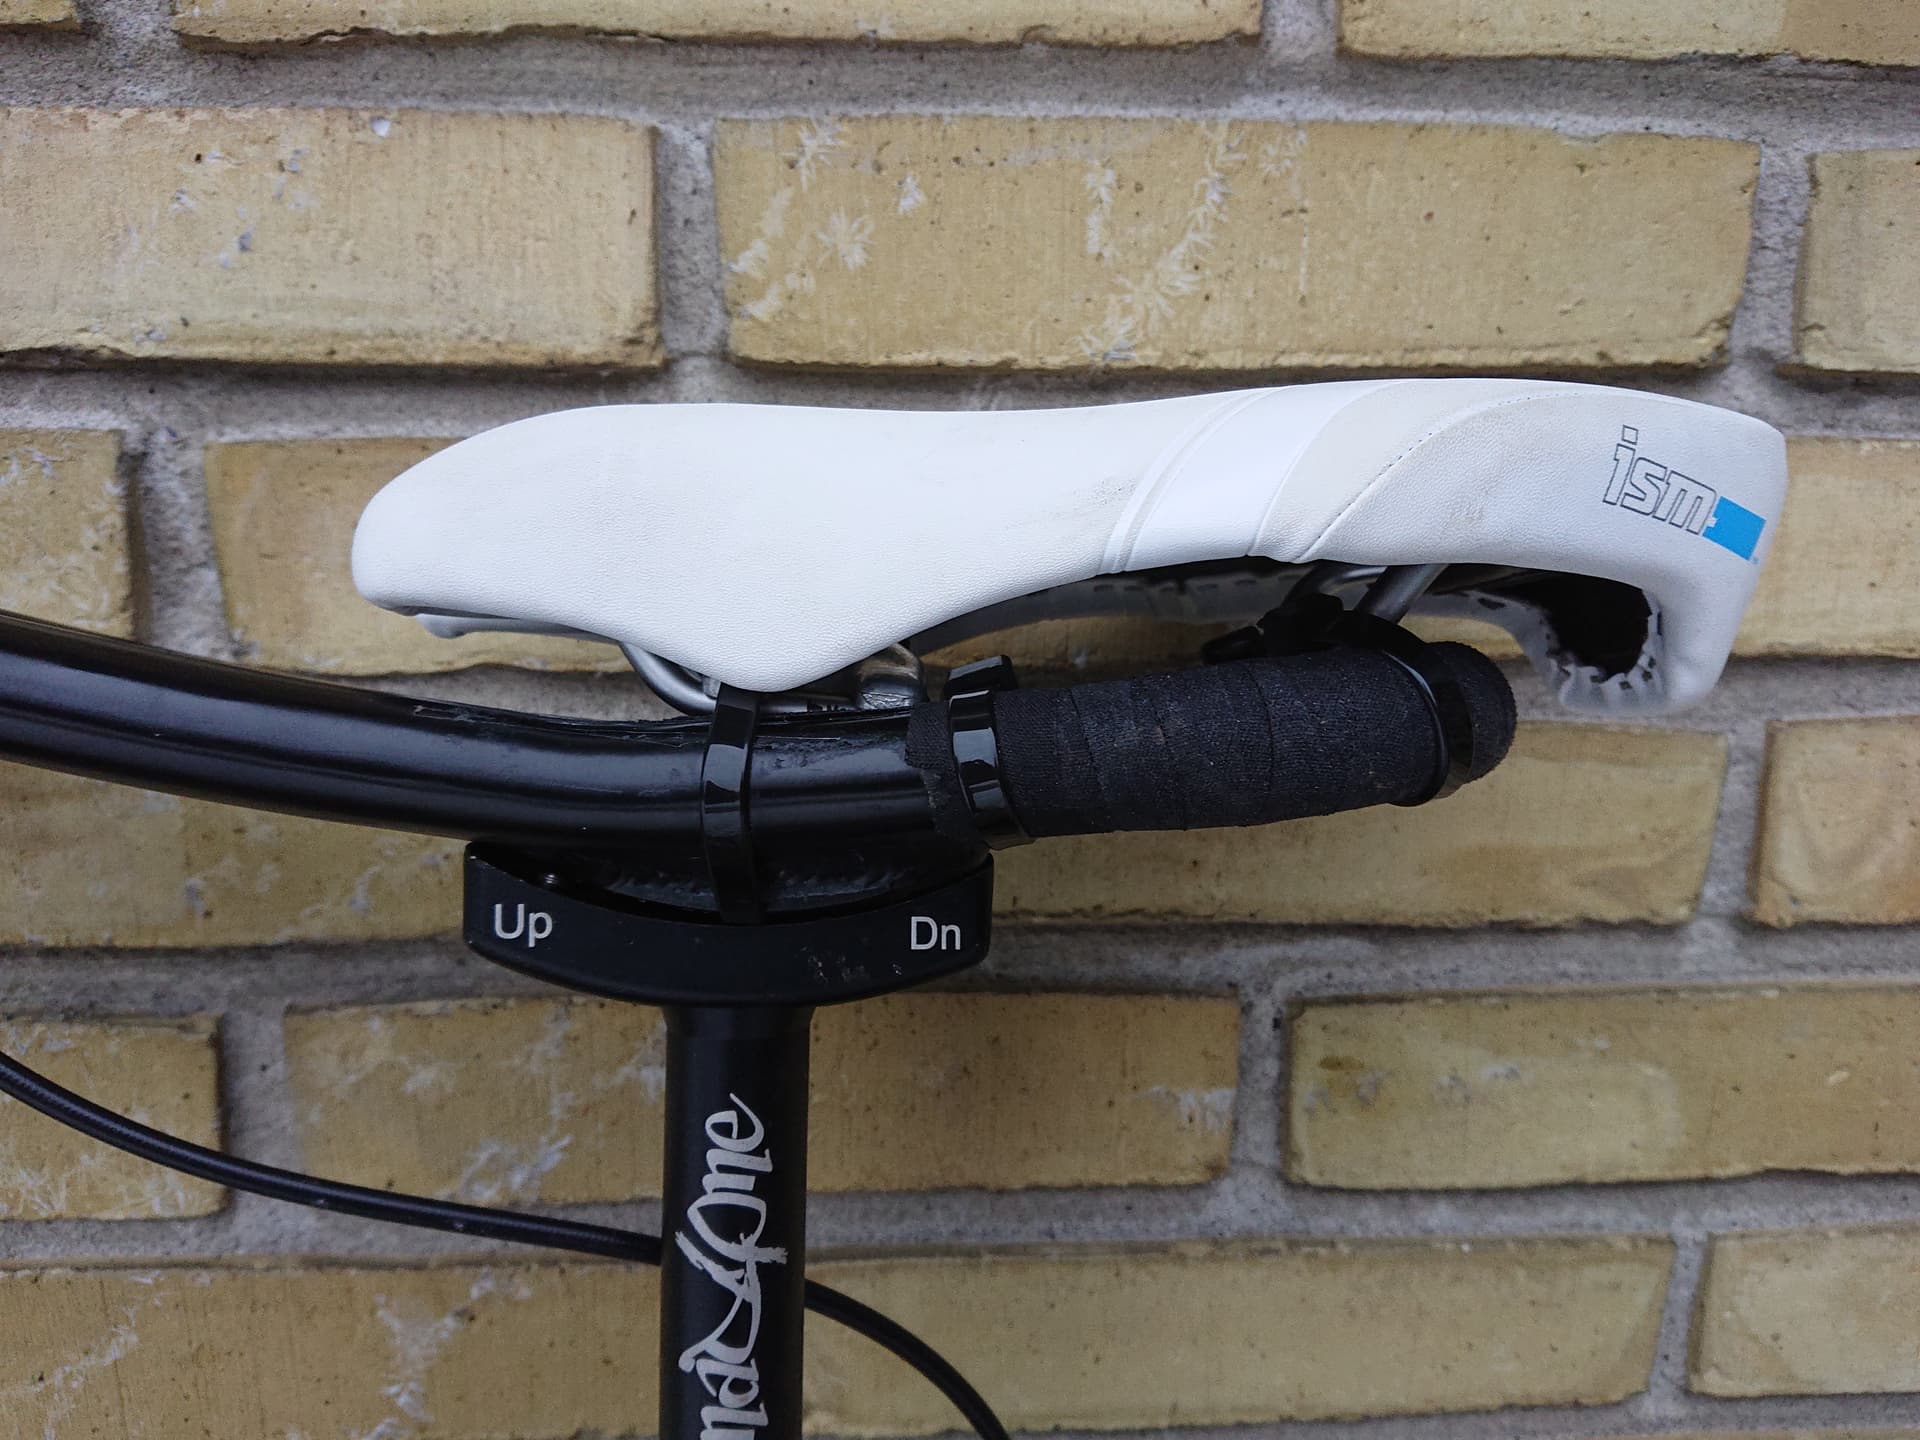
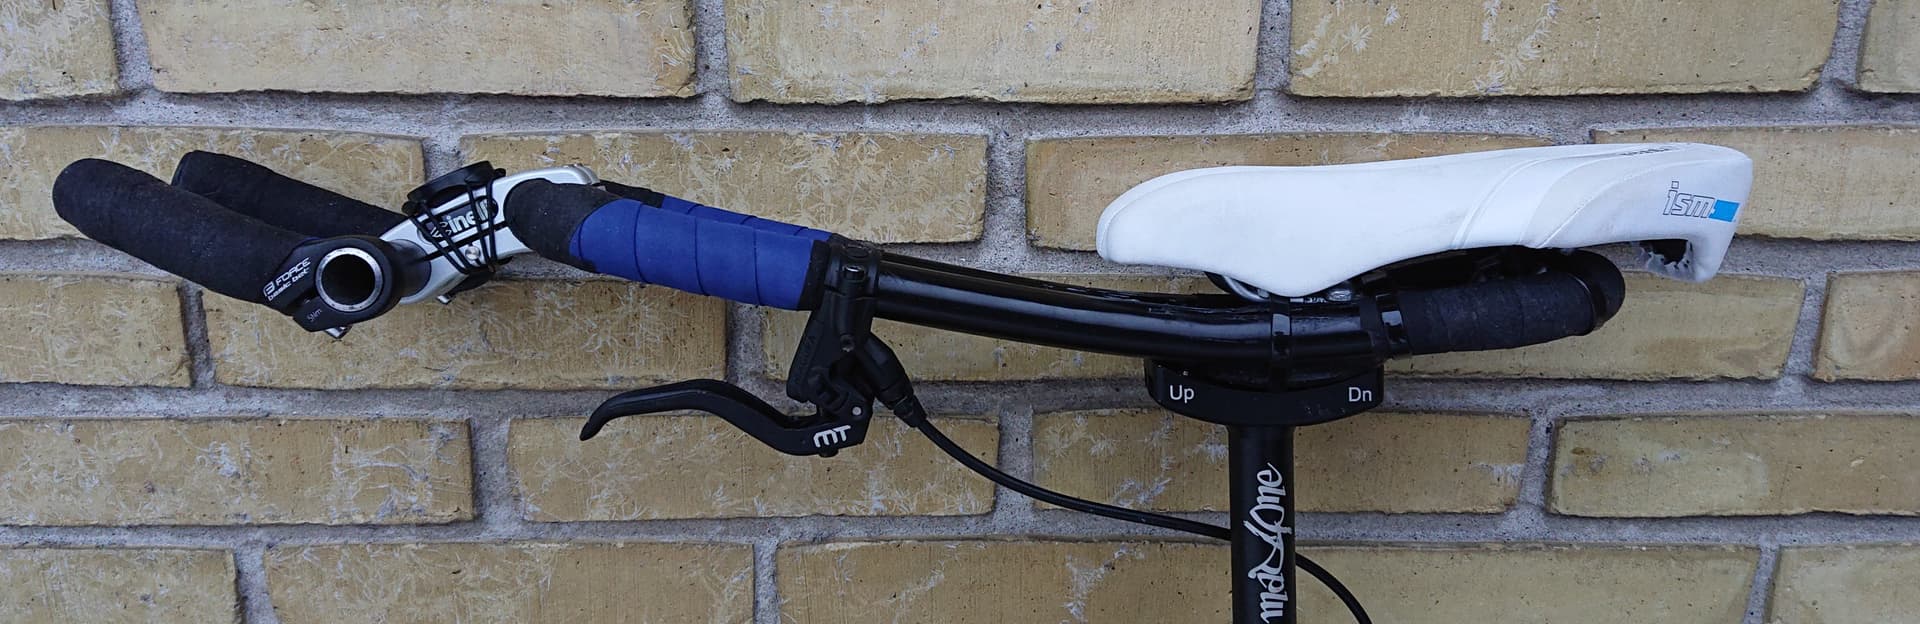
The full handlebar setup. Still work in progress.
The part connecting the handle saddle at the front is from a Cinelli Spinaci.
10 Likes
Love the work you guys are doing with bike saddles. I don’t have a long saddle base, just a short which is rather useless. I’ve started prototypes to see if it’s worth the money proceeding. I find the fore/aft location and the tilt of the saddle vital to achieving any chance of comfort. So, I’ve attached the end of a rail seat adapter to the base to allow easy positioning. It’s strong but it does sit rather high and the unicycle post will need to be cut before it can be ridden.

I find I need the saddle much further forward than what you have, which means the long base will not be long enough. I like the bar ends attached @Hammer post.
Next, I adapted a KH T-bar, without the rail post adapter as it was too high for now. This works ok, for a prototype, and is close to bike positioning. I need the saddle further forward and tilted down, that will be the next test, or I’ll commit and re-install the rail post adapter and cut the post.
All this is a long way from what you have achieved, so kudos to you both. Now I need to spend some money and buy a long base and better bike saddle. With the worthless AUD and shipping, that’s no small amount. So until then, please keep posting !
2 Likes
You’ve really got me wanting to try this out myself. It looks so inventive and I dig that front bar attachment.
I am sure the cable ties are easier to work with, and lighter and probably pretty darn strong - but I wondered if there exists a slim and lightweight option like these to use in place of those:
You probably considered this and it may be there’s just not enough space to use the fastening system.
2 Likes
From what Marco had told me the handlesaddle size S has a different shape, I think it is wider than the sizes M and L.
Concerning the saddle inclination, it’s true that you can play with it when installing the saddle on the handlesaddle, but also with the adjustment between the handlesaddle and the saddle.
By first positioning the saddle at the rear end of the handlesaddle, the goal is to keep a long handlebar length while making sure the saddle doesn’t point too far down. And I think it helps that the saddle doesn’t move. I didn’t do this on my first saddle and it went sideways (which didn’t stop me from doing very long rides, but it could have been more comfortable).
This is not a setting that works for everyone, as it is based on having your hands pushing on the handlebars all or most of the time.
@Hammer I don’t quite see the bike part you added between the handlesaddle and the saddle rails. Is it to keep the saddle straighter?
1 Like
Thanks. I also really liked how it turned out. It’s incredible stiff. Just like a natural extension of the handle saddle and also enabling a better wrist and hands positioning as the bar ends can be angled inwards and the width can be customized (I just cut a piece of an old bike handlebar to my desired width).
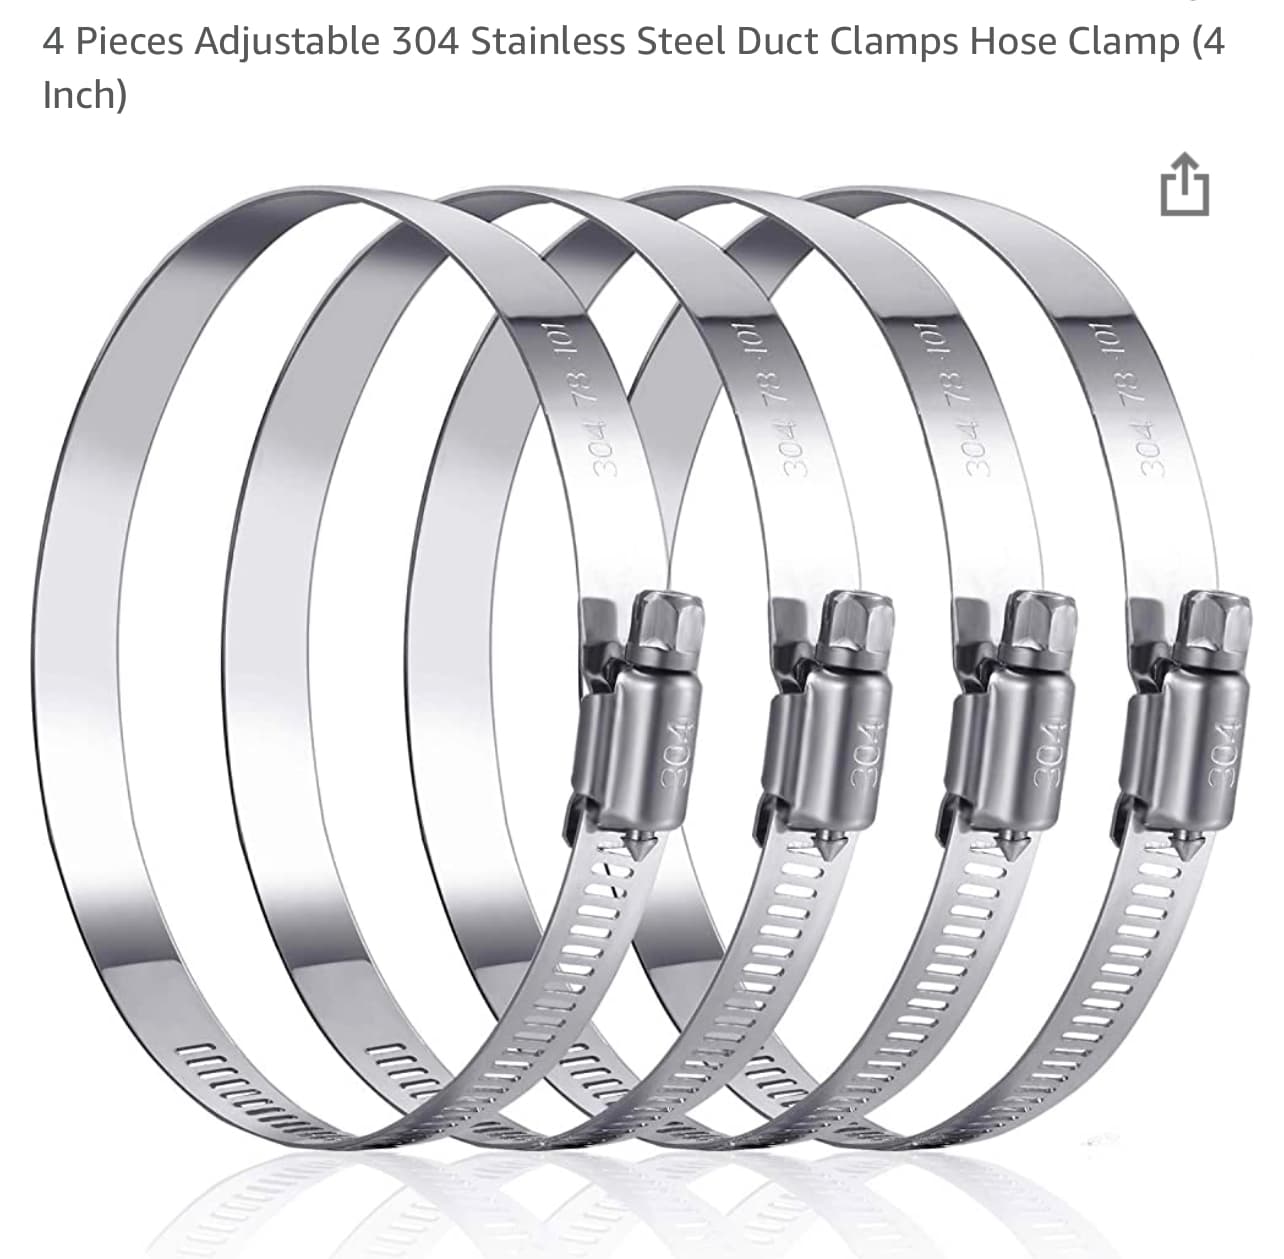
About the idea with the steel hose clamps. Yes I considered that but as I only have a few in the basement I did not have enough for an experiment. Seems the cable ties are also strong enough.
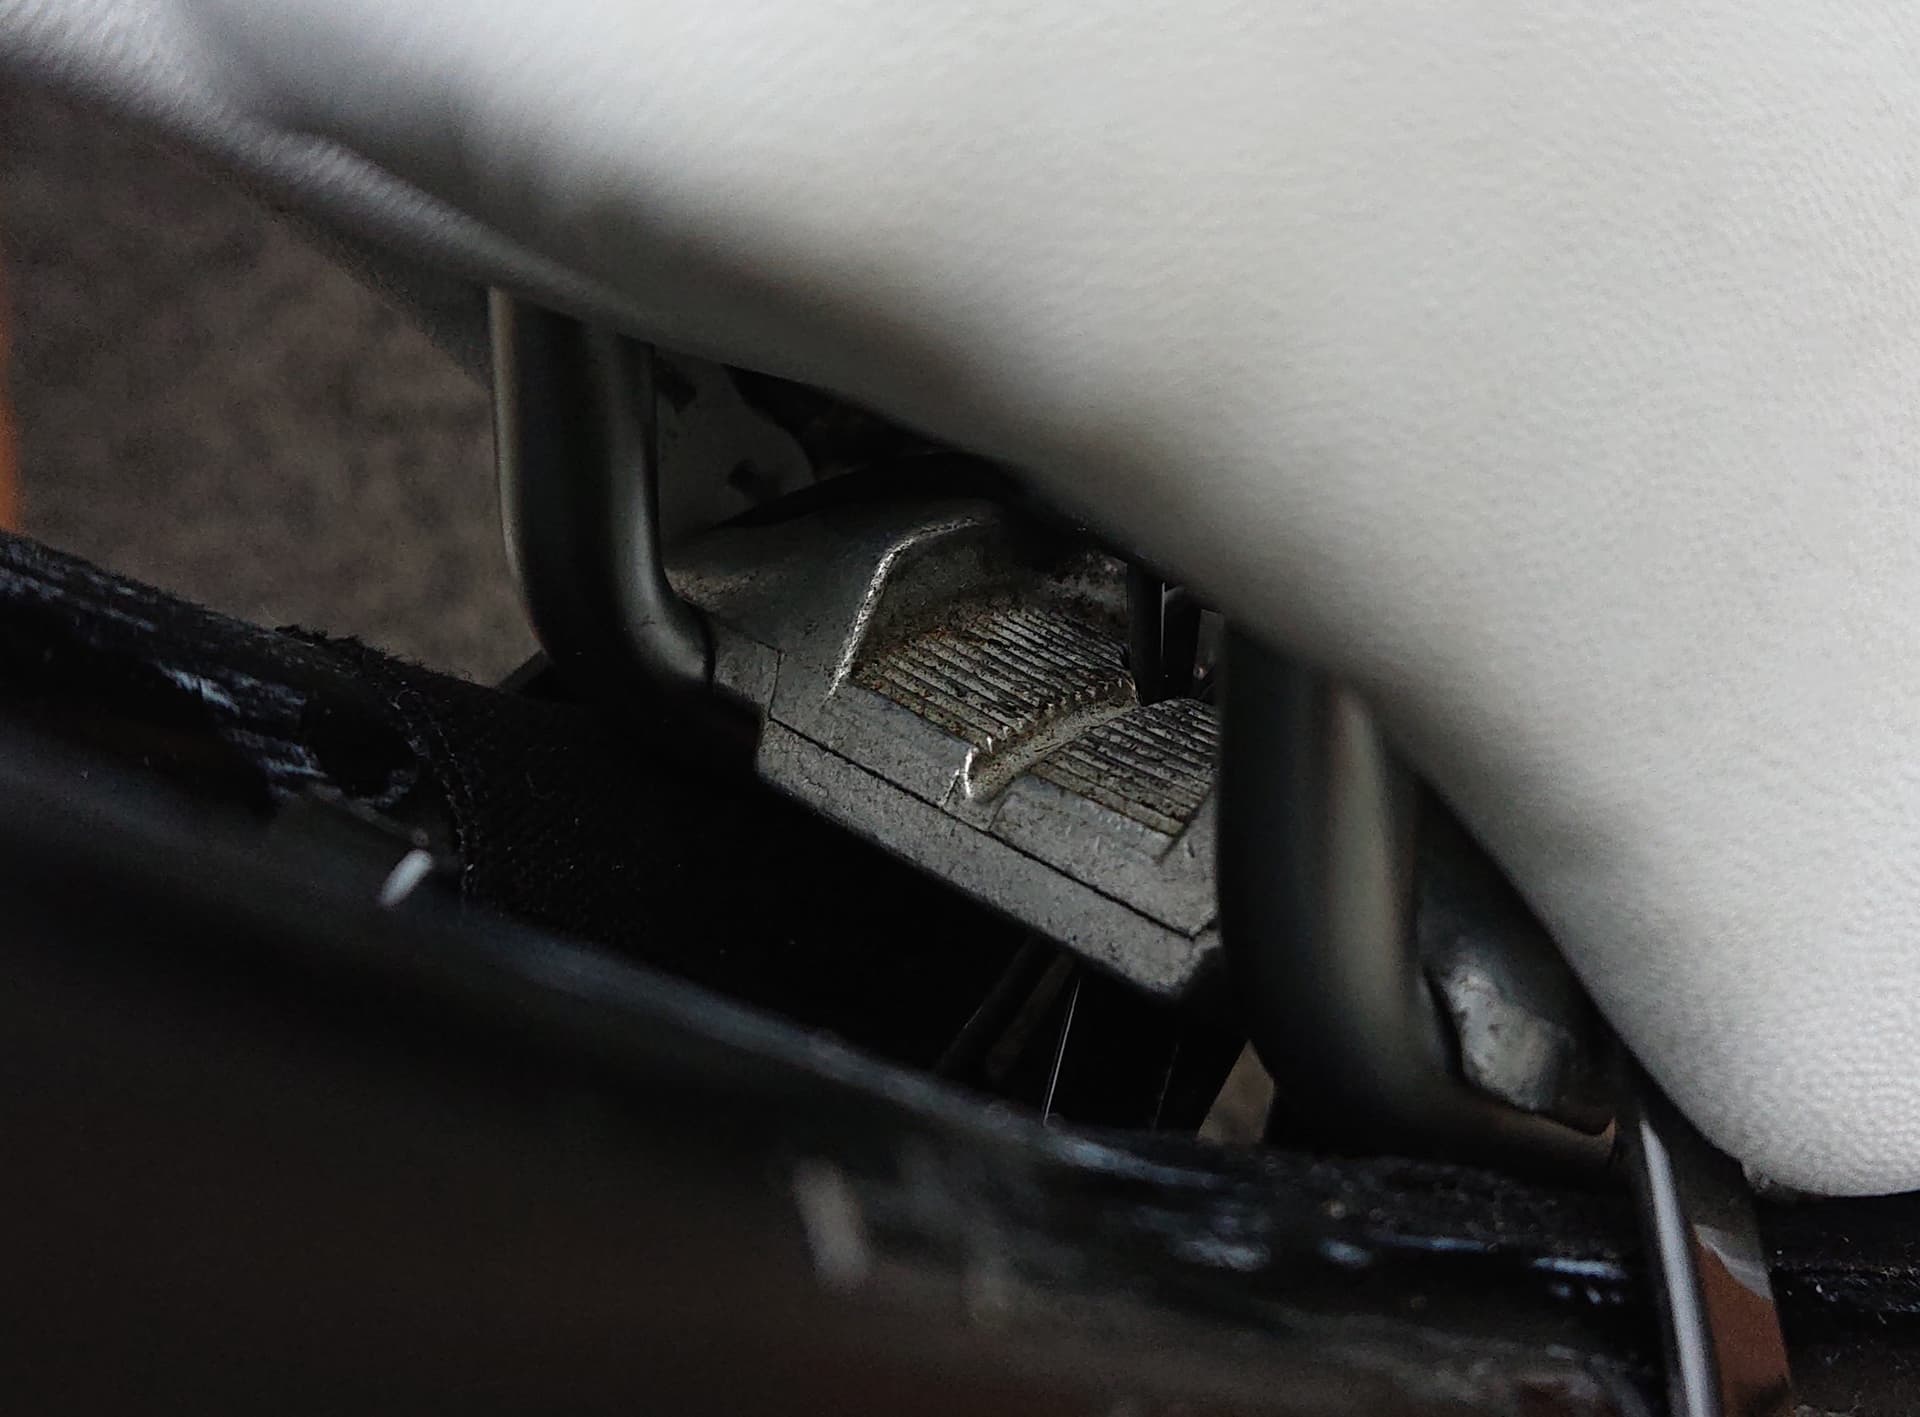
Yes that was part of the idea for using it. As the saddle has a split nose I imagined that it’s weaker at the front compared to a regular saddle because the rails underneath does not connect at the front. So my idea was to prevent it from “collapsing” or at least keeping it as stiff as possible.
The saddle does not move at all on the handle saddle. The only (very tiny) movement I can detect is where the rails connect to the plastic base of the saddle at the back.

4 Likes
@Hammer I just bought a used cinelli spinaci extension (for 20€) to try to fit the airstryke design profile extender to the end of a handlesaddle.
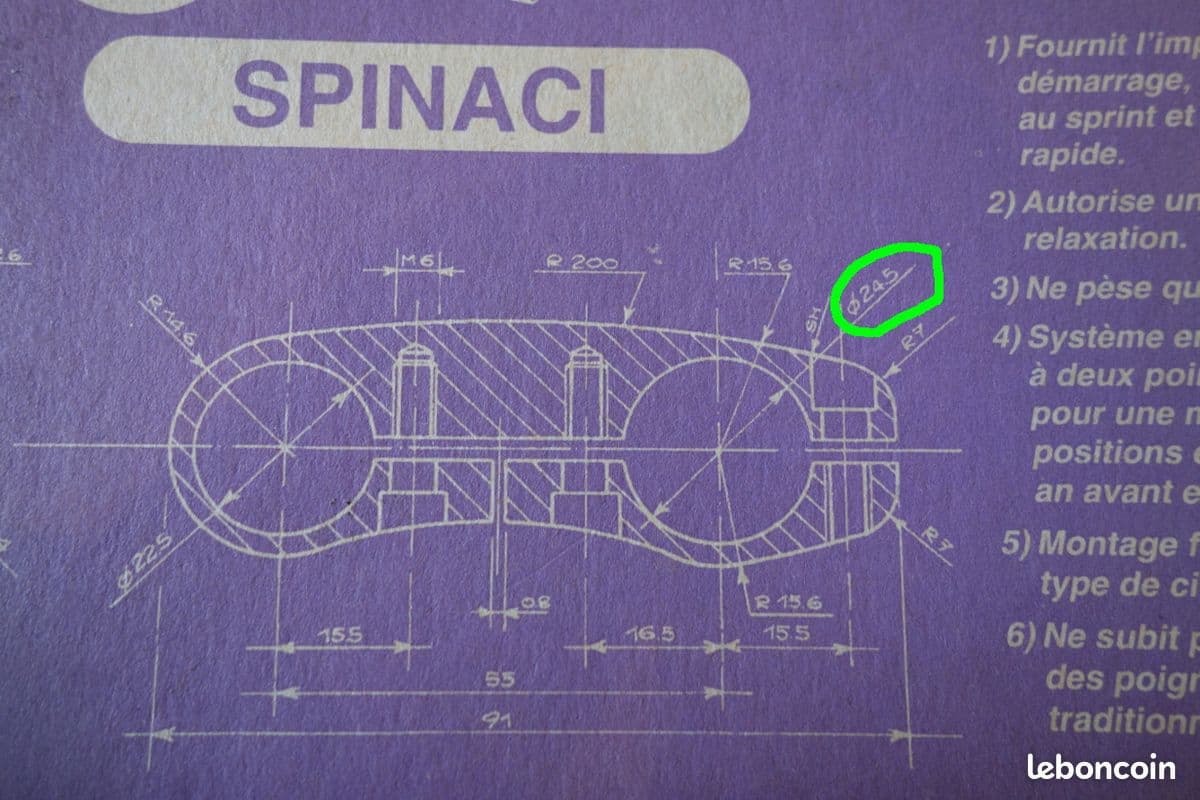
I didn’t do the measurements, but if I understand correctly the handlesaddle has a section of 24.5mm and fits perfectly with the cinelli spinaci.
That means that on the other side, the section is 22.5mm… did you cut a 22.2mm tube? I guess to fit my extensions, I’m going to need 31.8 - 22.2 shim.
EDIT : I measured the handlesaddle, it has a section of 22.2 mm… and yes 1" = 25.4mm
Yes I cut the end of a standard 22.2mm bike handlebar. I just tried measuring it and it actually measures only 22.1mm with my cheap digital caliper. It is a perfect fit so I’m not sure why it says 22.5mm in the drawing you shared. But the mount can flex/bend slightly so it might fit between 22.1mm and 22.5mm without issues.
The end mounting on the handle saddle that is 24.5mm is slightly too large for the handle saddle which I believe is made of 22.2mm tube (but possible a little larger and/or flattened where it is bending. I did not measure it). I used one or two layers of hockey tape as a “shim” and seems to work fine. Maybe a hard rubber shim would be even better.
If I understand you correctly you want to somehow connect the handle saddle with a 31.8mm tube where the aerobar can be mounted. So if the Spinaci is not strong enough then you might consider the Taq-33 Zoom Stem or the Tranz X Twinholder both are strange devices for raising a handlebar. I’m aware they are for 25.4mm but then a slightly large shim is needed at the handle saddle and then the aerobar needs a smaller (25.4mm->31.8m) shim. I have no experience with the two products but they look more sturdy than the Spinaci.
You can also find various “handlebar extender” like this and this but they are only for having an extra bar for mounting small items like phone and GPS so they are probably not suited for a unicycle handlebar.
2 Likes
1" = 25.4 mm
1 Like
I measured the handlesaddle, it has a section of 22.2 mm.
My idea is to use the spinaci to link the handlesaddle with a 22.2mm tube on which I would mount the extensions and barends…
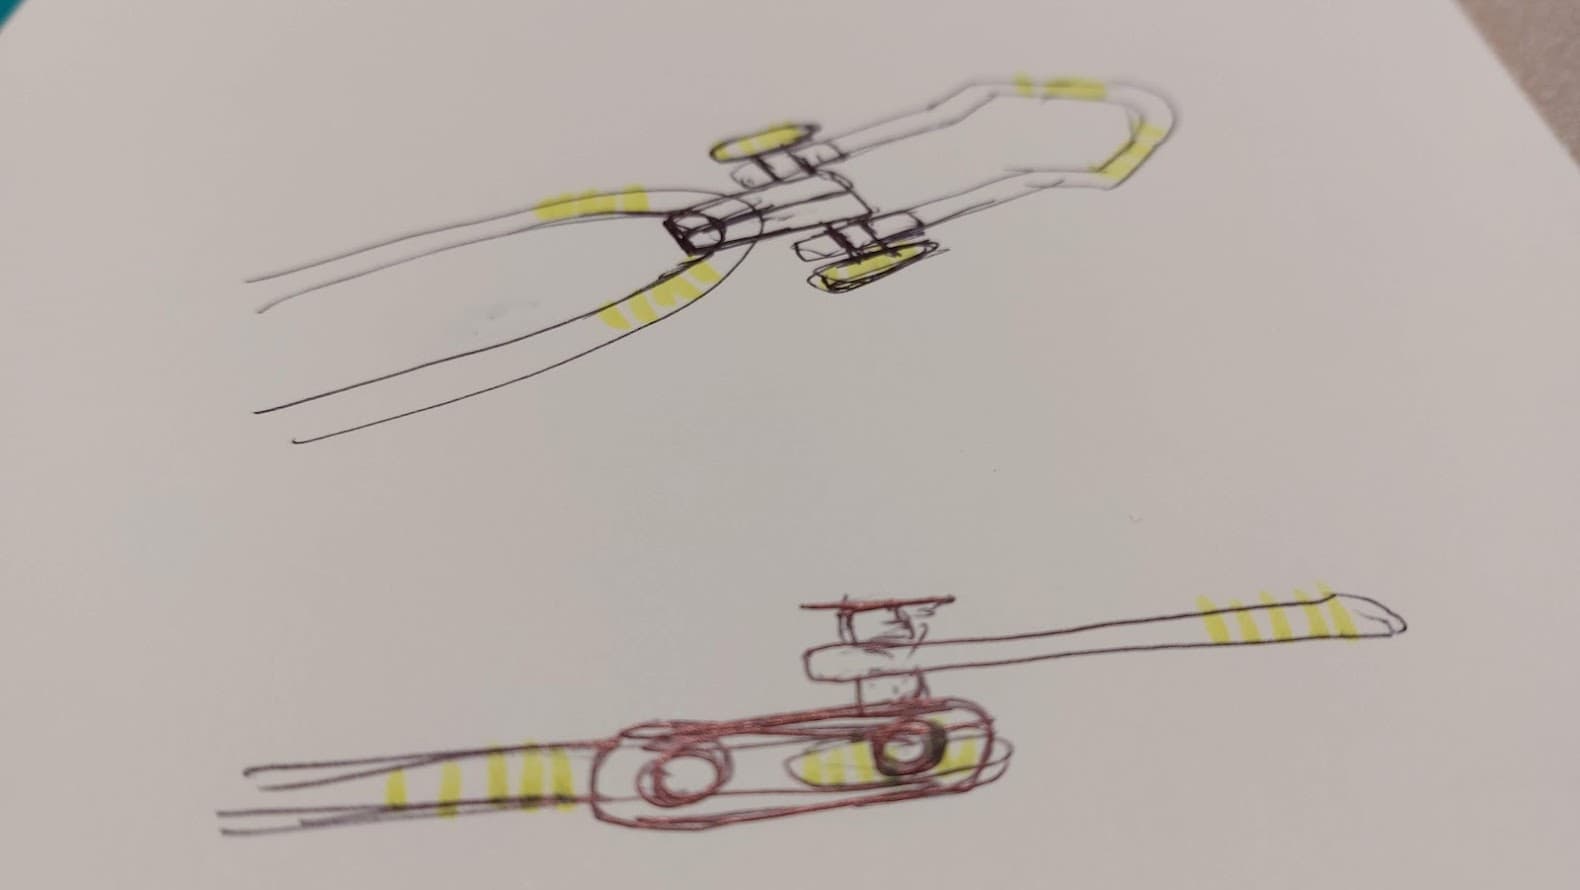
This would allow me to have 3 positions for the hands (in yellow). I’d see if it’s better to do this on an M or L handlesaddle.
The spinaci is not made to put its counter or its phone on it, I think it should be pretty strong as long as I find the right shims. You are right, 1" is 25.4mm. In my opinion there is a mistake on the plan, it’s weird 24.5 mm… I guess it’s more like 25.4 mm… I would see.
I’ll probably need 25.4 > 22.2 and 31.8 > 22.2 shim, 22.2 tube and barends (22.2).
2 Likes
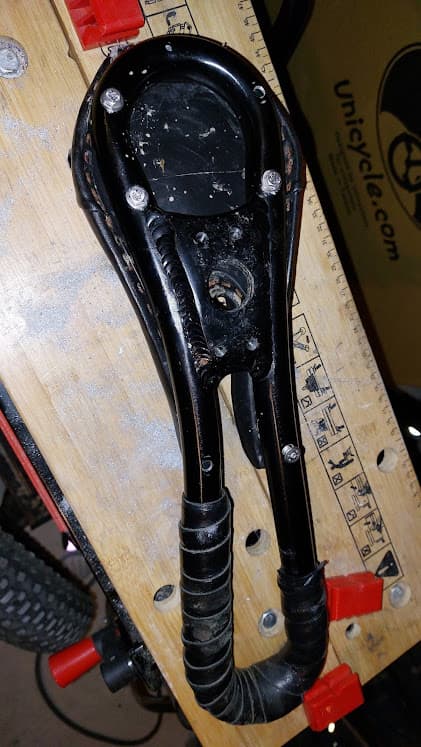
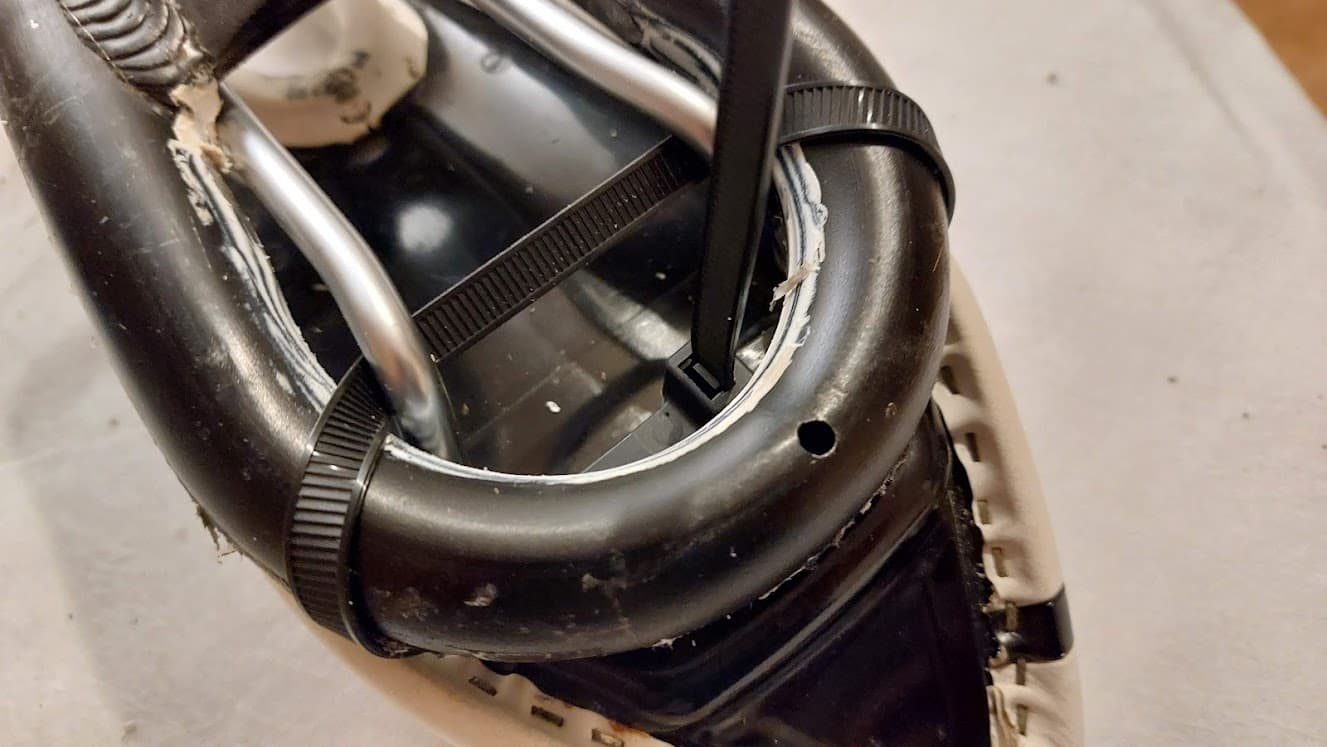
A little update to tell you what happened to me when I fully attached the saddle to the back of the handlesaddle frame as I showed in the following picture :

In fact, the rails of the saddle dived inside the handlesaddle. It doesn’t matter much if you ride a conventional bike saddle, but with a bifid saddle like an ISM it is a problem. This is the result, it’s much less comfortable:
I had to cut these 2 clamps at the front:
Instead I put a single clamp that spreads the rails outward:
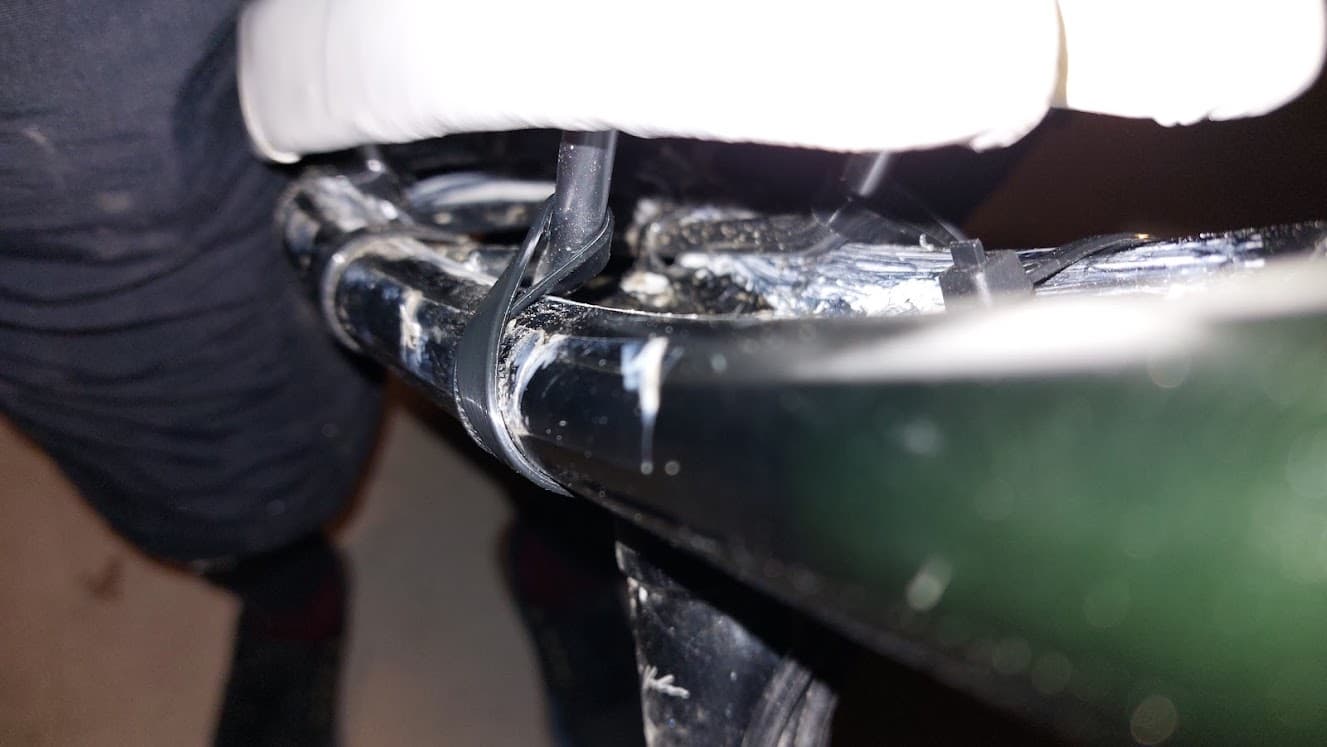
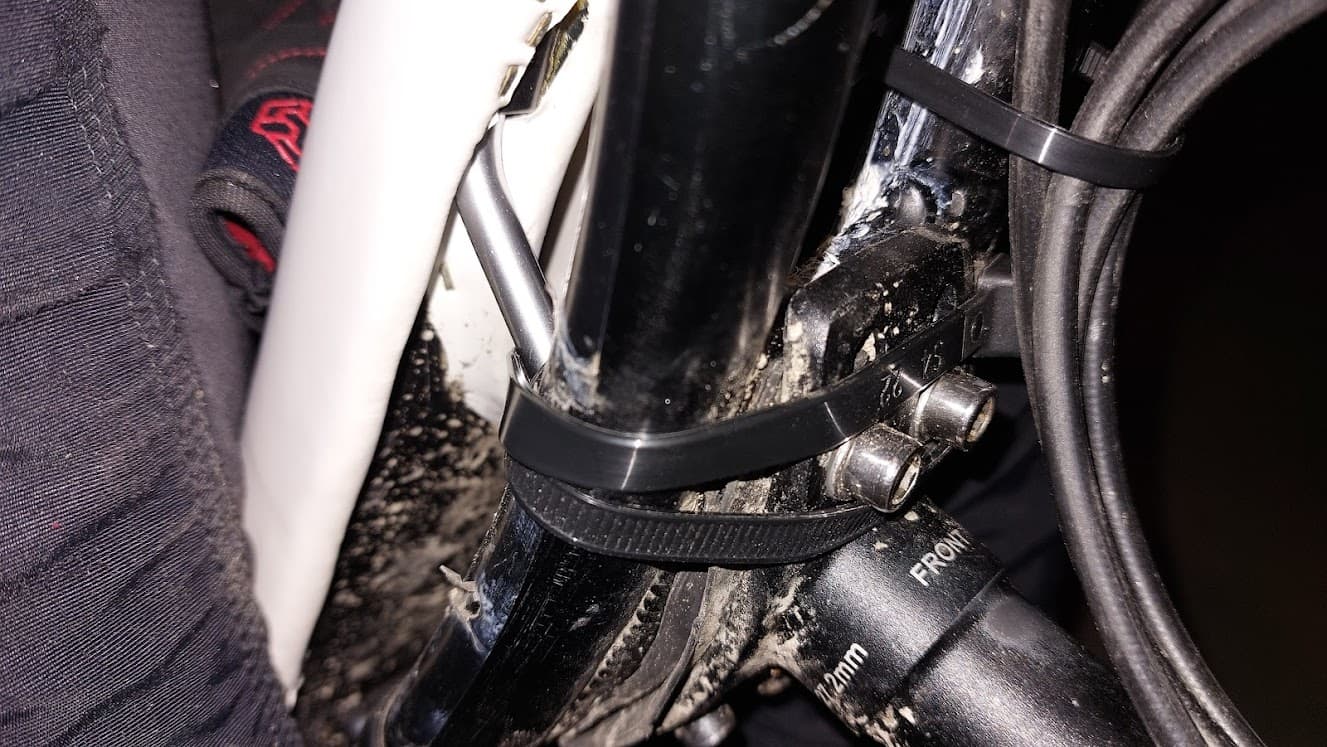
It’s not ideal, if I want to make modifications on the seatpost I have to cut the clamp. I’m not sure if it’s better to put the collar between the seatpost and the handlesaddle, I think it’s less durable… Maybe the best thing is to find a bike part like @Hammer did.
Anyway, today I rode 42 km in just over 2 hours with this saddle and it was very comfortable.
3 Likes
Is the purpose of the handle?
1.) To “lean on it” and save your arse for long distance?
2.) To “minimize” side/side wobbling for higher speed?
Personally, I’ve been toying with the idea of making a handle bar out of a somewhat stiff/vinyl tube or hose. Something to grab and “minimize” side/side wobbling if I wanted to go faster. However, at the same time something that is flexible. Then, if I UPD onto it, it won’t leave a hole or bruise through my body. I tried the nimbus “shadow” handlebar setup a few years ago…no thanks…slam
The handlebars on a unicycle are an additional support.
Its use requires training, but its advantages are multiple:
- It provides comfort, it allows to limit the pressure on the saddle and eventually on the pedals.
- It improves the front-rear stability, in controling the pressure on the saddle and the handlebars.
- In “chaotic rolling areas” or if you lack visibility, to avoid UPD, you can lighten the pressure on the saddle and push more on the handlebars (and more pressure on the pedals too)
- In the more technical and or steep parts, you can find a little more power by tilting the saddle back to pull hard on the handle.
IMO here are the 4 advantages of a handlebar on a unicycle. All these aspects require that the connection between the saddle and the handlebar is very rigid.
Some points do not require a handlebar, with a bumper it can be enough, but with a bumper you have to push harder. With a handlebar further away, it is not necessary to push as much.
About the wobbling, I suppose that a very long handlebar can help, but compared to what I mentioned it is a side effect and has interest only to race.
5 Likes
Seriously? handlebars for mountain/downhill riding?
Okay? I want to hear from unicycle riders who use a handlebar going down the hill?
I had a bar on my unicycle, and I know what it feels like.
Tipping forward might give you more speed(again, on my 24" nimbus wobbling is a factor…maybe less on 36"), but the tipping forward = more instability. Simple physics: CG is more fwd the center of contact with ground. Most stable is where you are above the center of contact with ground, which happens at super slow speed and bunny hopping.
In my opinion you are wrong. Putting weight on the handlebars does not create instability or move the center of gravity forward. When you push on the handlebars in front, the seat tilts backwards.
On a unicycle, you can temporarily have your center of gravity forward (to accelerate) or backward (to slow down), but if it lasts you end up falling.
However, on the road with long handlebars you can slightly lower your center of gravity.
For DH, that’s probably where the handlebars are least important. I’m not the best person to talk about it, but it seems to me that the most important thing is to hold the saddle comfortably and firmly and to have the brake lever under your fingers, a handlebar like a short T-bar or a handlesaddle M may be appreciated by some, but for others it will be a bumper.
I know @makym doesn’t like any handlebars, and @muni_ben @turtle and his team use handlebars.
7 Likes
a handlebar like our “Ursli-Bar” https://www.ursli.li/shop/ is great for muni: you can use it at sharp turns and push or press the saddle around. Also for us the brake position is way better than just under the saddle, way more control. Also our freewheel muni riders can’t imagine to ride without it:
https://youtu.be/pVPXcLzp2fE
4 Likes
With a short handlebars your hands are only very slightly further forward than the plastic handle. I use a short flansberrium style one and I love it, mostly because it is much more comfortable to grip since the hand can actually wrap around it. The brake is also much more ergonomic to use.
The other advantage is a bit more leverage, slight disadvantage is that the seat moves further behind you when you pull on your handlebars.
I think the plastic handle is still most common among muni riders, but short handlebars are quickly gaining popularity.
2 Likes
This is a work in progress since I picked up a short handle saddle from YouveLostAWheel at the weekend…
My plan was to graft the back end of my little used KH zero to the handle keeping the job as tidy as possible for the more ‘factory’ and less ‘ghetto’ look.
So far I have established that the two holes fixing the rear bumper line up perfectly to the back of the handle saddle, meaning that drilling two holes here should give a solid fixing at the back:

And I have cut the front of the seat base to roughly the length of the M4O pad and determined that careful shaping here will allow it to fit between the rails of the handle. I haven’t decided how to secure the front. Maybe the two bolts at the back will be enough, or maybe I will add some kind of velcro strap under the seat cover.

The final step will be to trim and shape the front of the foam and cover for a finished look. Mock up of the rough position below…
(I think that might be upsidedown, sorry). More to come as I progress …
3 Likes
Cool project. Please keep sharing your progress.
I’m a little curious what you are trying to accomplish by merging a KH Zero with the short handle saddle. How will this be different than just having a Zero on a pivotal seat post? Your mock up suggest that they will be fairly similar in length.