Wheelbuilding - experience of a novice who didn't want to read a book

(You don’t have to read this post either - you can go directly to the video links below)

For my build I used:

-Nimbus Drift Trike disc hub
-Nimbus Dominator2 24" rim
-36 spokes (3 cross pattern)

I’ve spent quite a bit of money at the local bike shop on wheel building and wheel adjustment over the years. I’ve been wanting to learn this myself, but never really found the time or energy to get on with it. On an impulse I bought a Nimbus Drift Trike disc hub for my Oracle 24" frame, so now was the time to learn. After I did this build, the wheel is no longer a big mystery to me, and I will now be able to maintain my 15 wheels myself.

Ordering spokes (the hard part):

I remembered reading something about dished wheels (explained in video below), and differerent spoke lengths on the disc side and none disc side of the hub. To find the spokes needed, I tried to use a spoke calculator (https://www.unicycle.uk.com/calculator/), but I didn’t really understand it. The hub I ordered was not in the list, so I had to try to meassure it myself. This is where I got confused because with a disc hub you have to calculate spoke length twice: disk side and none disc side. I tried with some of the preset disc hubs in the spokes calculator list and discovered that the value “Flange Width” varied depending on disc/none disk side. From the illustration this didn’t make any sense to me, and I didn’t understand the explanation either. I finally discovered that the meassurements I needed was stated i the product descripton, but it was called “Hub Width” instead of “Flange Width” (Hub Width disc side: 31mm, Hub Width non disc: 66mm). The spoke calculator gave the values 227.03mm (none disc side) and 225.17mm (disc side). According to Sheldon Brown I should round up to the nearest millimeter. Roger says you should go short rather than long, so I guess it depends on what spoke lengths are available. I ordered 226mm and 228mm. I later discovered that the double bottom of the Dominator2 rim made the spoke length less critical than I first thought.

The next question was which “gauge” I should order. Gauge is the diameter of the spoke. 12 gauge is 2.6mm , 13 gauge was out of stock and 14 gauge is 2.0mm. The 12 gauge spokes was not available in shorter lengths than 375mm, so 14 gauge was my only (and correct I think) choice.

Finally the nipples. Nipples has to be ordered separately even though they are in the same photo as the spokes. Because I rounded the spoke length up, I decided to go whith the shortest nipples which is 14 gauge / 12mm. This was also a correct choice.

Preparation:

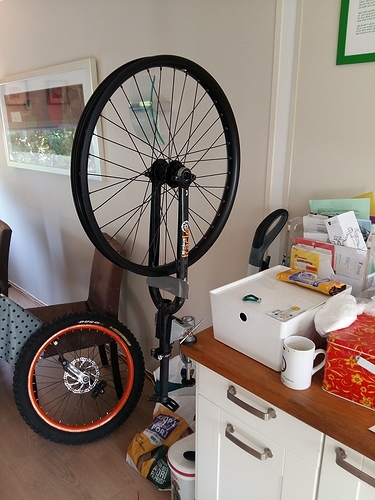
I don’t have a truing stand so I bought a cheap vice that you can attach to a table with an 90° angle to hold the frame (see picture below).

A zip tie on the frame to correct sideways run outs

A piece of duct tape beneath the wheel to correct circular run outs

Linseed oil in the nipples after advice from bungeejoe i another post (to provide some lubrication when lacing and truing the wheel and then to act as a bit of a thread-lock to keep spokes from easily loosening)

What I didn’t have:

Dishing tool - I just meassured the distance between the frame and rim to get the wheel approximately in the center of the frame. I noticed that my original Oracle wheel was quite a bit off center, so I figured It didn’t have to be that accurate.

Spoke tension meter - I just tried to feel with my hands how tight the spokes on my original Oracle wheel is, and tried to make the new wheel the same. I might buy a spoke tension meter for my 36" wheel later.

The instructional videos:

I watched both these excellent videos once beforehand, and also parallel to the building process.

How to lace a wheel with 36 spokes (17 minutes): https://www.youtube.com/watch?v=_6Sd3bMeDck

How to tighten and truing the wheel (39 minutes): https://www.youtube.com/watch?v=MmQRRNyeCes
Building a wheel can be a really rewarding experience and not as difficult as it might seem. It just requires patience, attention to detail and a methodical approach.

I replaced the corroded spokes in my Qu-Ax Luxus wheel with bright stainless ones. That made the length selection simple and only cost $23 online for the set of spokes and nipples, delivered. I figured it was good place to start learning and if I stuffed it up then I could always take the wheel to the local bike shop.

My internet is very slow so I didn’t use videos. I read a bit but couldn’t really relate to it without being hands on at the same time. So I just laced by following the pattern on another wheel. It took me two attempts from the start to get it laced as I discovered more than one way to get it wrong along the way.:wink:

I had zero special equipment. I just used the uni in my lap as a truing stand and gauged the rim with a small screwdriver held against the frame by hand. I have a very good eye and steady hand for such things. Others might prefer to set up a simple rig like UniMyra’s especially for larger wheels.

Truing is mostly a matter of understanding how the spokes pull on the rim and tightening or loosing to move the rim in the right directions towards centrality, circularity and straight running. Maintain even but light tension during the initial truing. Whatever you do to spokes in one area you typically do the same but a little less to the adjacent spokes and the complementary action to the opposing group of spokes.

How you distribute the adjustment to the adjacent spokes depends on how far the error is distributed.

What constitutes the opposing spokes depends on the error. If the whole rim is not centered on the hub then tighten the spokes on the high side and loosen those on the opposite side. If the rim is oval then tighten the spokes on the high points and loosen them on the low points. If rim warps one way then tighten the spokes on the other side to pull it into line and loosen the opposing spokes.

Be systematic and repeatedly check all aspects, keeping the tension even. The errors are often a combination of all three aspects, especially at first. Slowly and patiently bring up the tension. Keep checking for even tension across the whole wheel. If the wheel is true but some spokes are lower tension then bring up the tension in all the appropriate complementary spokes together while monitoring eccentricity, ovality and warp.

BTW When I got to the end and went to inflate the tyre, I discovered yet another way I hadn’t noticed to get the lacing wrong. :o The valve was between spokes that came towards each other making it impossible to fit the pump hose. So I got to do the truing all over again the next night. However I avoided re-lacing by tying the crossing points of all the spokes with string, removing the nipples and rotating the hub and spoke assembly to the right holes in the rim.

I would really encourage everyone to have a go at it. Do read up on the instructions, especially about setting the spokes at the end. It is important.

Despite how long it took and the mistakes along the way I thoroughly enjoyed both the process and the results. Obviously an experienced person would do it much faster but there really is no reason anyone with modest mechanical ability couldn’t manage it.

I love building wheels. Just built one for my new 29er yesterday. I’m fortunate enough to have a bike shop with a community work stand near me, and they let me borrow their tension meter. Definitely nice to have for balancing tension.

This is my 5th wheel build and I’ve used the Sheldon Brown guide every time. This is the smoothest one has ever come together for me. No dishing and the tension came out super even, with all the spokes within about 10% of each other.

My biggest piece of advice for anyone new to truing or building wheels is to pay attention to spoke twisting. Any time you tighten or loosen a spoke, have one hand on the spoke wrench and the other on the spoke, gauging how much it is twisting. Make an adjustment by moving the spoke wrench until the spoke stops twisting, then turning your desired amount, then reversing the initial movement to leave the spoke un-twisted. This way you make a wheel that stays true rather than falling out of true as the spokes untwist on their own.

I will keep this i mind. Good advice.

Good advice. You can also put a piece of masking tape on several spokes around the wheel, a bit like a flag. When they start to rotate, you know that the spoke and nipple are rotating together rather than just the nipple.

I’d say maybe even more important than spoke twisting is to lube the nipple threads, and the place where the nipple seats on the rim. If you use spoke prep or boiled linseed oil on the threads, and lithium grease on the rim holes you won’t really have any problems with spoke wind up. At this point the only time I really have to have my spoke pliers out is when I’m building Sapim Lasers, or CX-Rays. Those are light spokes that are prone to twisting before you get up to working tension. Also when I’m working on CF rims due to the extra tension they take.

So far, I have never used a spoke calculator when ordering spokes. I have very good experience with just telling municycle.com (UDC Germany) what wheelset I have/I’m planning to build.

The Picture below is from the user manual of my disc brake. What is the meaning of this illustration?

I did another wheelbuld - a 36 spokes 3 cross pattern exactly as shown i the first video I linked to above. It seems to me that the difference between the disc brake illustration and the video is that the trailing spokes goes on different side of the flange. Does it matter?

Wow, it’s really easy to get mixed up trying to visualize that. :thinking: But it looks like they’re saying that the spokes on the front wheel that are under tension (“pulling”) in braking should leave the hub on the outside of both flanges; on the rear wheel, the spokes under tension in braking should be on the outside of the left flange but the inside of the right (sprocket side) flange. Ergo, the spokes on the right side that are under tension while pedaling exit on the outside of the flange. Of course (non-giraffe) unicycles don’t work that way.

The sources I learned from said that it doesn’t. They mostly pre-date disc brakes though. (Do unicyclists brake hard enough to worry much about it? I tend to doubt it.)

A lacing pattern that looks the same on both sides, like the rear wheel there, was characteristic of machine-laced wheels, where the machine always put the spokes in the same way and a worker flipped the rim over to do the other side. Having the inside or outside spokes pulling together indicated a hand-laced wheel, so potentially there’s some snob appeal at play.

It IS a difficult chart to interpret (rotating direction, and lacing pattern and everything.) But like LargeEddie said as well, it usually doesn’t matter enough to matter. I’ve laced wheels up “the wrong way” and they’ve stayed true for years. It’s mostly to counter-act the braking forces, and the drive side rear spokes are laced the opposite in case the chain gets sucked between the large cog and the spokes, there will be less damage.

Thanks for the replies. The reason I go on about this is because I’m using a Schlumpf hub here. So what I’m really wondering is whether lacing one way or the other could affect the hub.

Apparently the Shimano lacing pattern is done like on a motorcycle. On the disc side (rotor/left) of the rear wheel, the trailing spokes runs on the inside of the flange. On the drive side, it is the opposite. I have read that the disc side is the most important because the force is greater there. Like LargeEddie says the “drive side” doesn’t apply to unicycles anyway.

On the front disc side (left) the trailing spokes also runs on the inside of the flange. This is where the braking force is the highest.

Sheldon Brown says this is not an important issue, but he doesn’t mention disc brakes.

In the lacing-video I linked to above, the dude has the trailing spokes on the outside of the flange on both sides (as do I). This is determined when he puts in the key spoke here: https://youtu.be/_6Sd3bMeDck When he gets to the point where he twists the hub (https://youtu.be/_6Sd3bMeDck?t=521) to avoid blocking the valve stem hole, the “inside spokes” becomes the leading spokes. Had he put the key spoke in on the other side of the valve stem hole, the “inside spokes” would have become trailing spokes.

If I was to build the wheel now, I would have done it like the Shimano front wheel. It took me quite some time to build this wheel with the right spoke tension and everything, so I don’t want to do it all over if I don’t have to.

Another thing I’ve become aware of, is that it is usual for bicycle rims to have the rim holes drilled at an angle. In this case it is important to get the trailing/leading spokes in the right holes. Do you know how this is done on a unicycle rim? (In my case a Dominator2)

I don’t think the Dominator2 rims have any eyelet offset or angled drilling. They don’t look like it anyways. Elbows in/elbows out doesn’t really matter and your wheel lacing shouldn’t affect your hub. What I try to pay attention to is on a USED hub, try to match the previous lacing pattern, so it doesn’t create any more wear marks from the spokes. As long as you can see the hub label in the valve hole, you’ll be just fine. :wink:

So to answer your question, as long as you have the correct key spoke, eyelet angle or offset won’t really matter (it will fall into place.) Where you have to take it into account is in spoke length. Some spoke calculators don’t account for offset or asymmetrical spoke beds, so you need to find out if your math or your resource does and adjust spoke length accordingly. If the wheel has a label, you should be able to read it from the drive side. I’m sure you did a good job! Lots of what you are worrying about shouldn’t affect the wheel or the hub. As long as you can get to the valve stem, have fairly even spoke tension, and can look down through the rim at the spoke nipples and see that the spokes are all in the bottom of the nipple (or they will break) and not too long (you can get away with this on a double walled wheel or a single wall with a dremel tool) I wouldn’t re-lace it and go ride! I recommend tape for the rim strip instead of using a rubber rim strip, but lower psi anything should be fine.

You definitely are making me want to try FW’ing Uni! Thanks for sharing your experience!

I see what your saying has to do about rim “handedness.” Technically the eyelets for spokes will be slightly to the side they go to (I think most rims are the same, but there might be exceptions,) but if you didn’t get it right, it will probably be fine. I haven’t noticed a single wheel where I’ve changed the key spoke hole due to it being an opposite “handed” rim, but I don’t think the spokes will be pulled at a strong enough angle to matter, too much if you got it pulling from the opposite side. If it makes you feel better, I’ve had to re-lace a lot of rims! It turns a yankee screwdriver into a worthy investment, though!

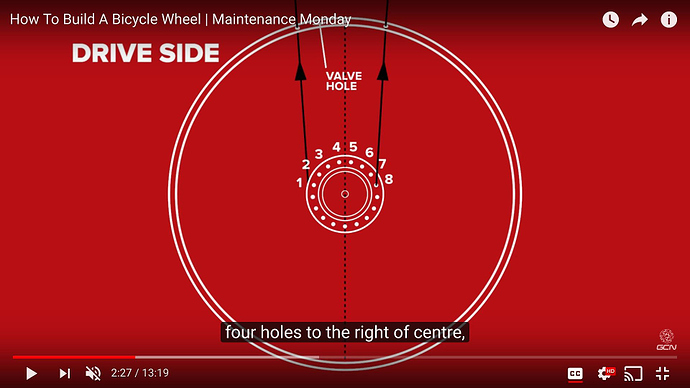
This is the best image I could find with the method on how I find the “key spoke.” I find the label on the hub and count 4 spoke holes over from center (counter-clockwise), and put the spoke to the left of the valve hole (head-out). I always put this spoke in the hole left of the valve hole, but I will check the next wheel I build and maybe check all of the rims I can find if there is one that this is not the case. I don’t think this picture is to spec, because it has 17 flange holes as far as I can count (the tutorial is for 32h hub), but method is the same.
Taken from: https://www.youtube.com/watch?v=Jw25tqAcn_4&t=130s (not the best tutorial, but a few helpful things)

Edit: not sure how to post a picture outside of photobucket, but can be seen at 2:27 and 4:39 of the tutorial.

Here it is:

Here is the image:

You’re probably right. I’ve e-mailed UDC to make sure.

I wasn’t aware of this. I started with a random spokehole on the hub.

I use the UDC spoke calculator and went up to the nearest mm. That seems to be the correct length for the way I laced the wheel.

There’s a print that says “Nimbus unicycles” which I put on the left side

I think got this right. The spokes are not quite in the bottom of the nipples, but almost.

The video was a little bit hard to follow without a wheel to build. I will get more infomation on lacing before my next build. I will leave this wheel as it is since no one has adviced me not to.

I’m not sur about the nimbus dominator 2 rim (I don’t have it by my side right now but can take a look at it tomorrow), I rather believe it has an offset (barely noticeable but still there).
I mean you have a right-handed rim or a left-handed one and you have to take it in account to know if the key spoke will be the one just after the valve hole or if you have to put it a hole away from the valve hole(sheldon guide).
Also the right flange must be connected to the rim holes of the right side.

About the schlumpf hub, if you have a first generation hub, the flange holes are alternatively filed on one side only, so they are meant to have the spoke going through it from the inside or the outside, if you don’t respect this you can brake it, but I don’t remember if you have a recent hub or not.

I looked at my Dominator2 rim, and I would lace it as posted and the illustration showed earlier (key spoke is a trailing spoke, left of the valve stem, coming from the 4th hole from center of the hub flange). As said earlier, there are other ways to lace them that will probably not have any harmful repercussions. Searching around the forum, there is this thread, and I think the method is different (“key” spoke is a leading spoke?) but it sounds like it has proven successful as well.

My stock Dominator2 rim also has one side pulling spokes going one way and the other going the other way, (it doesn’t have disc brakes) just for information.