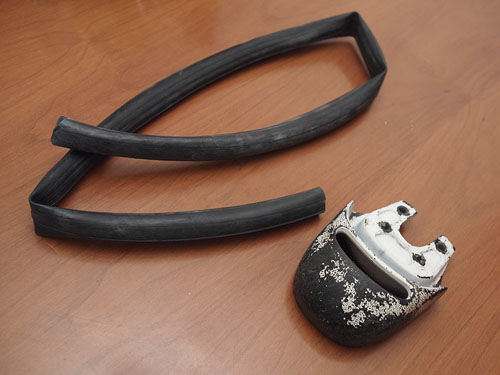
Post Your 36er Here

With apologies to One on One, here is my new 36er:

Frame: KH
Seat: KH Fusion Street
Seatpost: Atomlab pivotal
Seatpost clamp: 31.8mm adjustable, green*
Handle: Nimbus Shadow*
Brake: V-brake with friction shifter lever*
Bell: Sunlite Candy mini bell, green
Tire: Nimbus Nightrider
Tube: Kenda 29x2.3
Rim: Coker Double walled aluminum
Spokes: Coker 14g Stainless with green alloy nipples
Hub: Nimbus ISIS 48h
Cranks: Echo SL 160mm (will probably end up with 165/137 Moments)
Pedals: Wellego PC, green

*Not pictured

The photo was taken after I took apart the Coker wheel to swap the hub. I laced the wheel last night and will spend some more time tensioning and truing (and tensioning and truing…) before putting it all together.

Thanks to Saskatchewanian for the idea of using the Nimbus hub with the Coker rim in the KH frame and to Brycer1968 for thinking a little outside of the box.

what a beautiful pile of parts :stuck_out_tongue:

what did you do to the kh handle on the seat.
thanks zipper

It’s wrapped with an old tube. I do this on all my handles and really like how it feels when gripping them. This is why I was a bit bummed about the new 2011 KH handle design without the hole; I guess I’ll have to buy a few spares while I still can.

could you show how you did it. it looks really cool.
thanks zipper

Wrapping a handle

The attached pictures follow the steps below (this wrap is really sloppy due to basically doing it one handed so I could photograph the steps):

  1. Cut about half the length off old tube; take the handle off the saddle.

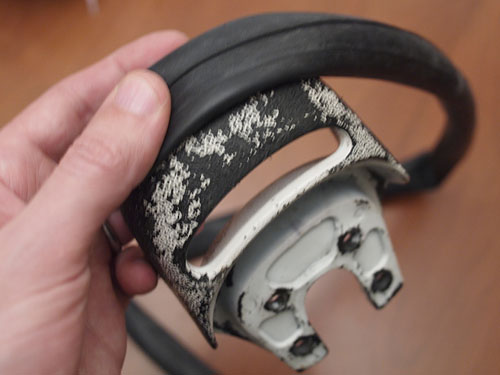
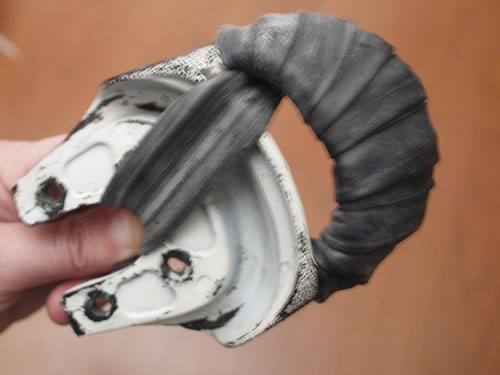
  2. Lay the end of the tube across the front of the handle (the left/right orientation doesn’t matter).

  3. Loop the long end of the tube up and through the hole in the handle pulling it tight the whole time.

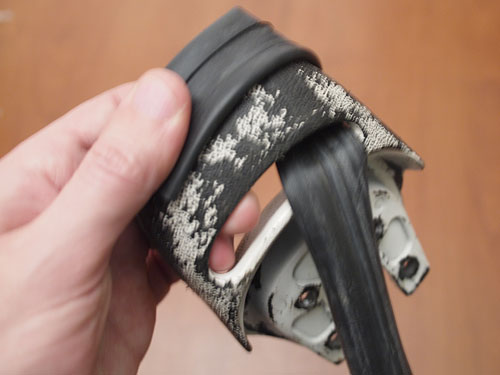
  4. Loop the end back down over the handle.

  5. Again loop the long end up, through, and over, overlapping the previous loop by about half the width of the tube. Repeat until the handle is covered.

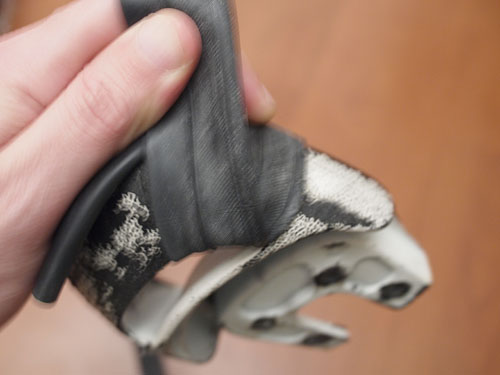
  6. When you get to the end of the handle, rather than looping back down over the front of the handle send it to the back. Hold this tight while bolting the handle back onto the saddle, which will hold everything in place. You can then trim any extra bit that might be sticking out from under the handle.

It’s really simple; the main trick is to pull the tube tight and keep it that way.

handle-wrap-1.jpg

handle-wrap-2.jpg

handle-wrap-3.jpg

handle-wrap-4.jpg

handle-wrap-5.jpg

handle-wrap-6.jpg

Saddle questions

I have never taken a saddle apart, but I have a Velo brand saddle purchased from EBikeStop that I think is the same thing as the ones in the list Sask included in his post. Is the saddle cover not glued to the foam? What tools do you use to trim the foam? Can you use the original cover, just trimmed down a little, or do you use a different material for the cover?

On another question, does anyone know about the UDC Club saddle? I just ordered the Nimbus Titan (great sale price) and it ships with the Club saddle and no option to upgrade. (It will arrive next Monday :smiley: :astonished: :D) I have a KH Freeride on my daughter’s 20" Nimbus II that is overkill for a 12 year old, but I wonder if the club saddle is worth keeping or if I should try to trim down the Velo that I have on my beater 24" (Avenir round crown with lollipop bearing/hub) so my daughter has a comfortable one :thinking: Any suggestions are appreciated.

So that I don’t just hijack this thread with my questions; I will post a photo of the Titan next week. It will be pretty generic, but it is my first big wheel so I am pretty stoked. Then later when I get the Coker V2 frame I hope to buy from Mr. Foss I will post it again! :sunglasses:

cool thanks very much
thanks zipper

My understanding is that the Velo and club saddles are very similar or even the same, although I haven’t had an opportunity to compare them. Hopefully you’ll help clear that up after you get your new uni.

The saddle covers are glued to the foam, but it’s still pretty easy to peel off. You could try using a hair dryer to warm up the glue if you have trouble with it.

I tried a couple different bread knives, a box cutter, and a dremel rotary cutter. The dremel was by far the most effective. Then for finishing off I’ve used hand-held sandpaper, power sander, and a grinder on the dremel. Again, dremel worked great. Power sander was OK, but a bit too cumbersome. I’ve also read somewhere that people (I think it may have been an old post by KH) have had good success with electric knives.

For re-installing the cover, I’ve had good success with a staple gun and the shortest staples I could find. Then I just trim the cover down as needed (after stapling it on).

My 36er has a KH saddle that I trimmed slightly for width. Here’s a picture, to avoid the thread-jack factor :slight_smile: (previously shown with full specs at post #166 (top of page 12) Post Your 36er Here).

Here is my new Nimbus Impulse that I got today. All stock except that I upgraded the cranks to KH 135/165 and added a Planet Bike Protege 8.0 computer.

P1040296.jpg

P1040297.jpg

NOTSOYOUNG ONE: I have a Titan (just got it myself) with the club saddle and I will say that it is fine as a training saddle, but the Freeride is much , much softer and has the nice cutouts for the “boys”. The club is a very firm saddle, even more firm than my Torker saddle but comfortable. Swap the saddle from your 12 year old after a few weeks of learning the 36er and beating up the club saddle. That is a no brainer, the KH Freeride has a very soft cover and sculpted foam insert. I don’t have hours in the saddle like many others do , but many folks rave about the KH on their 36er for the comfort it provides.

Everything but pedals and cranks. (cause niagaracyle likes to take their sweet time putting stuff in the mail)

Now If I can just figure out how to mount my sword to the seat post.

The black looks very evil. If Darth Vader rode a unicycle, that would be it.

Just make sure…

Hey Danechka, I’d either point your seat to the front, or flip around the seatpost clamp… Or check and make sure your cranks go on the correct sides so the pedals don’t fall off out in the woods without a crank arm tool or a pedal wrench or a brain…:o Yep been there…

I just assembled it - I thought it went either way…I guess I better check.

Hi Danechka,

So you bought the Titan frame from DavidP, and it looks like you bought the rim and tire from Coker, and now you are waiting on the cranks and pedals from Niagara Cycle. Did you already have the seat post and saddle? That saddle will probably work for short rides, but will be torture on anything long. Of all the things to make sure of on any cycle it is comfort, and the saddle is the most important comfort feature (besides being the most important protection for young boys like us ;)). Hopefully you have enough budget to buy a better saddle soon! That Coker ribbed tire looks like a nice one for distance riding - let us know how you like it once you get up and going.

Looks like a fun project. I contacted DavidP a month ago and thought about doing the same thing, but gave up on it. I am glad to see that his frame went to you :). When the Titan went on sale at UDC I finally got moving and made the purchase. It arrived this afternoon and I will post a photo tomorrow, along with a few comments about my first ride or two.

As MountainUni1 said, you will want to make sure the saddle is pointed to the front. Otherwise your pedals will be on the opposite side from where they are supposed to be and they will almost surely come loose. More than one of us has played that fun game :o. On the crank arms, there is an entire thread about how they can come loose, started by flyjeffa (he posted his BEAUTIFUL new Nightrider Impulse a few posts back on this thread). There is good information in that post about the square-taper hub and crank arms (also referred to as cotterless cranks). In short, it is good to tighten the crank arms frequently for the first several rides, then check them every once in a while after that. It is no fun if one or both get loose :(. Check the pedals occassionally too, as they can get loose, as can your saddle on the seat post. Maybe you already know all this stuff, so I will stop doling out unsolicited advise now :roll_eyes:

Nice work piecing this one together! I like the simple elegance of the Titan and the Coker Big One. Best wishes from a fellow noob on the 36er :smiley:

My X’mas gift.

http://www.youtube.com/watch?v=_4dxBOM1f8I

Nice :slight_smile:

I turned the seat around, but since I have no crank arms, there still is no R and L. right?
Once I put the crank arms on, they will be marked R and L and things will be clear.
Damn this thing is big. I had a 29" muni and I thought that was big.
Can you still buy Roach seat covers?

That seat looks like your butt will complain soon…:smiley:
You may not notice as long as you don’t ride longer distances, but I guess that it will cause your butt to hurt after 20 minutes.