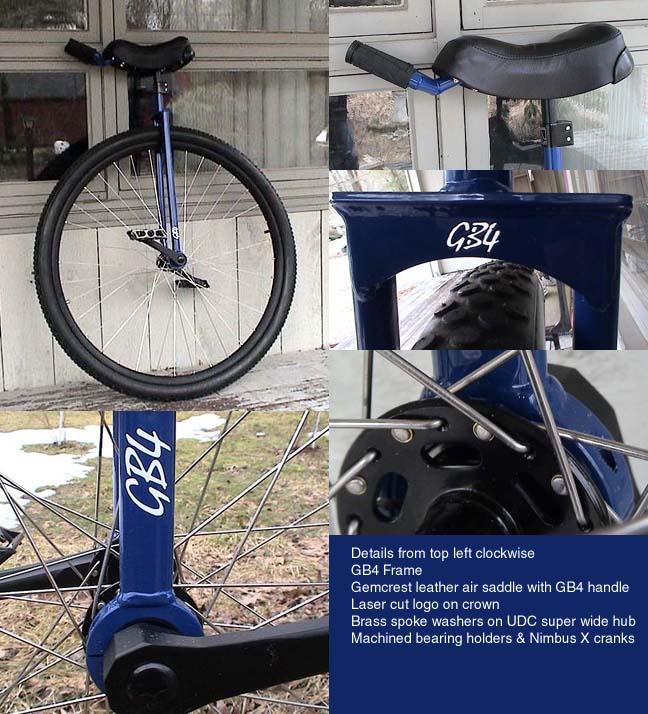
Here is a photo of my new 36" unicycle. I really can’t call it a Coker because the only thing that is Coker is the tire and tube.
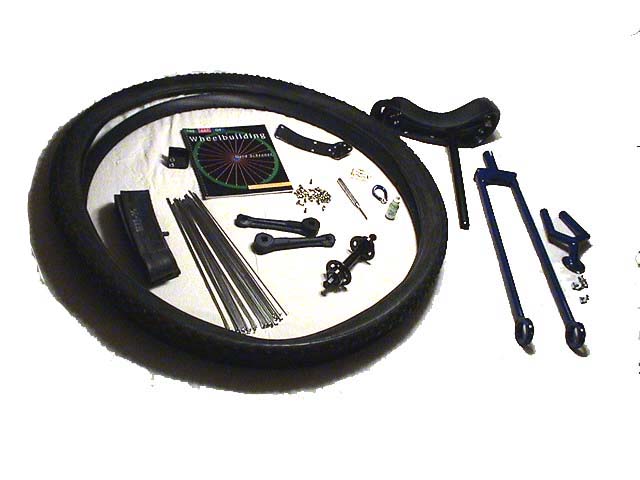
DIY kit after assembly
Here is the end result after putting all of the pieces in the correct places.
drools
Very nice! Where did you order it from?
that is a beautiful uni, brings tears to my eyes.
Chase
wow.its blue.
![]()
NICE 36 ! Bet it rides like a dream.
I’m moving toward a similar ride and can’t wait. I’ll be looking for any more info about your project.
Congrats! Bill
Wow you assembled everything in 3 minutes! That is a nice uni…
-Lee
How long to lace the wheel, and what did you use for a truing stand?
How long did it take to get all the parts in after placing your order? What kind of lead time should I allow if I decide to build one?
How do like the GB4 frame.
Was this your first wheel build?
How much do you think you saved doing it yourself.
Re: DIY kit after assembly
I don’t know, are you sure you put all of the pieces in the correct places? You better send it to me and I’ll check it for you - no charge - it’ll only take a year or so . . . ![]()
![]()
Semcycle.com - Nipples
GB4 Manufacturing - GB4 frame and handle
Unicycle Factory - Tom Miller SS Spokes
Unicycle.com - Coker tire, Coker tube, Torker LX Saddle w/ seatpost, Gemcrest leather saddle cover, Air pillow, Nimbus X cranks, Primo Viking Seatpost clamp, UDC Superwide hub, Airfoil Rim, GB4 Stiffener plate
Amazon.com - “The Art Of Wheelbuilding” book by Gerd Schraner
Rock n Roll Lube - Nipple cream
Bike tools Etc. - Brass spoke washers, Park spoke wrench
LBC - Hand Grips
Nice work, welcome to the club!
Boy 'tis a fine fine ride you got there
This was my second wheel build. My first was about 30 years ago, when I swapped out 2 tubular rims for clincher rims on a road bike. I really didn’t know what I was doing at that time, but I do still have that same bicycle in riding condition without any broken spokes.
It took me 4-5 hours to lace the wheel, tension, true it, stress relieve, tension, true again, stress relieve, tension, true again, stress relieve, (repeat the last three steps until wheel is true and at a good tension)
I did not use a truing stand. I used my uni frame with the seat post sticking down through the seat tube as my dishing tool and truing guide. Then I used my thumb for side to side truing. Not very scientific, don’t laugh, it worked extremely well.
I started getting the parts together the week after Christmas. I ordered my frame from George Barnes. Took delivery in early February. I am really impressed with the quality of work on the frame and handle. The bearing holders, themselves are beautiful and work so well.
I had to wait on the Airfoil rim from UDC because of a manufacturing problem. That took about 2 months.
With Semcycle, I had to wait about 3 weeks, because they were performing in Europe.
Spokes from Tom Miller were about a 7-10 day process. He has about 60 sets of spokes left. After they’re gone, that’s it.
From first order, to complete unicycle was almost 4 months. Most of the waiting time was because of the Airfoil rim. That shouldn’t be a problem anymore.
Money savings, depends on what you compare the final product to. Compared to the UDC Airfoil wheelset, the cost would be a bit more, but this wheel has Stainless Steel spokes, brass spoke head washers for a better hub connection, and I’m sure it is a much higher tension build.
If anyone has any other questions and wants individual answers, they can e-mail me at hotandcold58 (at) hotmail.com
I don’t know what this is but sure sounds interesting.
Congratulations to a fine 36"er!
Re: Re: DIY kit after assembly
I probably should send it to you to check out. After all, riding your Coker last October in Boston, was what started all of this. It’s all your fault, maybe I should send you a bill instead.
Looks like a fine job. Congratulations!
I’ve never heard of brass spoke head washers before. What is their function? Do they allow greater spoke tension?
how much did it cost?
There is quite a bit of play around the spoke at the hub on the UDC Superwide hub. The holes were drilled for 12ga spokes. This extra space around the spoke allows movement of the spokes in the hub that can cause broken spokes at the spoke head. The washers tighten everything up nicely.
You have to set the spoke heads into the washer and hub using a spoke head punch. I made my own from a Craftsman pin punch. I dremeled out a concave surface that matched the shape of the spoke head.
You can get the washers from Bike Tools Etc. They are online. A bag of 100 is $2.50 plus $6.00 shipping. They also sell a spoke head punch.
http://www.biketoolsetc.com/index.c...m_id=DT-SHW/100
Greater spoke tension is allowed by the Airfoil rim.
As the owner of a very similar ride I KNOW that you’ll enjoy it!
However, I want to know more about the “Geezer Unicyclists Of America.”