Custom muni project...

I’ll try not to babble on too much in this thread (something I often do when talking about unicycle projects). So here it is…

The original custom frame

In early 2003 I had my first custom muni frame built. I adored it, except for the horrible lack of side tyre clearance (1-2mm or so). It was light, rigid, beautiful, and yellow.

Original thread - http://www.unicyclist.com/forums/showthread.php?s=&threadid=21441&highlight=custom
Design changes - http://www.unicyclist.com/forums/showthread.php?s=&threadid=21540&highlight=custom
Bearing holders - http://gallery.unicyclist.com/albuo16/aak , http://gallery.unicyclist.com/albuo16/aal
Frame crown - http://gallery.unicyclist.com/albuo16/aat , http://gallery.unicyclist.com/albuo16/aav
Completed custom muni pics - http://gallery.unicyclist.com/albup21

I sold the frame to a friend who has built it into a beautiful light muni with a smaller tyre and rim. I went onto another frame…

The intermediate frame

I was given this old prototype frame from unicycles.com.au . This is the one I’m riding with for now. I don’t like it because although it’s really rigid, it’s also really heavy, the brake bosses are mounted poorly, the bearing holders aren’t quite the right diameter, and it has the same 1-2mm side clearance as my old frame. I’m planning on giving it away and getting a new custom frame made.

Here’s a thread about it - http://www.unicyclist.com/forums/showthread.php?s=&threadid=34178&highlight=custom+muni

The future custom frame

I’m changing frame builders this time, to a friend of mine who is a keen muni rider and very skilled at this sort of thing. This is him - http://gallery.unicyclist.com/album373/DSC08598 .

As I said, I adored most aspects of my original frame and hate most aspects of my current frame. My future frame will have the best of both…

  • Light weight (under 1kg)
  • Ample clearance (I meant it this time ;))
  • Moderate rigidity
  • Elegant beauty :slight_smile:

More details…

Twin brake bosses for HS-33’s

  • This time they will be mounted by a unicycling frame builder. As you can see on the intermediate frame, I’m currently running my Maguras off single bosses and it’s horrible.

Long ‘neck’

  • 200mm long leaving only about 25-30mm for downwards adjustment. This way it will be stronger and also look nicer in that it will carry the colour scheme right up to the seat

Brake cable out of the way

  • Nathan (the framebuilder) suggested this and I think I will go with it…having the braided brake cable either passing inside the frame to get it out of the way of sticks, legs, etc, or having it clipped to the frame the same as on many bikes.

Custom brake lever mount

  • I’ll most likely get Nathan to make me a small brake lever mount the attaches to the front of the seatbase. I had a lot of trouble tracking down bar ends for anything bigger than 22.2mm tubing and this time I’m going with 25.4mm.

Colour scheme

  • I like this colour scheme more and more each time I think about it. I’m going for white, black, and blue as my main three colours. White frame, black seat, rim, and tyre, blue pedals (Jim Cielencki’s) and seatpost clamp, and the chrome spokes, hub, and cranks. As I mentioned, the neck of the frame will extend to almost seat height. Here’s an edited picture of my old muni to show roughly what it will look like…isn’t it beautiful? - http://www.unicyclist.com/forums/attachment.php?s=&postid=286369

Questions

Seatpost size

  • I’m very much undecided about this. What is standard on most quality munis? 25.4mm? Thomson bike seatposts are available in 25.4 which is a consideration I had for the future. For now though, I don’t want an adjustable seat angle.

Wheel size

  • For now, I think I plan to stick to a 3" Gazz on an Alex DX-32. Running a 24" Large Marge would mean having to mount the brake bosses wider apart than usual which I don’t like, and I think a Gazz on a DX-32 offers me enough folding prevention. I also want a reasonably light wheel, and the LM with that future 4" tyre (or 3" Gazz for that matter) would not be light. What do you think? Should I allow that extra bit mroe clearance in case I want to eventually run a 4" tyre? I think as it is it would just squeaze in there, but I’ve been riding a muni with a just-squeezed-in-there wheel for two years and I hate it!

Any corrections or suggestions for my current frame design?
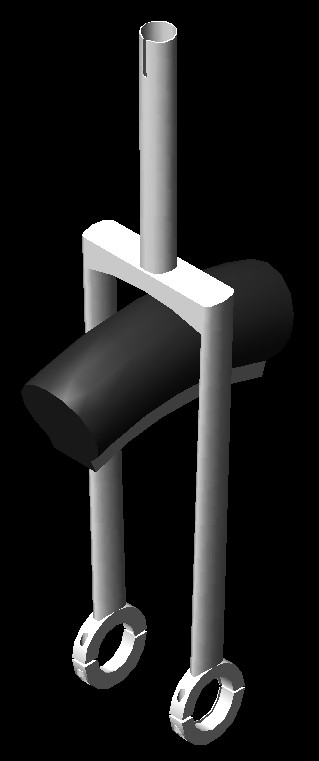
3D model

As you can see, it closely resembles my original custom frame…I loved that frame.

Frame specs - http://gallery.unicyclist.com/albuo16/Muni_Frame_Details
Isometric, shaded, view of back of frame - http://gallery.unicyclist.com/albuo16/Muni_Frame_Iso_Shaded
Front view, shaded, no wheel - http://gallery.unicyclist.com/albuo16/Muni_Frame_Front_Shaded
Front view, shaded, with wheel - http://gallery.unicyclist.com/albuo16/Muni_Frame_Front_Shaded_Wheel
Isometric, shaded, with wheel - http://gallery.unicyclist.com/albuo16/Muni_Frame_Iso_Shaded_Wheel
Isometric, wireframe - http://gallery.unicyclist.com/albuo16/Muni_Frame_Iso_Wireframe_Black
Isometric, shaded, wheel slided - http://gallery.unicyclist.com/albuo16/Muni_Frame_Iso_Shaded_Wheel_Slice

Please let me know what you think. Your suggestions really helped me when designing my original frame.

I’m very excited.

Cheers,
Andrew

Re: Custom muni project…

who are you giving it to ill gladly take it off your hands and pay the shipping :slight_smile:

That looks awsome. I’ve been wanting to build my own frame and have been working on some disigns. What program did you use to do the 3D modeling.

who are you giving it to ill gladly take it off your hands and pay the shipping :slight_smile:

  • Sorry, a local friend beat you to it.

That looks awsome. I’ve been wanting to build my own frame and have been working on some disigns. What program did you use to do the 3D modeling.

  • Cheers, I used AutoCAD for the modelling, and just did screenshots with the “Print Screen” button on the keyboard. It’s handy doing 3D models because you can really get an idea of how it will look (and as I did, put a wheel in there to check clearances) before you go too far with the design.

Andrew

I didn’t think autocad could do 3d versions. or are you using the mechanical desktop version of it.

Re: Custom muni project…

Pick a seatpost size that will allow you to use a Salsa Flip-Lock seatpost clamp. The Salsa is the best available quick-release seatpost clamp available. It clamps tight. I use a Salsa Flip-Lock on my muni and it has never slipped on me. It is nice to have a quick-release clamp on a muni because it makes it easy and convenient to change the seat height to suit the terrain and how you’re going to ride.

So you’ll want to pick a tubing size for the neck that has about a 28.6mm OD. From there you can work backwards to find a suitable wall thickness and figure out what the ID is going to be. That’ll be your seatpost diameter.

If you can’t find good tubing with a proper ID so the seatpost fits snugly you can always go with a custom shim to make the seatpost fit properly. My muni has a custom shim and it works just fine. I was worried that a shim might make it more likely for the seatpost to twist or slip. But if the shim is well made and properly sized you won’t have a problem. Otherwise finding tubing that has the right OD and ID to fit the seatpost could be difficult.

Common seatpost sizes on unicycles now have been 27.2mm, 26.8mm (the Hunters), and 25.4mm.

I didn’t think autocad could do 3d versions. or are you using the mechanical desktop version of it.

  • I don’t think it’s the Mechanical Desktop version, no. I remember back in highschool though we used Mechanical Desktop for 3D modelling. What I’m currently using is just plain old AutoCAD 2002.

To access the 3D stuff, you should be in model space and work wit hthe “Solids” toolbar. The quickest way to choose your toolbars is to right click on any of the toolbars you have up, then a list will pop up. I’ll attach a screenshot of the ones I usually work with.

The Salsa is the best available quick-release seatpost clamp available. It clamps tight. I use a Salsa Flip-Lock on my muni and it has never slipped on me. It is nice to have a quick-release clamp on a muni because it makes it easy and convenient to change the seat height to suit the terrain and how you’re going to ride.

  • I’ve oggled those seatpost clamps before, back when I was working at Gap Cycles, but at $60 a pop I can’t really justify buying one. Very true though, that it’s nice to be able to quickly adjust your seat height out on the trail. I’ll have a browse around at other cheaper options. What about a combination of a cheaper quick release (no more than $30) and knurling (is that the right word?) of the seatpost? I’ll also see what Nathan has to say. He has a pretty extensive background in machinery and that sort of thing so maybe he can come up with a solution of non-cycling origins.

So you’ll want to pick a tubing size for the neck that has about a 28.6mm OD. From there you can work backwards to find a suitable wall thickness and figure out what the ID is going to be. That’ll be your seatpost diameter.

  • A wall thickness of 1.6mm is reasonable for a seatpost isn’t it? Do you have any idea what a common thickness is for munis? 1.6mm would fit a 25.4 post with a 28.6 clamp.

If you can’t find good tubing with a proper ID so the seatpost fits snugly you can always go with a custom shim to make the seatpost fit properly.

  • Although I’m sure a custom shim would work well, I’ve spent two years riding with horrible non-custom shims from bits lying around bike shops. It’s one of those things where although the logical thing to do may be to run a shim, I’m holding a grudge against all shims whether they’re custom or not. :slight_smile:

Thanks for your help.

Andrew

John’s right on the Salsa QR; it’s worth designing your MUni around. I’m doing the opposite, though; there is a huge selection of seatposts at 27.2mm and I’m heading that way.

Whether you want to tilt your saddle or not, the Thomson is a great seatpost and you will be happy you used one. It has a textured surface for better grip within the seat tube.

Official word from Surly (to me, at least) is that they “have no plans” to produce a 24" x 4" tire. If they do develop plans, they say, it would take over a year before they appeared. So you might shy even further away from planning for that.

The DX32 is a great, time-tested rim with an excellent braking surface and is also worth building a frame around.

I welded my seatpost to the frame (because I had problems with slipping after trying various solutions).
I’ve found that I can change the air pressure in my airseat to give the “raising and lowering” effect (using a high-capacity Gemcrest). Mostly, I’ve just learned to ride at one height though.

Whether you want to tilt your saddle or not, the Thomson is a great seatpost and you will be happy you used one. It has a textured surface for better grip within the seat tube.

  • One concern I had about the Thomson is that it only has the two bolts up top connecting to the seat (or rails). Would this be strong enough for aggressive muni riding? What do you think of what I mentioned before about knurling on a standard unicycle seatpost?

Official word from Surly (to me, at least) is that they “have no plans” to produce a 24" x 4" tire. If they do develop plans, they say, it would take over a year before they appeared. So you might shy even further away from planning for that.

  • Thanks a lot for that, it’s very nice to know. I’ve given it more thought and I like the idea of sticking to the, as you said, time-tested DX-32 and Gazz combo more and more each time I think of it. So my semi-official decision is to stick with the DX-32 and 3" Gazz with 15mm or so clearance each side, and 20mm or so on top.

Thanks for your help.

Andrew

Mostly, I’ve just learned to ride at one height though.

  • I don’t run an airseat, and I don’t really want to change my riding to suit the muni…I think it should be the other way around. Although I can see how it would work alright with an airseat.

Andrew

U-Turn is right about John being right. the Flip-Lock is the best

Agreed, but it’s $60!

The Salsa Flip-Lock is expensive, but it’s worth it. It’s the only quick-release seatpost clamp I’ve found that actually works. If you want to save money you can go with a more standard non-quick-release seatpost clamp. You could upgrade to the Salsa later on if you choose.

Don’t do any knurling. There is absolutely no need with a good seatpost and a good frame. Start with good quality tubing for the seatpost and make sure it is machined well to the proper OD. Then make sure that the inside ID of the frame is machined well and is the proper ID. Even just a little bit of slop will cause problems. Also make sure the tubing used for the seatpost is strong enough, thick enough, and hard enough so that it doesn’t compress when clamped. Some of the standard unicycle seatposts use wimpy steel that can compress when clamped tightly. If the seatpost compresses you’re never going to be able to keep it from slipping.

I don’t know what kind of wall thickness is necessary for the neck of the frame. Someone who has built a frame would know better. 1.6mm sounds excessive though. Going with a 28.6 OD and 27.2 ID would give you a wall thickness of 0.7 mm. That is probably closer to what is necessary.

The Thomson seatpost is strong. It is made from a stronger aluminum alloy than most other seatposts. That’s why they can make the walls thinner. The Thomson will not compress when clamped tight.

The Thomson is also a one piece seatpost. Meaning that the guts are not just glued on. The bottom part of the seatpost is all machined from one piece of aluminum. Seatposts that have the guts glued on have a tendency for the bond to break down and eventually fail because unicyclists twist and pull on the seat. Bike posts aren’t usually designed for that type of abuse. That kind of failure won’t happen with a Thomson because the seatpost is all one piece.

The two bolts that clamp the rails and hold the seat at the correct angle are very strong. Thomson specs them to be strong. They are held in the seatpost in such a way that they pull straight down and don’t have to bend. They hold tight, clamp tight, and stay tight. I have no worries that one of the bolts will fail. The whole seatpost is really well engineered.

If you can get a Thomson seatpost and a rail adapter of some type, you won’t be disappointed. It’s a combination that works and has proven to be reliable as long as the rail adapter is welded well.

Thanks. I’ll look into having Nathan mak me a rail adapter and brake lever mount as one piece, but I really don’t want to ad much weight to the muni.

I ordered a pair of blue unsealed (the only ones available) Odyssey Jim Cielencki pedals from Gary of unicycles.com.au today. Tomorrow I will hopefully pick them up, and then ask him about Thomson seatpost prices.

Andrew

JC is right, don’t knurl your post. It will weaken the post, and won’t realy improve grip. Also, the issue of how to hold it int he lathe would be rather difficult. You would have to knurl it before doing anything else to it, including welding on the top bolt part.

Thomsons are excellent posts, and will not break. I do disagree a bit with JC on some details, though. There’s nothing particularly special about the aluminum used int he posts. If there were, other companies would use it too. The reason they are so strong yet so light is that the entire post, including the mounting holes, etc, is machined from the same extrusion. This means that the post gets extruded to the outside weird oval shape of the top, and then gets cut down on a lathe to size. Then a mioll puts in the shape on the top of the the post, and viola, you have a thomson. The oval shape on the inside also makes the post stronger than others. It is thicker walled where the clam compresses most, and thin walled where there is the least compression force. All around a great post. As for the masterpiece, i’m still puzzling over how they cut the oval on the inside of those.

The weight of the rail adapter will be comparable to the bar end, but the weight saved by using a thomson will compensate for the added weight of the rail adapter.

I reccomend getting a single bolt weight weenie seatclamp, or just making your own. Single bolt clamps are adaquate when you have a 27.2 or larger post, and are lighter. Also, once they are clamped down hard, they are as good as anything else on the market. I don’t see any reason to use a quick release seatclamp, since it’s not like you change seat heights all the time (at least I don’t).

Jagur is right about U-Turn being right about John being right.

All that I can say is that Harper is correct that Jagur is right about U-Turn being right about John being right.

The weight of the rail adapter will be comparable to the bar end, but the weight saved by using a thomson will compensate for the added weight of the rail adapter.

  • Very nice to know, thanks.

Single bolt clamps are adaquate when you have a 27.2 or larger post, and are lighter.

  • Adequate strength on 27.2 posts because there’s more contact surface when clamping?

I don’t see any reason to use a quick release seatclamp, since it’s not like you change seat heights all the time (at least I don’t).

  • I think I would if I could. I know I did a lot on a bike back in the day. I know it’s different with a muni because you always want to be able ot comfortably grab the seat and you want some of your thighs keeping it in position, but I still think I would like to be able to quickly raise/lower the seat that 30mm or so for hill climbing and downhill runs without tools. For me it’s not so much the weight of a 5mm allen key in my pocket or the few seconds it would take to adjust the height with an allen key, but just the fact that I’d have to remember to bring one along with me.

Jagur is right about U-Turn being right about John being right.

  • Well if John, Dave, Jagur, and Greg all agree I can’t go wrong. :slight_smile: Wait…even more people. How much did you all pay for your Salsa Flip-Lock’s?

Andrew