Look like I forgot to attach that screenshot, sorry. Here it is…
Thomson uses a 7000 series aluminum alloy (I’m not sure exactly which). Most other lesser seatposts use a 6000 series aluminum alloy (probably 6061-T6). The 7000 series stuff is harder and stronger than the 6000 series stuff. That’s why the Thomson posts can use less material and still be stronger than other seatposts.
The seatposts are thicker in the front and back because that’s where the most stress is on a bike. On a bike the post will get forces that want to bend it forwards or backwards. Putting more material on the front and back of the seatpost makes it stronger in that direction. That is slightly less true on a unicycle. We still put the majority of our force in the forwards and backwards direction but we also put more side loads and twisting loads on the seatpost than a bike would. But still, the Thomson works very well on a unicycle.
In general the better and stronger and more expensive aluminum alloy bicycle components will use 7000 series stuff while the cheaper and weaker components will use 6000 series stuff. 7000 series aluminum is more expensive than the 6000 series stuff so parts made from it are going to be more expensive.
The Salsa Flip-Locks are about $25 to $30 USD over here and sometimes on sale for less. They are on the expensive side for a seatpost clamp since you can get an adequate single bolt clamp for about $5 USD. But if you want a quick release style clamp the Salsa is the only way to go if you want something that works.
For my muni I adjust the seat height by at most about 1.5 cm and usually less. A 1 cm change feels big to me. I’ll usually put the seat up higher for long climbs and for XC style riding. I’ll lower the seat for bumpy trails and DH style riding. It’s just really nice to be able to easily adjust the seat height. If I was using a fixed (non quick release) seatpost clamp I wouldn’t even bother changing the seat height except for very special situations. The convenience factor plays a big role.
The Salsa flip lock is nice, but I was a little disapointed with it. I find that to get it to clamp tight enough to keep the seat from twisting, I have to force it so tight that it’s almost as much work as taking out an allen wrench and fiddling with a normal clamp.
I like it better than the 5mm single bolt clamp I used to use, because I was always stripping the head of the allen bolt. The Salsa doesn’t have that issue, but I don’t find myself adjusting my seat hight any more often than I did with an allen clamp.
I recently tried a Profile clamp that had a single 1/4 inch allen bolt. The allen key for it was pretty big, but the large size made it relatively easy to adjust, and much easier to get to an acceptable tightnes without stressing the components. With the 5mm bolt I was pretty much pushing the boundries of the materials to get it tight enough. I might look in to switching to the Profile clamp on my MUni sometime in the future.
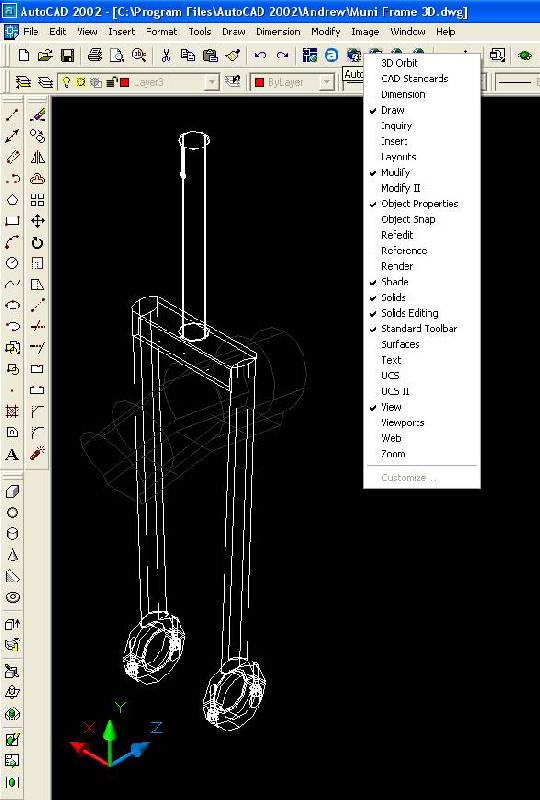
Thats cool I never knew that autocad could do that. Thanks for letting me know. For my designs I have been using Pro/E.
But I have been having to go to the engineering Computer lab here at Iowa State to use it.
Is that with your KH Pro frame? Maybe the seatpost shim is a little out of spec.
I’ve had no problems with slipping with the Salsa clamp. I do have the Salsa clamp adjusted so that it is tight. I use the palm of my hand to close it. But I’m able to open it easy enough. A little grease on the cam makes it easier to operate.
Maybe you can get a replacement shim for your KH. Maybe a little anti-seize between the shim and the frame will help. Or some other very thin shim material between the shim and the frame will fill in the extra space to get a snugger fit.
The fit between the frame and the seatpost can be fussy. Just having the neck of the frame be a few thousandths of an inch too big or the seatpost a few thousandths of an inch too small can make for a loose fitting seatpost that is difficult to keep from slipping.
Here’s what Surly has to say about why seatposts slip.
I’ve not tried the Surly Constrictor seatpost clamp, but it seems it would be a good one to try if it’s the right size for your frame.
I was able to use the Surly Constrictor to fix a slipping seatpost on a Wilder frame here on the East Coast. It seemed to work pretty well.
Why is it that everything goes wrong for me on the one unicycle that I really want to be perfect?? Today I picked up the blue Odyssey Jim Cielencki pedals I ordered. They are blue, but not the beautiful blue that unicycle.com sells and that you see literally any time you search for blue Jim Cielenckis, but a horrible pale blue. They cost $80…and I hate the colour!
What’s even worse is that this morning I discovered a loose keyway in my Profile hub. ![]()
Things just aren’t working out for me…and I have no money left. ![]()
Andrew
This is actually quite funny. Gary gave me the number for the distributor and it turns out I got the limited edition glow in the dark blue pedals that turn green in the dark. The green glowing colour is nice (I just tried them out) but the blue is horrible and I don’t do much night muni. The standard ones also cost a lot less. So I’m taking them back now and ordering the cheaper nicer ones.
More great service from unicycles.com.au. ![]()
Andrew
Hmm.Glad they worked out for you.THose were a funny looking blue.
Im sorta confused by all this.You havent got the new frame made yet?
If those three people are right, who does that leave left?
No, it’s only roughly designed so far. Give me about a month to save up the cash and for Nathan to set up a workshop in his new house.
Andrew
Oh.Good luck!
That guy in the red car.
I picked up the ‘correct’ colour pedals today. They look beautiful. I’m thinking of saving them for when my custom frame is up and running. I don’t mind scratching a muni (of course I don’t…I’m getting a white frame made up!) but I think I’d like to wait and have a shiny new muni with shiny new pedals that I can break in all at once.
Andrew
Re: Custom muni project…
On Thu, 31 Mar 2005 01:48:05 -0600, “jagur” wrote:
>U-Turn is right
Judging by his avatar, U-Turn is only right about half of the time.
Klaas Bil - Newsgroup Addict
“When it comes to the family jewels, you won’t be having fun until they’re having fun. - Jake D”
Re: Re: Custom muni project…
In the Northern Hemisphere… ![]()
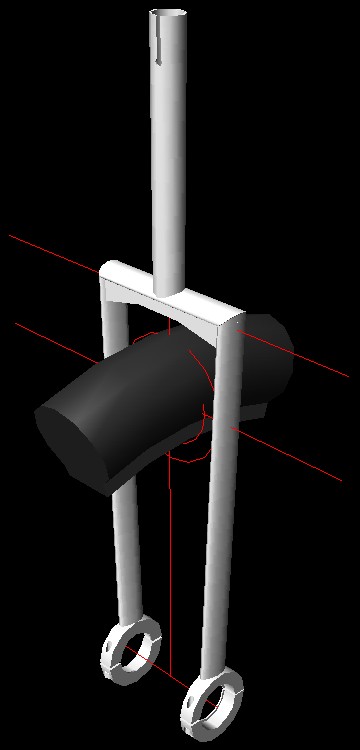
The tubing was ordered today and I’ve touched up the design to suit. The new specs are:
- 0.9mm thick, 25x12mm streamline tubing (really strong and light stuff apparently).
- 15mm side clearance at the widest point on a 3" Gazz (this may be reduced a little to make the brakes fit easier, but not much), 20-25mm top clearance.
- The little bracing fillet thing will be set about 2 or 3mm in, not flush (purely aesthetic).
- Neck of the frame is to fit a 22.2mm seatpost. This came about for several reasons; we’re a little restricted by sizes in this beautiful streamline tubing, the neck of the frame runs up really high so there’s not so much stress on the seatpost anyway, and I’ve never bent one before.
Andrew
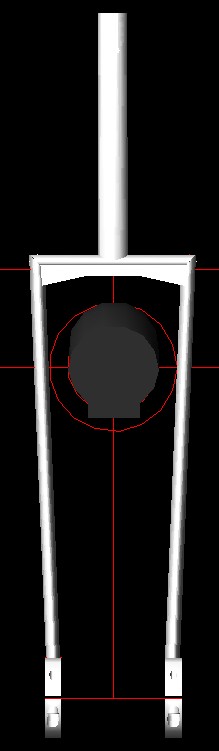
Here’s a non-dirtorted, non-perspective view.
The other important dimension I left out - 345mm from the axle to the bottom of the horizontal tube in the crown.
A question…
We’ve run into a slight hurdle at the brake bosses. I want overkill in my side clearance after running munis with 1mm max clearance for years now. I’ve designed it with 15mm side clearance for now and would only be willing to go down to about 12mm minimum.
The problem is that the brakes won’t reach as is. Apparently we’re goign to fall about 10mm short of the rim, but this doesn’t seem right to me. Surely there are plenty of munis out there with a similar style and a similar amount of clearance. What about the '04 KH frame? Where are the brake bosses positioned on that one in relation to the rim (in this case a 42mm wide Alex DX-32) and the legs of the frame?
The other concern I have is that the tyre may rub against the top part of the bosses. Has this ever been a problem? There’s no point in giving myself 12-15mm clearance to the side of the tyre if the tyre’s going to rub on the bosses within 5mm or so. What do I do? I’ve been searching for photos of existing frames at the brakes but haven’t had much luck. Can anyone help me out with this? Thanks.
Andrew
OOOOPPPPPSSS! Ohh Geeze, I just read the ppst and it has the Thumbs down on the top. That is a mistake, I meant to put the Thumbs up. Soooooo VERRRy Sorrry. The rest of my post is below. Again, forgive me.
Andrew,
Cool design!
Remember first reading about my project on Muniac.com when you first arrived on the scene? I know you read it, but not sure if you remember it.
I smiled as I saw the computer graphic representations. That’s almost identical to my first muni project. Except it didn’t have the truss under the crown.
Here is the link with photos on the building process.
http://www.unicyclist.com/gallery/?g2_view=core.ShowItem&g2_itemId=109198
Welding with the mitred corners is really tough as the builder had told me. I ended up having the frame pinched to accomodate the tire because I had a suzue hub with a 3.0 gazz. I think my tubing is greater in width than yours. My frame flexes, but that could be from a variety of reasons. When you look down the seat post tube, the whole frame is not aligned. After welding, the tubes had bent due to the heat, but he did his best to straighten it out. Also, the pinched sides to accomodate the tire may have weakened the fork legs. But the frame does flex under hard pedaling like when going up a steep hill which causes the brakes to hit the rim. So, the missalignment or the pinching could have contributed to the frame flex. Your design uses the truss, so that may mitigate the flex on my frame.
Additionally, the frame was designed around a Sun BFR rim, which is much narrower than the Alex DX32. We still got the brakes (Magura HS 33’s) to run with this narrower rim. Since the tubing was aerodynamic, the x- section was tear-drop shaped. Is yours? We reversed the tubing to put the fatter side tubing to the back and then the magura two hole brake mounts were welded inside the forklegs. We couldn’t weld on the very end, too narrow and pointy. He had to cut the braces from the stock mounts(available at uni.com) to match the taper on the inside of the fork legs.
I haven’t read your entire thread, yet, but responded only to your most recent posts. Maybe I missed some info.
Your using different materials and a different welder, so that may eliminate any of the issues I had with my frame. I mention them only because of the similarity in design. It’s fun designing and being involved in these custom projects isn’t it!![]()
About 6 months ago, a chap in the UK sent me an email regarding making a “Coker” frame with aero dubing. I don’t know what happened if it ever got finished. I need to look up the old PM. I can get it to you later. His experience with aero tubing may be helpful.
Cheers.