Wheelbuilding - experience of a novice who didn't want to read a book

This is the best image I could find with the method on how I find the “key spoke.” I find the label on the hub and count 4 spoke holes over from center (counter-clockwise), and put the spoke to the left of the valve hole (head-out). I always put this spoke in the hole left of the valve hole, but I will check the next wheel I build and maybe check all of the rims I can find if there is one that this is not the case. I don’t think this picture is to spec, because it has 17 flange holes as far as I can count (the tutorial is for 32h hub), but method is the same.
Taken from: https://www.youtube.com/watch?v=Jw25tqAcn_4&t=130s (not the best tutorial, but a few helpful things)
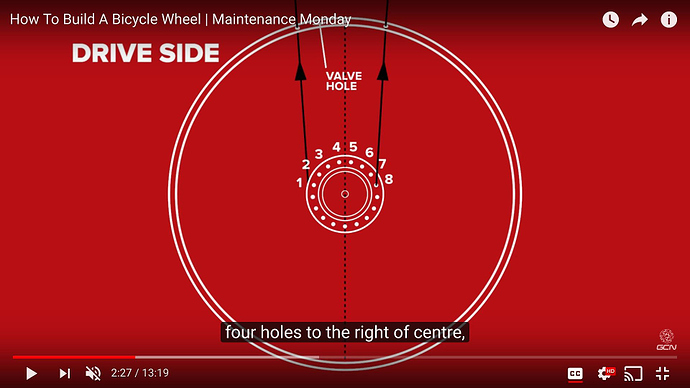
Edit: not sure how to post a picture outside of photobucket, but can be seen at 2:27 and 4:39 of the tutorial.

Here it is:

Here is the image:

You’re probably right. I’ve e-mailed UDC to make sure.

I wasn’t aware of this. I started with a random spokehole on the hub.

I use the UDC spoke calculator and went up to the nearest mm. That seems to be the correct length for the way I laced the wheel.

There’s a print that says “Nimbus unicycles” which I put on the left side

I think got this right. The spokes are not quite in the bottom of the nipples, but almost.

The video was a little bit hard to follow without a wheel to build. I will get more infomation on lacing before my next build. I will leave this wheel as it is since no one has adviced me not to.

I’m not sur about the nimbus dominator 2 rim (I don’t have it by my side right now but can take a look at it tomorrow), I rather believe it has an offset (barely noticeable but still there).
I mean you have a right-handed rim or a left-handed one and you have to take it in account to know if the key spoke will be the one just after the valve hole or if you have to put it a hole away from the valve hole(sheldon guide).
Also the right flange must be connected to the rim holes of the right side.

About the schlumpf hub, if you have a first generation hub, the flange holes are alternatively filed on one side only, so they are meant to have the spoke going through it from the inside or the outside, if you don’t respect this you can brake it, but I don’t remember if you have a recent hub or not.

I looked at my Dominator2 rim, and I would lace it as posted and the illustration showed earlier (key spoke is a trailing spoke, left of the valve stem, coming from the 4th hole from center of the hub flange). As said earlier, there are other ways to lace them that will probably not have any harmful repercussions. Searching around the forum, there is this thread, and I think the method is different (“key” spoke is a leading spoke?) but it sounds like it has proven successful as well.

My stock Dominator2 rim also has one side pulling spokes going one way and the other going the other way, (it doesn’t have disc brakes) just for information.

I’ve managed to get 2 parallel discussions going. I’ ll try to keep the Schlumpf related questions in the Schlumpf thread.

I got an answer from Roger about the Dominator2 rim:

“The holes are drilled centrally, although if you look carefully you can see they are slightly angled when drilled. This is due to the jig type, not a requirement to build that way. The rims then have eyelets set in them at 90 degrees… so the nipples have a good seating. In my experience there is no different is built one way or the others on these rims - do not worry at all.”

Awesome! Roger always seems super helpful. If you haven’t checked out the video of him building the penny farthing wheel, it’s pretty neat. https://www.youtube.com/watch?v=3EkO4KhG-h0

Re-reading this, I realize I worded this poorly (pulling/trailing spokes going the “other way” would not be pulling, of course they would be leading/pushing,) but hopefully you got that it was laced different on both sides despite me botching the explanation of it.

I’ve built my third wheel with an old KH 26 Freeride rim and a Nimbus Drift Trike Disc hub.

Once again finding the right spoke lengths was a problem. I noticed that the UDC spoke calculator and the KH website stated differnt “Effective Rim Dimension” (ERD) - KH: 541 and UDC: 536. I thought I’better meassure myself and did 2 diagonal meassures which both read 545, so I went with that. The result was too long spokes. On the second try, I used the KH ERD when calculating spoke lengths. That worked well, but the spokes went all the way into the bottom of the nipples, so even the UDC ERD would have worked. Spoke lengths disc side was: UDC: 254.3, KH: 256.39, mine: 258.39.

Not true!

This time I did some reading after all, and after building a couple of wheels the Sheldon Brown tutorial was easy reading so I followed that. The first time I got dizzy just looking at all the colored spokes, but his explanations really are excellent. Even though it was my third build, I still I managed to get the lacing wrong. I started all over and on the second try I got it right. I supect I did something wrong with the second group of spokes on the first attempt. Note to self: make sure you have enough time available when you lace a wheel.

This time I used a spoke tension meter. Lesson learned from Sheldon Brown: It is the spoke tension on the disc side that matters. The only thing to consider on the none disc side is that the spoke tension should be even. The rim is an old muni rim which has taken some beating, and it was impossible to get it true. It is off both lateral av vertical, but I did the best I could with it.

I had to grind a millimeter or so off the inside of the bearing holder/D-brake to get enough clearence for the rotor bolts.

So, really you’ve built 4 wheels now (you just have 3 to show for it :)).

On ERD:
It can be hard to get a good ERD measurement on a used rim that is as wonky as you describe. The way I measure ERD averages the entire rim in one go, so you don’t need to measure in multiple places. I haven’t ever had to re-order spokes.

Basically I measure the circumference of the rim at the outer edge. Then I divide by PI, to get the diameter. Then I use a depth gauge to measure the relief from the outer edge of the rim to the bottom of the nipple slot (I put a nipple like the one I’m building with in the rim to get the best reading). Then I subtract twice this relief number from the overall diameter to get the ERD. It only takes a couple of minutes and has proven to give consistently reliable results.

Do you use a soft tape measure for getting the outer rim diameter? We have the DT Swiss spoke measuring kit, it’s nice, but it’s not really necessary. You can use two spokes with known lengths directly opposite each other to measure ERD, like it’s shown here:

1 Like

I use a flat metal tape. I recently got a “Pi tape” that reads with the diameter when you measure the circumference, so it eliminates one step.

I have used a few methods for measuring ERD. The opposing spokes is good (like poor mans Wheelsmith ERD rods), but it requires at least a few independent measurements to be averaged (especially with a used rim). By measuring the circumference you get an automatic average of the entire rim.

Sutherlands used to sell an ERD measuring kit that works a lot like what I’m using. The one difference was a very nice wide plastic strap that will go across the width of any rim. I have very small clips that I use when I have a difficult rim. They just hold the tape in place so it doesn’t flop off the edge.

The Pi tape would be nicer if it was metric, but it’s not a big deal to convert from inches to mm’s. Maybe someday I’ll find a metric version though.

I’ll see if I can shoot some pix of my tools/process.

I tried to meassure like in Jener8or’s photo, but I must have screwed up somehow. I don’t have that meassuring device either.

I’m curious about how you did it without calipers.

The photo illustrates one of the biggest flaws in that system. If you look at it you can see that the spokes aren’t in the diameter, but off by one hole. It’s certainly not a big problem because it’s easy enough to be more careful; however, it does add time.

For a personal wheel it could take as long as you want, and there would be no problem. I build wheels professionally, and when I charge $35 to build a wheel it needs to be done quickly, or I’m losing money. Systems that are fast, reliable, and accurate are essential.

I used a ruler. Probably not the best way.

Pix of my ERD process

It took a few days before I could get some pix.

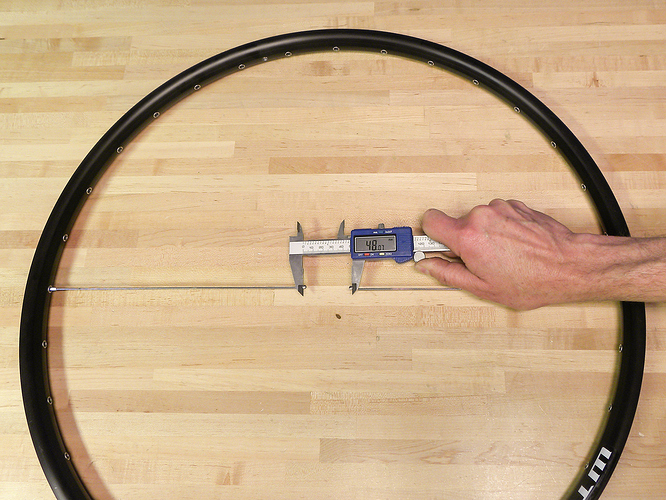
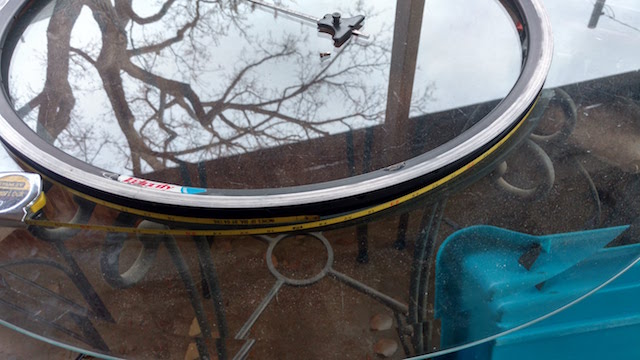
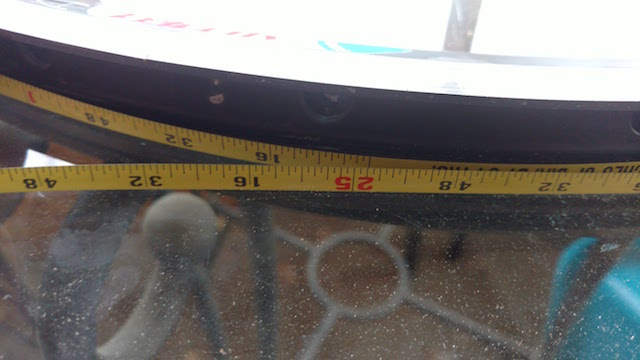
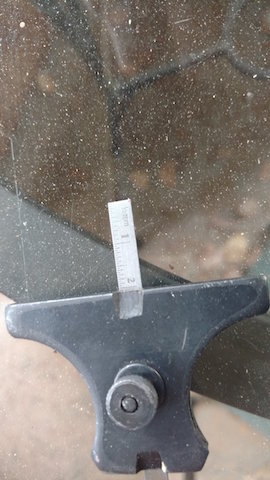
The first two shots are of the diameter reading with the Pi Tape. With the rim on the glass table top I can lay the tape around the rim tightly without having to work very hard at keeping it from dropping into the well of the rim. Some disc rims don’t work well with the table top, and so I have some clips that hold the tape along the edge. It works just as well, but using the table top is much faster if the rim plays along.

It reads 24 15/16", which is 610mm’s.

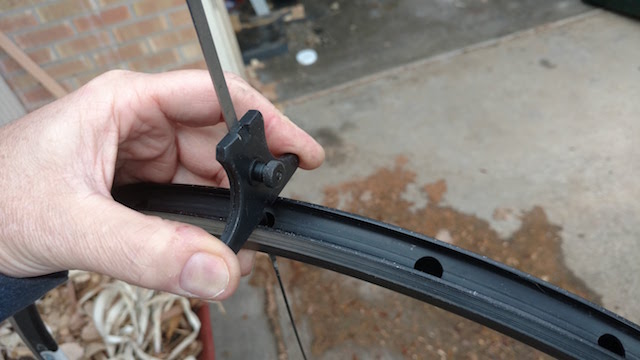
The third and fourth photos show my depth gauge taking a reading from the outside of the rim to the bottom of the nipple slot. In this case I’m using an aluminum DT nipple, and the reading is 20.5mm’s. You need to subtract twice this number from the outside diameter to get the ERD.

610-41=569mm’s, and that’s the ERD.

This system averages the diameter of the entire rim, and takes into account how the nipples you are building with sit in the rim.

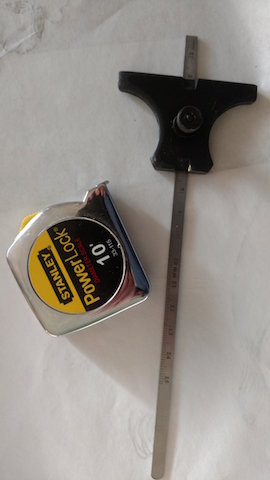
The last photo is the tools:

  1. Depth Gauge, this is a generic one that was $7, and it reads about .2 of a mm short, but otherwise it is good.
  2. Stanley 33-115 PowerLock diameter tape (1/4"x10’), I bought this at a local hardware store for $8. I have found a metric one that is only about $10. I may pick one up just to eliminate the conversion.

tape around rim.jpg

reading the diameter tape.jpg

depth reading to bottom of nipple slot.jpg

IMG_20171229_150621406.jpg

IMG_20171229_153536472.jpg

Should I get new spokes?

A flange on my hub broke for the second time since 2010. The last time the wheel was rebuilt by my LBS, and they reused the spokes. This time I’m going to rebuild the wheel myself. I’ve had to replace a couple of spokes since the wheel was new. I will use a steel Nimbus hub which according to the spokes calculator requires the same length spokes. Shold I get new spokes, or will the old ones be ok?

I would go with new ones if money wasn’t too tight. Spokes very often (most often?) break because of metal fatigue, and putting in fresh ones now while you’re unlacing and re-lacing the wheel gets you a fresh start. You can save a few shekels by reusing them but it’s much easier to replace them now than it will be later.

It’s also a chance to upgrade to a better spoke if you think there’s something to be gained there. (E.g., double-butted spokes are not only lighter but the extra spring from thinner middle part is said to reduce reversing loads at the vulnerable ends where they tend to break over time.)

I had to order new ones because I was mistaken about spoke lengths, but thanks for the adwise anyway.

I’ve finally built my first 36’er wheel, but not without problems. I though it would be a good idea to use threadlock instead of lenseed oil. It was not. Once I had the wheel laced, I could not tighten the nippels because they got stuck. I managed to salvage the spokes, but had to order new nipples. Went back to lenseed oil.

The threads on the spokes were not equally long, which made the initial thightening a bit more difficult.

When I started I couldn’t quite remember how to lace the wheel, so I made some notes that I’ll post her so I’ll find it later. I do it like Sheldon Brown and not like the video I linked to in my initial post. The difference is that I get the trailing spokes running on the inside of the flange, which is supposed to be better/stronger.

36 spokes: 4 groupes of spokes (4 x 9)

The first group

Look at the hub from the RIGHT side.

DISHED WHEEL: If this is a dished wheel with an inboard disc rotor on the left side, the LONGEST spokes goes on this side. Put the shortest spokes away so you don’t mix them.

The first group of spokes goes into the hub from the OUTSIDE of the flange on the RIGHT side of the hub.

Put spokes in every other hole.

THE FIRST SPOKE: Put the first spoke (key spoke) into the rim in the first hole to the RIGHT of the valve stem hole.

OFFSET HOLES: If the holes in the rim are offset, you should choose the first or the second hole to the right of the valve stem hole depending on which one is on the right side of the rim.

Put the rest of the spokes in every fourth hole in the rim.

The second group

Look at the wheel from the LEFT side. Turn the wheel so that the valve hole is at the top of the wheel.

DISHED WHEEL: If this is a dished wheel with an inboard disc rotor on the left side, the SHORTEST spokes goes on this side. Put the longest spokes away so you don’t mix them.

The second group of spokes goes into the hub from the OUTSIDE of the flange on the LEFT side of the hub.

Install one spoke at a time.

THE FIRST SPOKE: The first spoke of the second group (the 10th spoke) should go into the rim just to the LEFT of the key spoke (looking at the wheel from the left side).

OFFSET HOLES: If the holes in the rim are offset, you should put the second spoke in so that there are spokes in the two holes to the left of the valve stem hole.

(When the 10th spoke is installed, the rim should have to spokes next to each other next to the valve stem hole. The key spoke and the 10th spoke must not cross each other)

NEXT 8 SPOKES: Install the other 8 spokes in this group following the same pattern.

The third group

Look at the wheel from the RIGHT side.

DISHED WHEEL: If this is a dished wheel with an inboard disc rotor on the left side, the LONGEST spokes goes on this side. Put the shortest spokes away so you don’t mix them.

TWIST THE HUB: Twist the hub CLOCKWISE så that the spoke next to the valve stem hole is angled away from the valve stem hole.

THE FIRST SPOKE: The first spoke of the second group goes into a random hole on the RIGHT side of the hub from the INSIDE of the flange. This spoke should point in the opposite direktion of the existing spokes. It crosses over to spokes and goes under the third spoke on the same side of the flange. It goes into the rim next to a spoke from the other side of the flange.

The fourth group

Look at the wheel from the LEFT side.

The spokes gos into the wheel following the same pattern as the third group.