At 18-20 mph you don’t need a handlebar to be in trouble in case of UPD ! ![]()
There’s trouble, and then there’s FACE trouble. A definite difference!
muni handlebar
- better brake position
- better brake lever protection,
- better steering
- better grip
- i use the pinky finger for brake and have the same time handle control with four fingers.
and the best!absolute excellent looking:p:p:p


I resisted going with a droopy dick style handle based on aesthetics until it was my only option due to a broken part during the Nepal Uni-tour. Based on that experience I am a convert.
It might look funny, but it’s a very effective design that works extremely well.
On a 36, I guess you’d be going fast enough that all the people screaming and pointing at your “droopy dick” would be left behind pretty quickly.
Yup, I get that a lot. Unless they’re road bikers going in the same direction, it’s over fast.
And I don’t even have one of those handles.
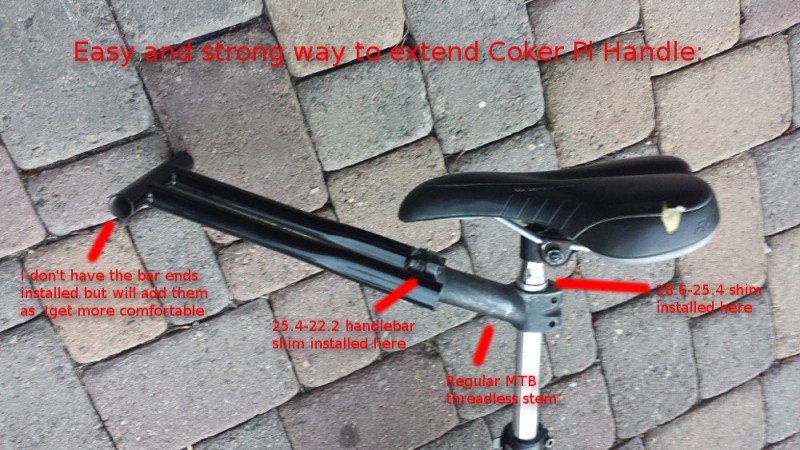
Not a DIY handlebar per se, but I figured out a good way to extend the Coker Pi Bar a couple inches:
I feel pretty good about this because it’s simple, cheap and should be very sturdy, with just one added part to the bar (and technically we remove the seatpost attachment so it’s a net even).
It’s just a MTB stem for a 25.4 handlebar (they come in up to 150mm length, this one I had lying around is around 100) plus a couple of shims. You need a stem with a removable faceplate rather than the ones where the handlebar has to slide in from the side. And the faceplate needs to be relatively skinny, many are too wide to fit onto the Pi Bar.
For the front, you need a 25.4-22.2mm handlebar shim to attach to the Pi Bar (we’re not using the seatpost attachment that comes with the Pi Bar). Unless you find a 22.2mm stem, but those are very rare in longer lengths.
For the rear, if you have a 25.4mm seat post you may be able to find a 1 inch threadless stem and not need a shim. But I used a 1 1/8" threadless stem (the current standard and easier to find), so I needed to shim it as well. 1 1/8" is 28.6mm which helps when searching for the shim.
My original single bar handlebar interfered with a saddle upgrade so I removed most of it and made a double tube handlebar. This one was made out of a scrap of 1/2" EMT (electrical metal conduit). I plugged one end, filled it with water and left out in freezing weather. Once it was froze solid I was able to bend it into shape without it kinking. I just welded it onto my homemade seat post. Seems to work fine. Now I just have to figure out how to ride consistently with two hands on the bar.
My original handlebar:
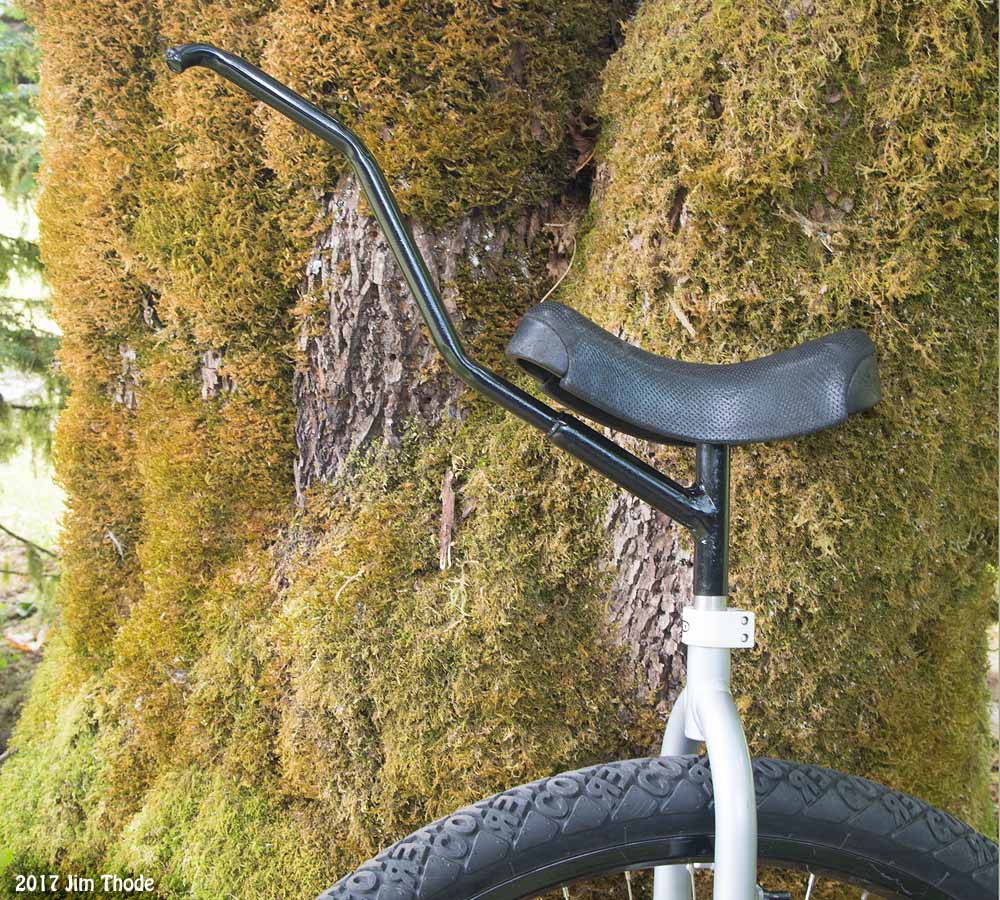
My new handlebar:

Jim
Bending without kinking
Clever idea! (Whether it was yours or not.)
Would filling it with sand also work? No freezing required in that case.
I heard of others filling the tube with sand to keep it form kinking. Even with ice it works better to bend over a rounded object rather then a square object to prevent kinking.
Jim
Jeanbute Osti posted an interesting project that Jakob Flansberry made for him over on the Freewheel Unicycle Chat facebook group and when I saw it I thought it would be a great way to do something I’ve wanted for a long time, having a regularly oriented brake lever for my freewheel unicycle. There are a couple issues I have with my current lever configuration which is the basic standard for mountain unicycling (lever on a mount under the front bumper with no extra handle). The issues are these:
- It's difficult to get absolute leverage
- Long descents are hard on the fingers (muscle-wise and numbness)
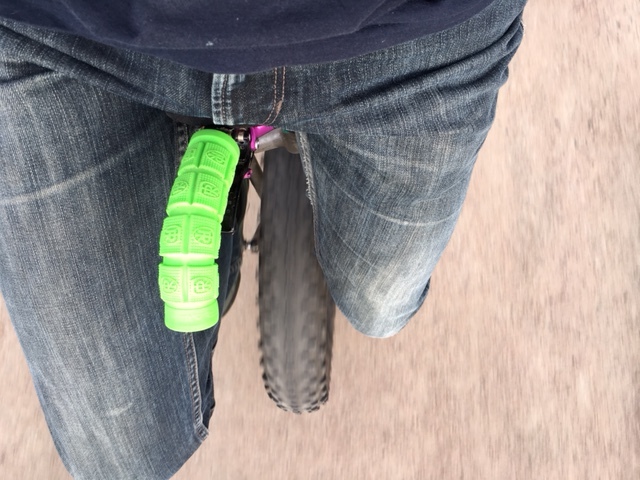
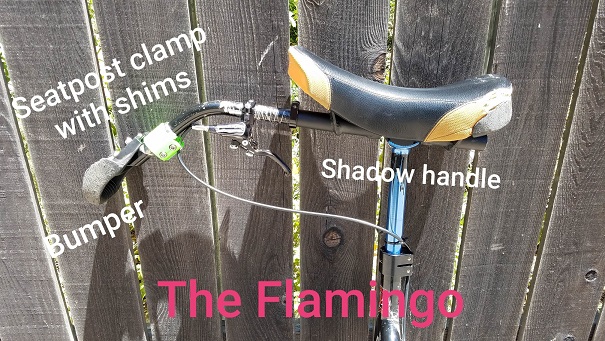
I put together this album of photos for my new configuration which I call the Flamingo:
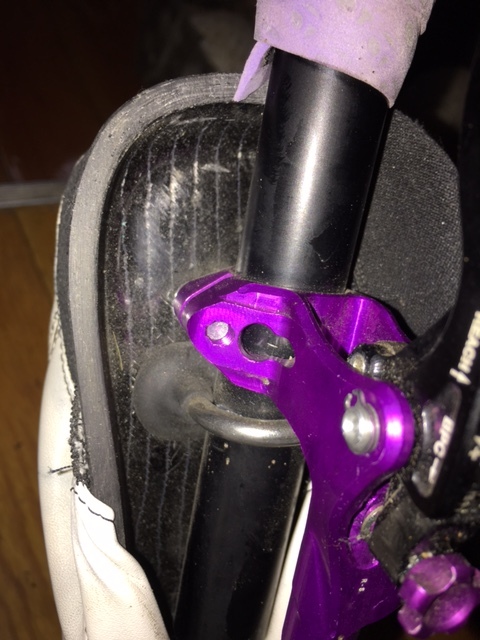
With Jeanbute Osti’s handlebar at the back of my mind I saw one of Corbin’s designs in person on Saturday at http://eastbayjam.com. I liked what Corbin did but it was too wide for my tastes and pulling up on the bar for dirt jumping would result in an odd angle so I modified it by using the Shadow handle I had on my Schumpf and the downturned bar to protect the lever and cable. I cut off the “T” with a hacksaw and added the bumper at the end using a seatpost clamp and shims from my peg unicycle. Both the regular seatpost clamp and the one that holds the bumper on the nose act as cable guides.
I can’t imagine how you hold on that bar grabbing the brake?!? Can you post a photo of it?
I’ll try to get a photo or video today. On the freewheel I like to keep everything close to the core which is why I only used the lever under the front bumper up to now. This puts my hand in a similar position except turned 90 degrees. I’m holding the bar just under the front of the saddle like you would a bike handlebar grip with my thumb pointed forward, two fingers on the lever, and the rest of my hand having a firm grip on the bar. I can pull up with force when necessary when braking or not braking.
If I could get a hold of a 7/8" curved aluminum bar I would use that instead my angled bar + bumper. I just need to protect the lever and brake tube. I could pad the curved part with handlebar tape and run the brake tube along the inside of the aluminum tube. It wouldn’t have to go all the way back to the frame.
Here’s a video of the Flamingo in action.
I still can’t figure out why you’d want to mount the brake lever in reverse as you have done.
What’s the benefit that I’m missing?
I would argue that this is the forward direction and the way most other unicyclists mount the lever on a bar pointing in the direction of forward movement is backwards (unless they point their thumbs to their body to use the lever). This is the orientation I’ve usually seen bicyclists use when they have a handlebar that curves. The benefit is that you can get a good grip on the bar whether you’re braking or not braking. I find it’s much easier to keep two fingers on the lever at all times and then on the rare time that’s not necessary (i.e., a steep incline) I can easily grab the bar with my whole hand. In the opposite orientation I don’t see how you can have two fingers on the lever without pulling the lever down. Also in that orientation how can you pull up on the bar if you’re dirt jumping and still have your hand in a position to brake if necessary when you land? Compared to the under-the-bumper orientation this gives much more leverage and I should be able to go on long descents without tiring my fingers out as much.
P.S. Here’s the latest version of the design: https://www.instagram.com/p/BkVxs_fjTOo/
Ahh, that makes sense.
I’ve never used a single bar setup like that, or used a lever with more than one finger so that’s probably why I don’t quite see how it’d be useful.
Is it primarily for fatigue reasons or power reasons that you use two fingers?
Regarding leverage, I have tended to use two finger levers but I had been thinking that if I run one under the seat again, I’ll probably go to a 4 finger one to get a bit more leverage and reduce fatigue.
I suspect I may find that I need a disk brake with bite point adjustment as well so that the dead zone with the longer lever is not noticeably larger.
For under the saddle I use two fingers for both power and fatigue and can run out of either. In the new setup I could get away with one finger but in order to do that I’d have to have a slightly longer bar and also a longer hose. So I’m making do with two fingers and feel I have sufficient grip on the bar.