19 is a stack of CD’s.
Custom photo’s while you wait!
Per your request ![]() :
:
alright!! thanks!
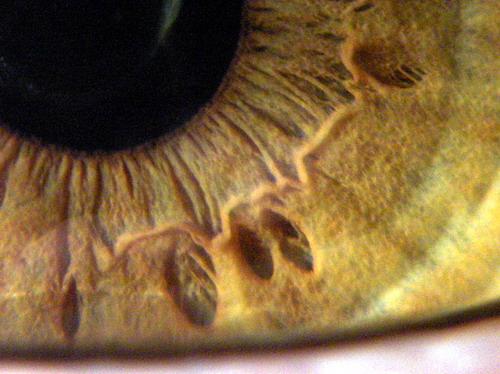
is that a self-eye?
I’ve added 30-some photos to the webpage. Feel free to check them out and leave comments!
I’ve started doing some ice photography and also there’s a couple of fire photos as well.
As a special bonus, more eye photos! 
~Cameron
Those are friggin’ awesome macros! Very well done. I know it takes a lot of patience to get things right, especially if your “bug” doesn’t want to hold still…
So what equipment are you using? This is something photographers seem to always want to list on their sites. The more “consumer” your camera is, the more impressive the results are.
I’m about to receive my first digital non-toy (SLR) camera. Can’t wait to see if the results justify the much higher cost! 
I’m using a digital toy camera. ![]()
Most of my photos on the web page are taken with my brothers HP Photosmart 315 (2.1MP) camera. It is about as point-n-shoot as you can get. As of October I now use a HP Photosmart 817 (5.1MP) It is still considered point-n-shot but has manual focus, aperture and shutter settings.
A couple of the photos where taken with a konica-Minolta dimage z-3 (A more SLR type camera) which was able to use for a couple of weeks during the summer. I also used my brother’s HP Photosmart 707 for a couple of months.
So far I have taken close to 3,000 macro photos with the HP 315 and 1,000 with the HP 707 and currently 2,000 with my HP 817. I had my foot in a cast for a couple of a while during the summer so I had some time to work on my photography.
The cameras don’t have a macro mode that lets me get close enough for my shots so I use a lens out of a rifle scope (attached to the camera with elastic bands) to magnify.
I’m not sure what to say on my site about my equipment. People might think I was joking. ![]()
Cool!
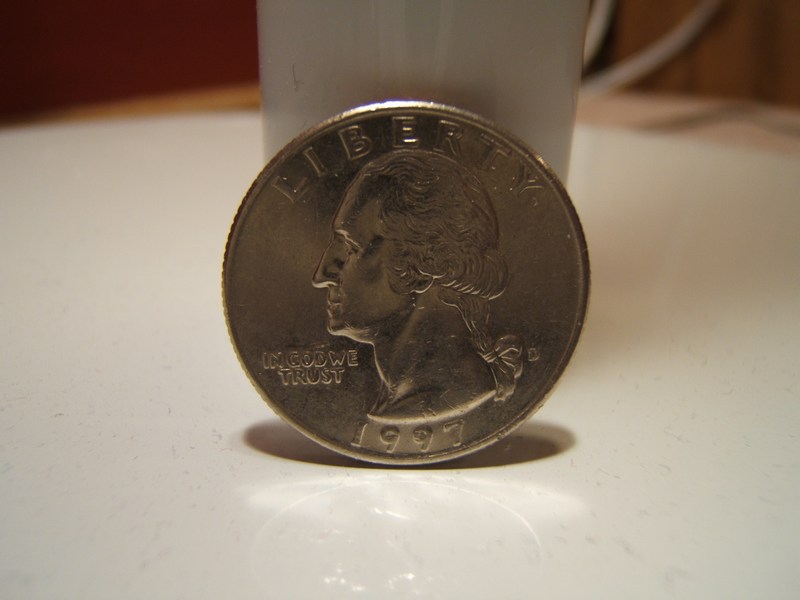
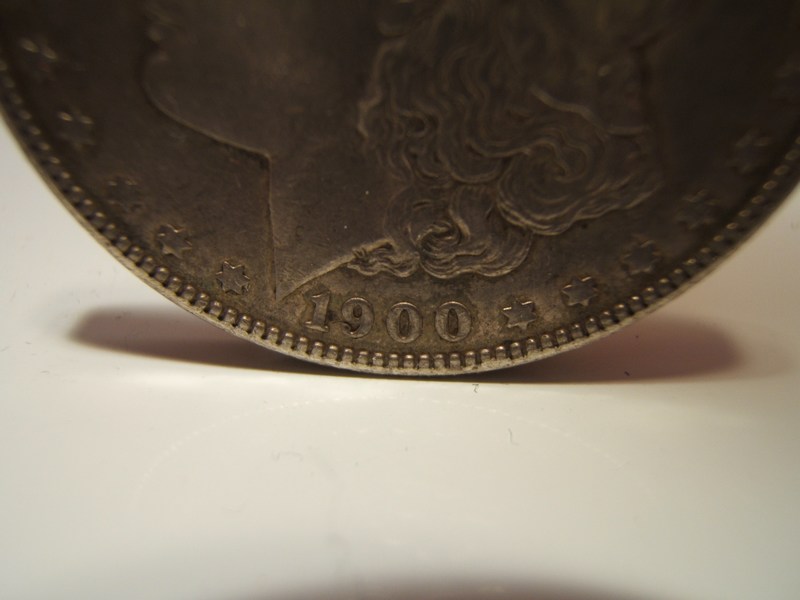
On a previous thread One_on_one showed one lighting setup for photographing a coin, you would try that setup, it works using regular lamps!
[THREAD]38992[/THREAD]
P.S. For me not to mind the thread jacking, post one constructive comment on my macro web page! ![]()
You have shown that it’s not the camera, it’s the photographer. Excellent work. I sent you an IM a few months ago about your work. Not sure if you got it.
Because you are using point and shoot , you should have a photograph on your website showing the equipment that you are using. It would raise a few eyebrows.
I’m sure you’ve gotten the comment, “You must have a very good camera” I would give anything to see peoples faces when they find out that the camera they use is better than the one you use. Only difference is that your photos blow theirs away.
Duane: I’m glad you enjoyed looking over some of my photos. I’ve been doing macro photography for 8 months now. Prior to that I did photomicrography for 2 months in conjunction to a high school biology course.
If you have time to help me more: would you be able to explain how to photograph a subject (a coin etc.) so that the background is perfectly white yet the object is normally lit? I’ve seen some photo’s like that on worth1000.com and I can’t figure out how it is done.
I should have a photo of my equipment up on my web page this afternoon.
So far only one “real” photographer has seen my camera setup, his reaction was truly priceless to watch. He had already seen my photos and then wondered what brand of camera and lenses I used! When I said I used a HP camera he looked surprised and said he didn’t know that HP made a SLR camera. I told him I wasn’t sure about the lenses but I could show it to him. I don’t know whether it was that my lens was 1/2" in diameter or that it was bouncing up and down on a rubber band that disconcerted him. 
For those of you who are interested I have posted some of my photomicrograph’s on my web page. Feel free to check them out and try to identify what you are looking at.
I noticed on another thread that you now have the SLR, have you had time to compare the results yet?
There are a couple of ways of doing this. The easiest is to get a piece of white plexiglas. You light the subject normally from above, and you place a light beneath the plexiglas to illuminate it. You have to be careful to balance the light underneath with the light above. If you have too much light, you will end up with lens flare. Not enough and the background won’t be pure white.
The other way is using a roll of white paper and a broad source of illumination above to illuminate the whole background paper. Then you’ll use a second light source, or reflectors to light your subject. If you own a light meter, you can take readings of the paper and know before you snap the photo if it is going to be white, flaring or gray.
To make a broad light source, I built a frame out of 3/4" PVC and got a piece of white ripstop or other white nylon. Sew 1" wide elastic at the corners and attach it to the frame. Place a light behind it and you have a broad source of illumination, much like window light.
That’s terrific!![]()
Thank you so much!
Your first suggestion looked like it would suit my lighting equipment the best. (two desk lamps:D ) I found a frosted glass globe light-shade that works for small objects.
I can play with the aperture and exposure on my camera so after a lot of hit and miss I got close to the right lighting and contrast, so I the background was hotspot white and the subject wasn’t washed out. I basically have a 60w light bulb under the white glass and a halogen lamp as side lighting for the subject. So far my results have been rather mediocre, critique welcome! ![]()
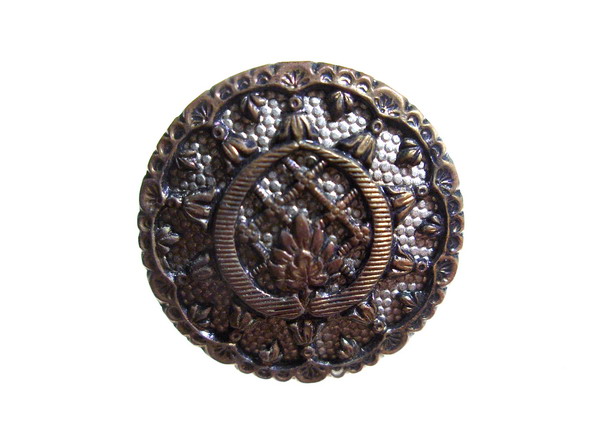
I put a few more of the photos up on my web page, but here’s a photo taken using that technique (the image is resized to .29mp):
I’d say that you succeded in what you were trying to do. I like the way that you gathered up basic household items to create your lighting set up.
You were able to get a nice clean white background without any flare at the edges of your subject. The next thing that you should try is to increase the intensity of the main light or decrease the intensity of the background light to see what effect it has on your image. I’ve found the easiest way to do that with incandescent lights is to connect a dimmer switch up to the light. That allows you to dial in the exact intensity that you want. The only downside is that your light will tend to get warmer (Color Temperature) as you lower the intensity.
UNIquely, I poked around your macros today…really like 'em! Didn’t look at them all carefully enough to go voting for a favourite though. But I wanted to tell you they are inspiring photos and extremely well done.
I dare to dabble in macro now and then myself. Having seen your pix and reading this thread has motivated me to take more pix and try to improve my skillz.
Just for the heck of it, here’s a couple of recent macro’s of mine.
hummm, no show?
Let me try that again.
Ah I see, they are too big…humm, too bad, macro looks so good at a large size.
ok, well I’ll resize them and try again…
I’m trying to fund a digital SLR camera by selling some copies of my photos on Eb*y
The auction ends tomorrow, still no bids.
This auction is a test, it if sell, I’ll probably list a bunch of them.
Any ideas how to make them sell?
Frame it, maybe.
A older film SLR camera came my way a couple of weeks ago! I’m able to borrow it for a few months. So far I’ve only taken one roll of film. I ended up buy ISO 800 because macros always take a lot more light then regular photos. It turned out that I was shooting 1/500s and a 1/1000s at f/11 with window lighting. With the high ISO I can notice the grain in some of the photos but it isn’t too detracting.
I used the standard 55mm lens in reverse, just holding it up to the body. Shooting that way a 35mm long subject filled about half the frame. I also tried a few shots holding the lens three inches away from the camera body; like that the 35mm long subject was about 1.5x the size of the film. I think modern macro ratio is based on a 4x6 print: a one to one ratio would be a 1” subject appearing 1” long on a standard 4x6 print. If so; a reversed 50mm lens gives a magnification of 2.5x, at 3” away it would have a magnification of roughly 8x. Those at 8x didn’t turn out the best because I only used regular paper as an extension tube between the lens and the camera body, it turns out that white paper isn’t very light inhibiting! A few I also trying holding my largest magnify lens up in front of the normal camera lens, those turned out alright as well at about 6x.
I took some digital photos of the prints and put them on my webpage, if you have time to check them out: www.camerondonaldson.com They are under “Film SLR”
Critiques welcome!
I’ve always liked closeup photography. I have a zoom lens with a ‘macro’ focus setting, but have never used a macro-specific lens. I’ve used those little filter-style magnifiers quite a bit; probably not the ideal thing optically, but a good cheap way to get at least some close-focus capability. Back in high school I was always going around with the whole set of three stacked up on the front of my lens. Many of the insects and spiders and things in your albums are close relatives of things in mine, some probably the same species even. Your work is more polished than mine though. Good stuff there.