JC Coker Handle (revision Beta 3)

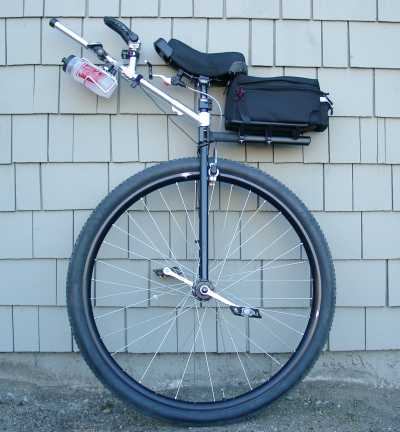
I have made some more modifications to my Coker handle. It’s now up to what I’m calling revision Beta 3. I first described my handle in the thread JC Coker Handle (revision Beta 2). Read my post in the “JC Coker Handle (revision Beta 2)” thread for the background on the handle design. The big changes since Beta 2 are the rear rack and a longer boom.

I’ll attach a picture of the setup to this post, and I’ve also got more pictures in my Miscellaneous Stuff gallery.

My goal with this setup was to have a way to carry my water and my gear on the unicycle rather than carrying it all in a hydration pack on my back. I want to be able to go on a reasonable length Coker ride without carrying a hydration pack. Right now I only have a single water bottle mounted. My plan is to have two water bottles on the boom. I just haven’t figured out the best way to do that yet. I have some ideas for that and I’ll try them out this week.

The boom is a 2 foot length of 1-1/8 inch (28.6 mm) aluminum tubing. I wasn’t planning on having the boom that long. I was planning on cutting it shorter. But with the water bottle mounted where it is, the extra long boom protects the water bottle and cage in the event the unicycle takes a nose dive.

The boom is now fit in the stoker stem with a 1.2 mm seatpost shim. The seatpost shim works much better than the Coke can shim I was using in revision Beta 2.

The water bottle is mounted on the boom using a Minoura BH-95 bottle cage holder. It works well and can clamp to any tube from 22.2 mm to 28.6 mm. I have a second Minoura water bottle mount and I’m just trying to figure out how and where to put it.

The big modification for this round was the rear rack. The rack is an Axiom Journey seatpost rack. $20 at Alfred E. Bike. In addition to being only $20, it has a big flat area on the mounting clamp so it can be easily cut and welded so it sticks out at 90 degrees. It was $30 at a local welding shop to have the clamp cut off and welded back on at a 90 degree angle. There is a picture in my gallery showing the clamp and the new weld. It was quite a search to find a rack that could be easily modified to stick out at 90 degrees. Most racks have a more complicated clamp on the seatpost and would require a more complicated weld to modify.

The only complaint I have with the rack is that it uses four bolts to attach the clamp on the seatpost. It takes some fiddling to completely remove the rack from the unicycle. It’s definitely not a quick release. But the rack does have an interesting quick release on the rack platform. You can remove the rack platform by undoing two quick release clamps. That still leaves the rear boom on the unicycle, but the bulk of the rack platform is gone.

The rear bag is a Top Trunk Bag by Delta Cycle Corporation. It’s a fairly small bag for a trunk bag. Most trunk bags use large size as a selling feature. I was looking for one that was smaller and narrower. The Delta bag works well for me, but may still be a bit too tall for shorter riders. I have seen some trunk bags that are smaller and shorter, but I couldn’t find any in the stores, or online. The Delta bag works just fine for me.

On my first ride with the trunk bag I did a little experiment to see how the unicycle would behave with a lot of weight in the trunk bag. I stuffed it with two extra water bottles, more tools than I would ever need on the road, a spare Coker tube, a bike lock, and more. All that weight in the rear bag made the Coker handle poorly. Precision maneuvering was more difficult. Sharp turns were more difficult because the extra weight made it more difficult to initiate the turn and more difficult to pull out of the turn. Steep climbs are also more difficult with the extra weight in the rear bag. The extra weight on back made the unicycle want to fall backwards when I stood up on the pedals. The extra weight also made it so the unicycle didn’t flow through the dead spot of the pedal stroke so it was more difficult to keep the unicycle going up the hill. On the flats the extra weight wasn’t too much bother. The lesson learned is that for hilly rides I need to make sure the rear bag is not stuffed with too much weight. Typically what I’ve been putting in the rear bag is just a minimal set of tools, camera, some energy bars, maybe a bike lock, and maybe a wind breaker or other extra layer of clothing. Keep the weight down and it works great.

All in all, I like the setup. All the bulky parts are easily removable so I can turn it in to a basically normal looking Coker fairly easily. When I take the Coker for a single track trail ride I’ll remove the front handle and boom and remove the rear rack. I still want to play around with hand position on the front handle. Maybe some sort of modified aerobar instead of the two bar ends. I’ll see. There is very likely going to be a revision Beta 4 in the future as I play with more ideas.

jc_coker_handle_b3_1_small.jpg

Nice work JC,

One question, when you fall (if you fall) do you ever get tangled in all that stuff? It seems like it might be a liability to have the front and rear boom.

I was thinking about making some sort of post mounted touring handle for my 26er. There’s a chance I’ll follow that type of setup.

Daniel

Nice work, John. You guys with long legs have a lot of room to work with.

As far as the weight goes, I’m guessing that if you did some more rides with more weight, you’d get used to it. However, balancing weight fore and aft might be a good strategy.

It’s not likley that you’ll get tangled in the handle or the extension for road riding. I have had a bunch of falls and it hasn’t been a problem. When you UPD the unicycle will fall and you’ll end up going right over the handle and the extension. I haven’t been concerned about getting tangled up in the stuff. However, I would not do muni style riding with the handle extension. There would be too much risk of getting tangled in the stuff. That’s one reason why I made the handle so it’s easily removable.

It is important to plug up all holes in the tubing and make sure there are no sharp edges. I have handlebar plugs and other plugs on all of the open ends of the tubes. All edges are smooth. Sharp edges and unplugged tubes could cause injury if a fall goes badly.

Long legs are an advantage. The GB4 frame is also very nice in that the neck is rather long and has room for both the handlebar mount and the rear rack.

I don’t know how well I could get used to the extra weight for climbing. The unicyle did not want to go up the hill. It was fighting me. It was harder than it should have been to turn the pedals over and keep the unicycle moving. For rides with a lot of climbing my strategy is going to be to put the weight in a hydration pack rather than putting the weight on the unicycle. It’s easier to deal with the weight when it’s on your back in a hydration pack. When you’re wearing the weight it’s not affecting the handling of the unicycle.

I am envious of your setup. I would like to modify (redo) my Wyganowski handle in a similar way. Right now it has a basic “T” bar at the back, which I have difficulty getting a backpack to bungy to so I can bring my change of clothes to work. A proper rack will be great.

I’m aware of the weight issue, and can feel a definite difference in the overall ride when there’s something on there. This doesn’t have much effect on handling for a commute-type ride, but you can feel the difference. Taking the weight off the rider always makes sense.

I suppose the objective with the rack situation is to get the weight as far forward as possible. This means keeping the pack narrow, at least at the front, so it doesn’t interfere with leg movement.

I think I will have mine all custom made rather than using a manufactured rack, since it’ll probably cost the same (or less) in the end, plus it can all be one piece with the front part.

Out front, I want my handle to be much, much lower. I’m seeking a more bike-like position to improve on the aerodynamics. This takes getting used to and is more risky at speed, but is okay for straight riding on paved roads.

Big handles definitely don’t help on rough terrain. I did my first proper trail ride the other day, switching out my 125s for 150s. My first cycle-dropping dismount of the ride chewed up my front handlebars (just the plastic caps). I’ll have to turn those around next time!

So far, I’m not impressed with the Coker for riding trails that go up and down. The wheel is just too heavy to be lugging around! For flatter rides it’s probably great though. I’m preparing for the 24 Hours of Adrenaline. Until my new 29er arrives, I’ll keep playing with the Coker though…

Ultimately what I’d like to do with my Coker is combine the handlebar and rack system into a frame to support it all. This would probably have a bicycle seat at the top, a handle right in front of the seat for leverage, and one or two other handle locations for both aero and comfort cruising. The aero handle should be removeable for trails.

The hard part about all that will be designing something flexible, in the idea that riders of various sizes might want something similar.

Yes, it’s a clinical condition known as Handle Envy. :stuck_out_tongue:

See the link below. The setting was Monday night at my house. John and I had just finished the quick assembly of my new GB4 36, and I couldn’t have been a prouder new owner. Was thinkin’ I was Bad with my big 'ol custom handle with space enough for computer, brake, bell, and headlight. So John has to haul out the heavy artillery. I turned green with envy. My GB just blushed a deep red.

http://gallery.unicyclist.com/GB4-36-custom/IMG_0623

I don’t want to catch you calling my Coker “Mr. Happy” again. :angry:

You will loose your handle envy when you see me flub up more mounts because of the pack on the back. It is more difficult to mount with that pack on the back. When I first put the rack on I couldn’t mount the unicycle. The rack was in the way. I’m more used to it now, but it’s still more tricky than without the rack and trunk bag.

I do a rolling mount to get on the Coker. I take two steps and then jump up on to the pedals. With the rack I have to take smaller steps because my legs will hit the rack or bag if I take larger steps. Then I have to be more bow-legged as I jump up.

My success rate is getting better. But every once and a while I’ll flub up several mounts in a row.

John, I like what you’ve come up with on your own.

If you’d like to have 2 bottle cages w/one mount, then look at the Profile Design.

http://www.tri-zone.com/Catalog/BigFlatwingWeb.html

I had mine mounted on the front of the Wyganowski. The plastic cages brake after the first UPD though, but were easily replaced with steel cages that only bend.

Rick Hunter just finished a Coker ext which I asked him to build for my new H36 w/Stockton wheel. I haven’t picked it up yet, so no pictures are available. The new ext will be adjustable from the seatpost out (telescoping) and on the vertical hand grip. This should accommodate different body types and preferrences.

More on this later.