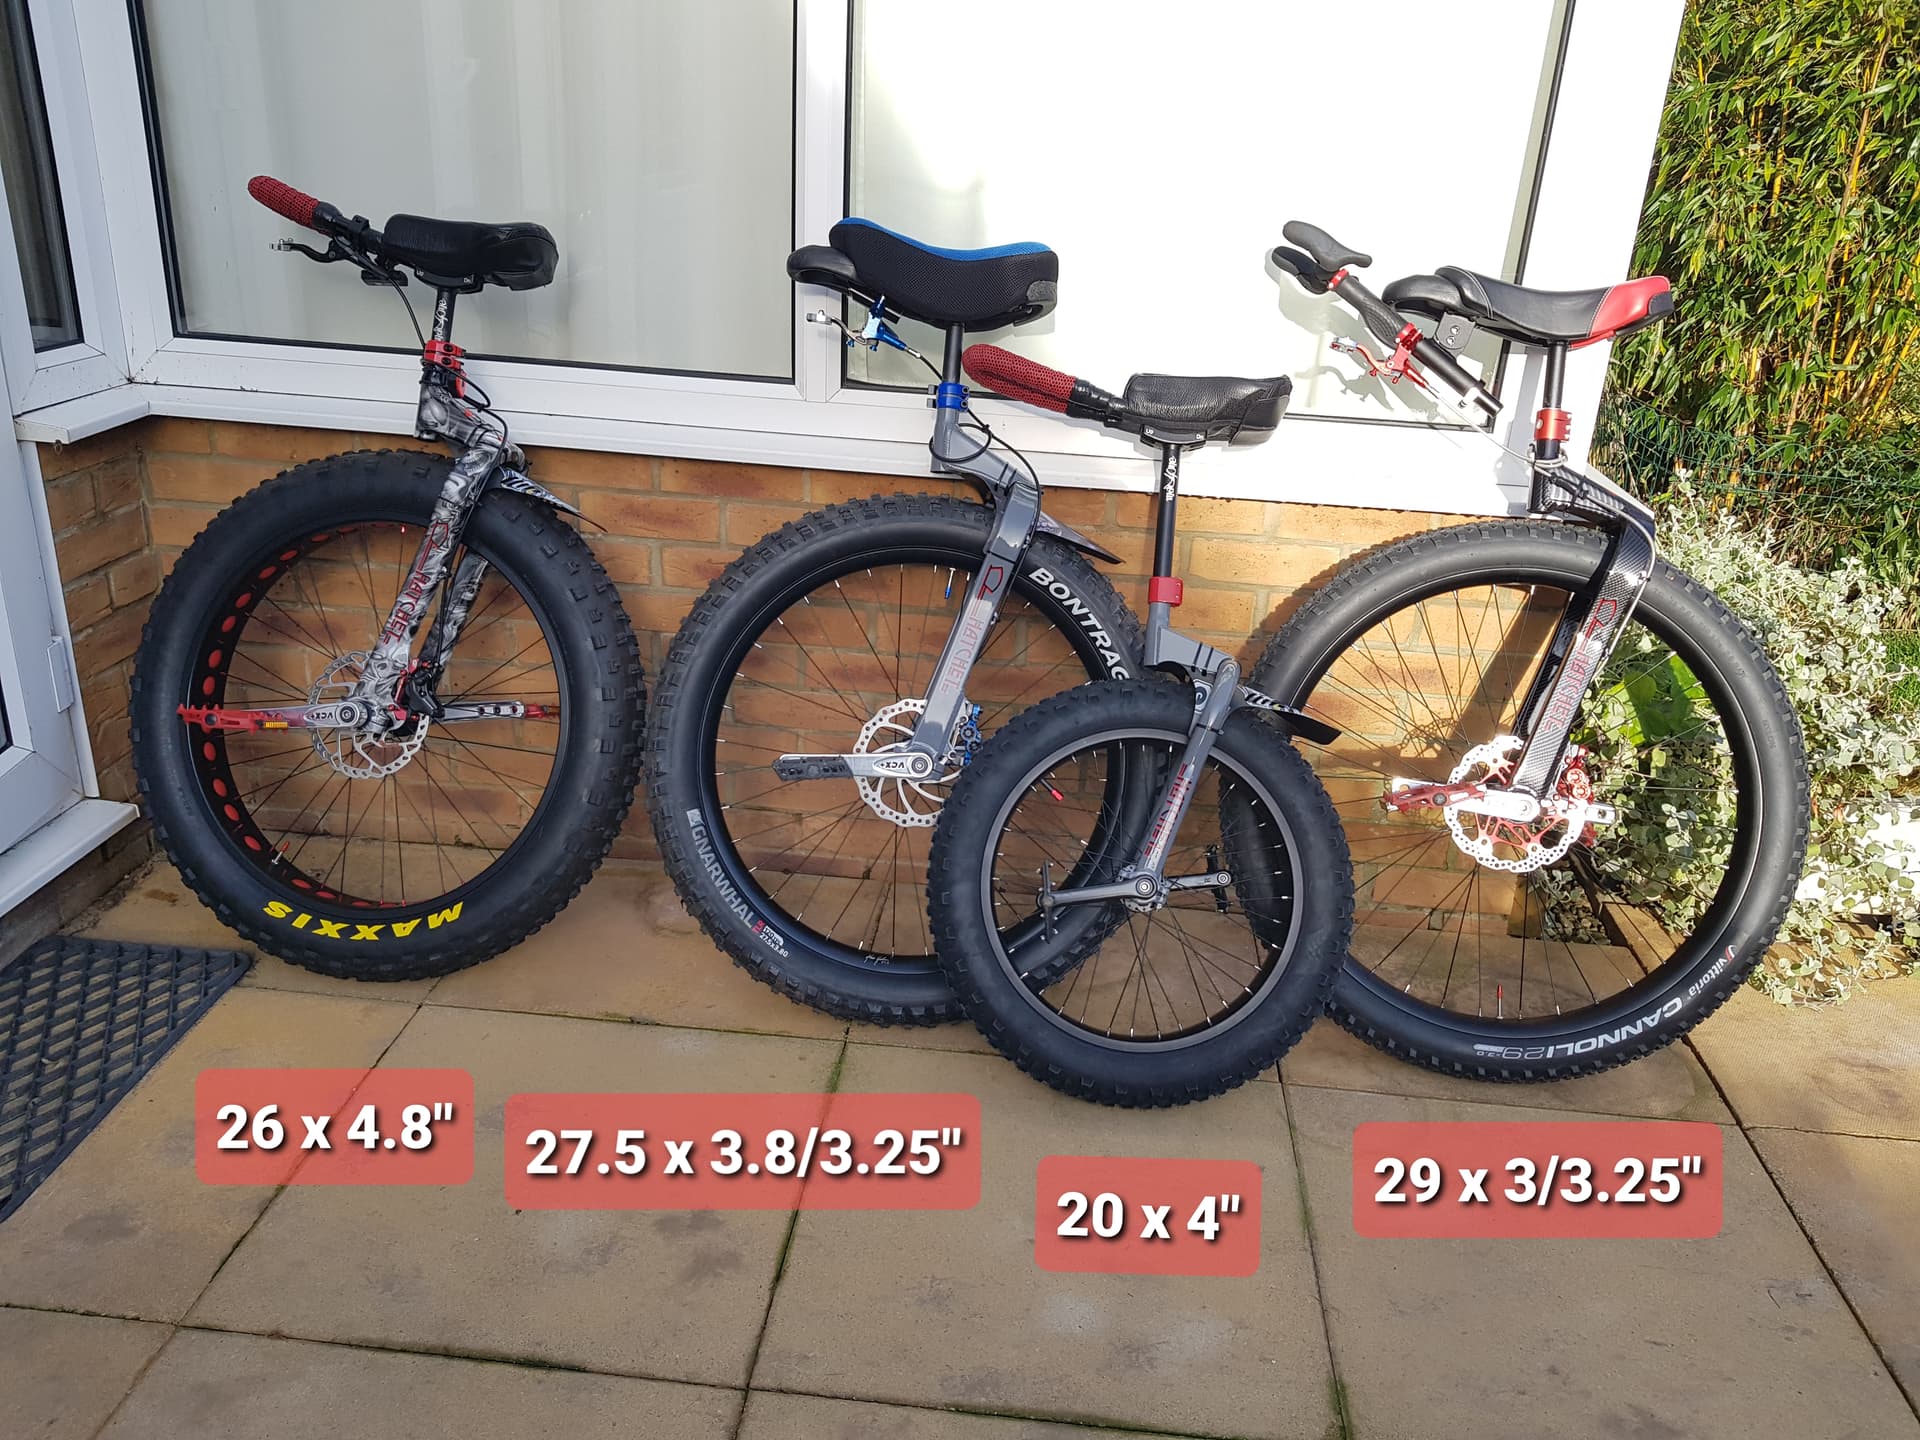
Hello, I thought I would share my rather unique set of Hatchets, each a different wheel build, hydro dip paint job. Each a blend of Nimbus, Mad4One, Kris Holm, Hope, parts, to give my my personal best Hatchet build.
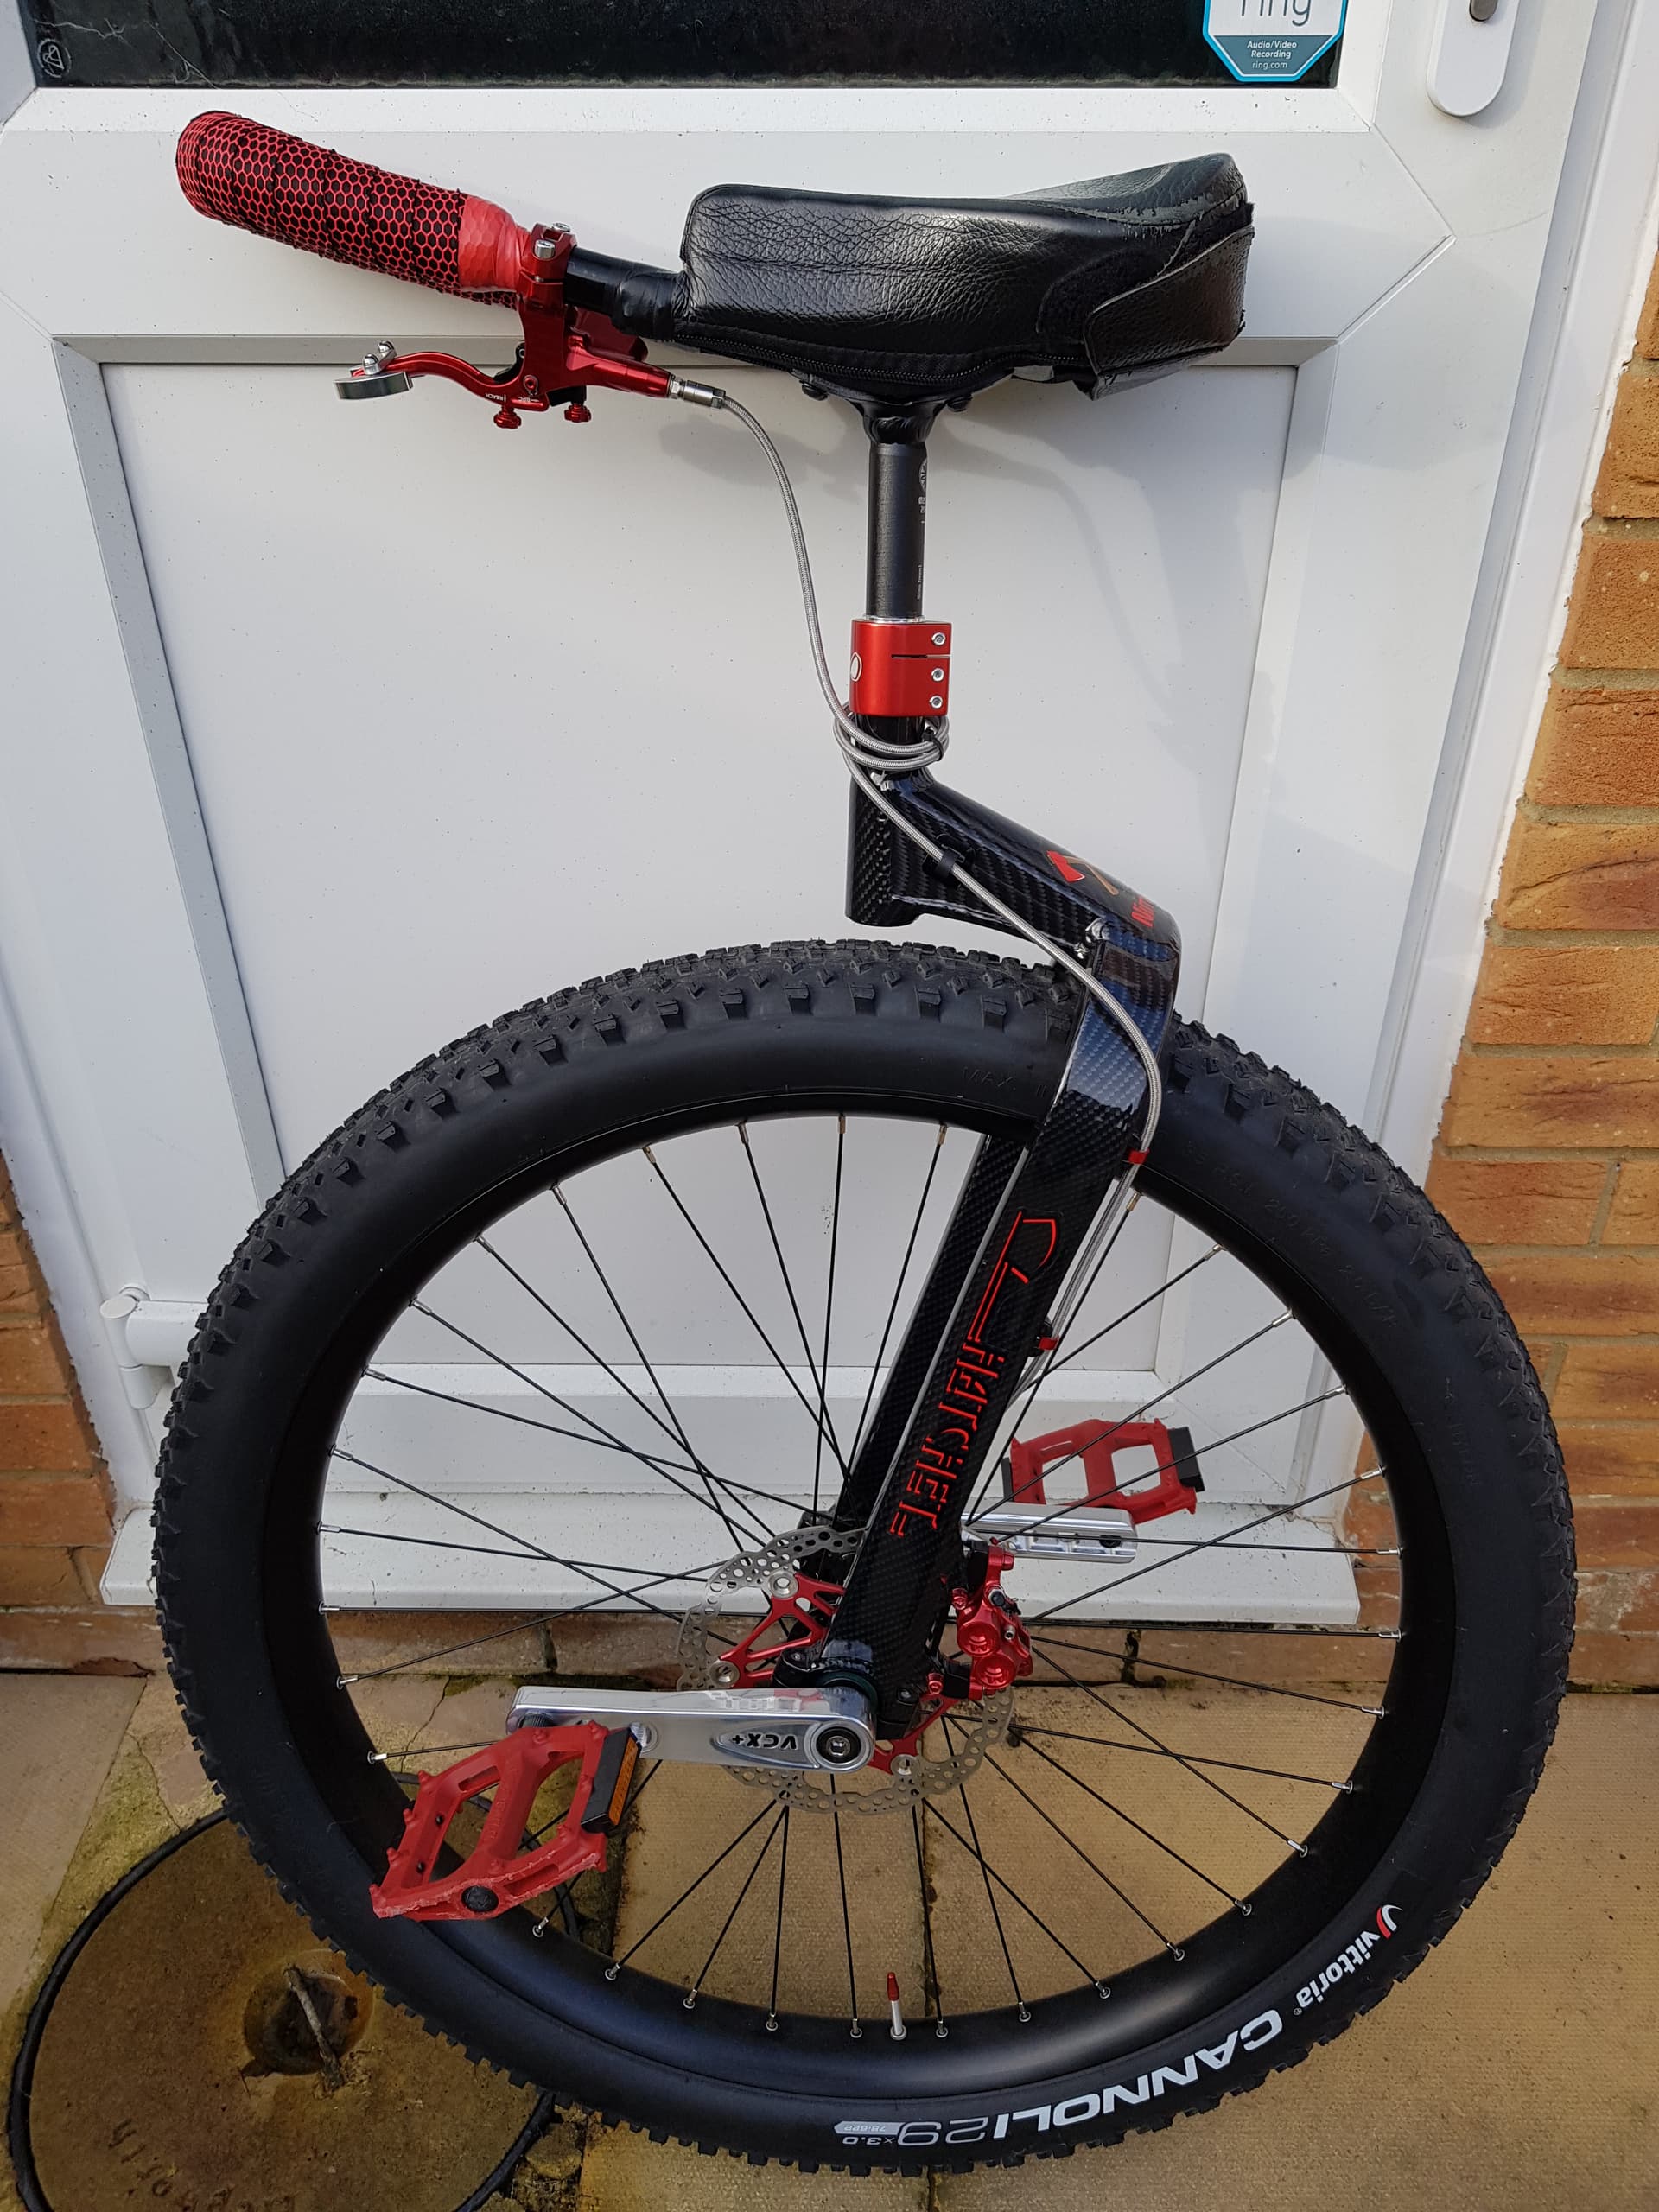
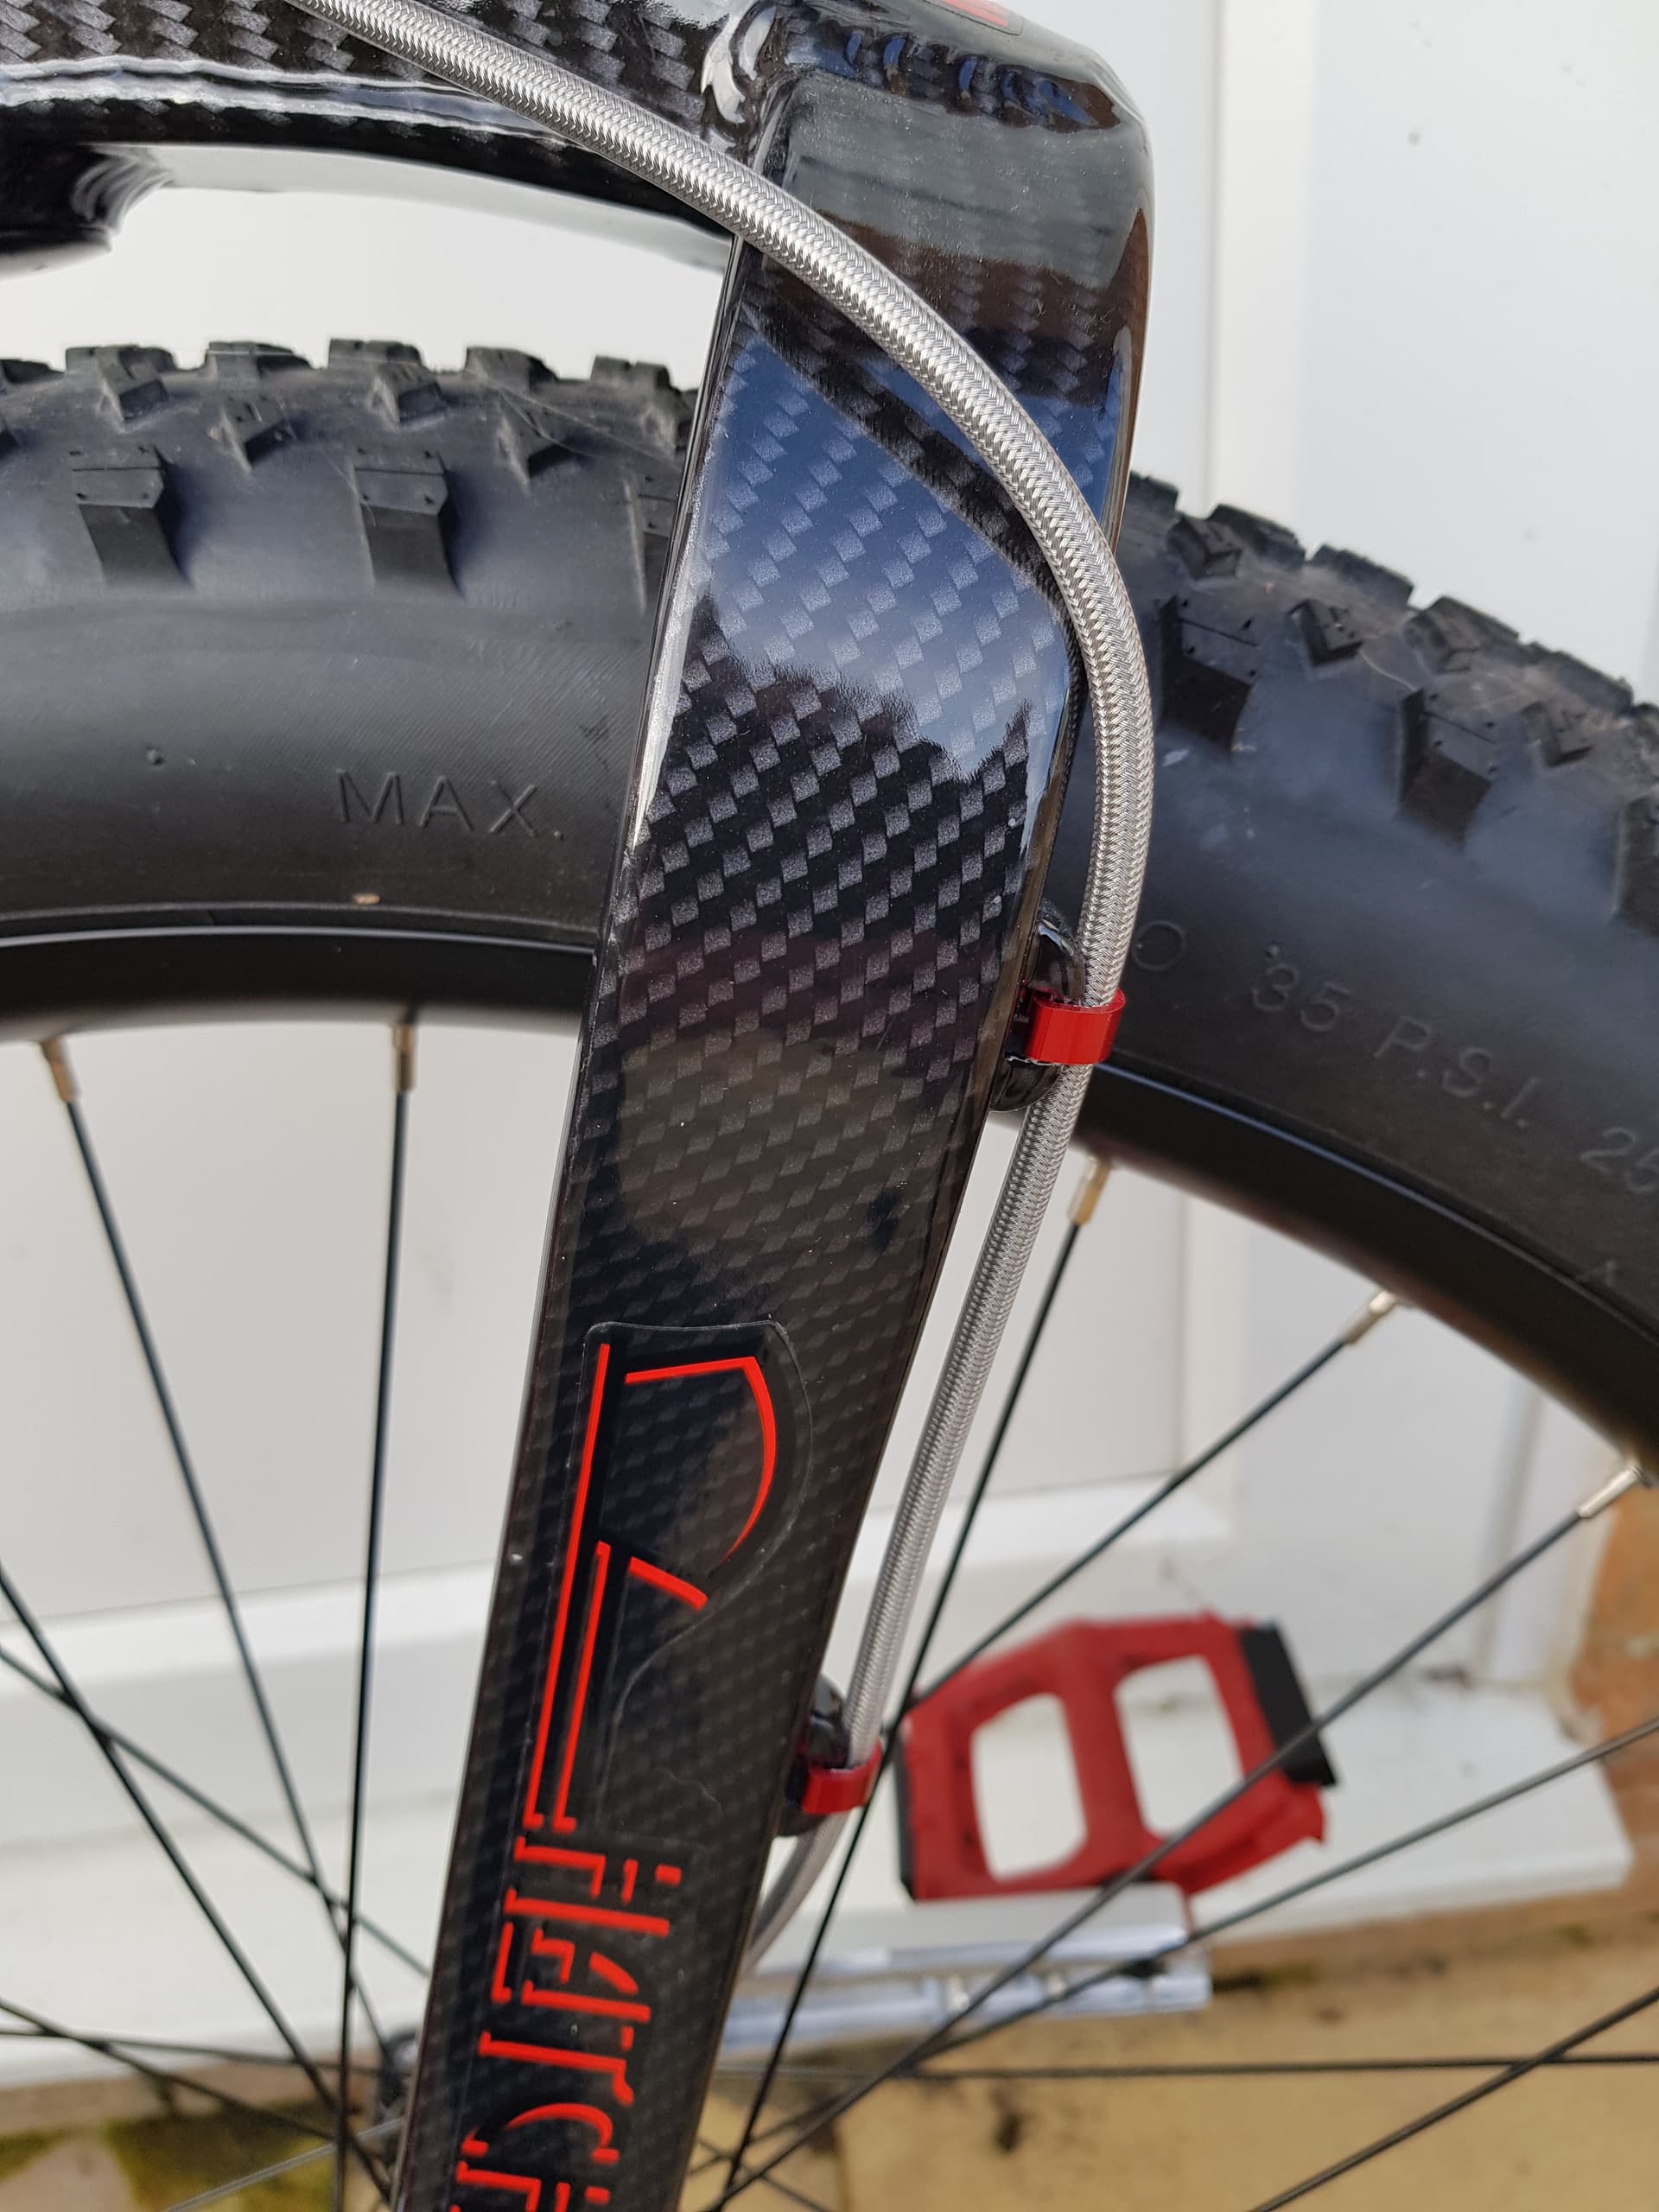
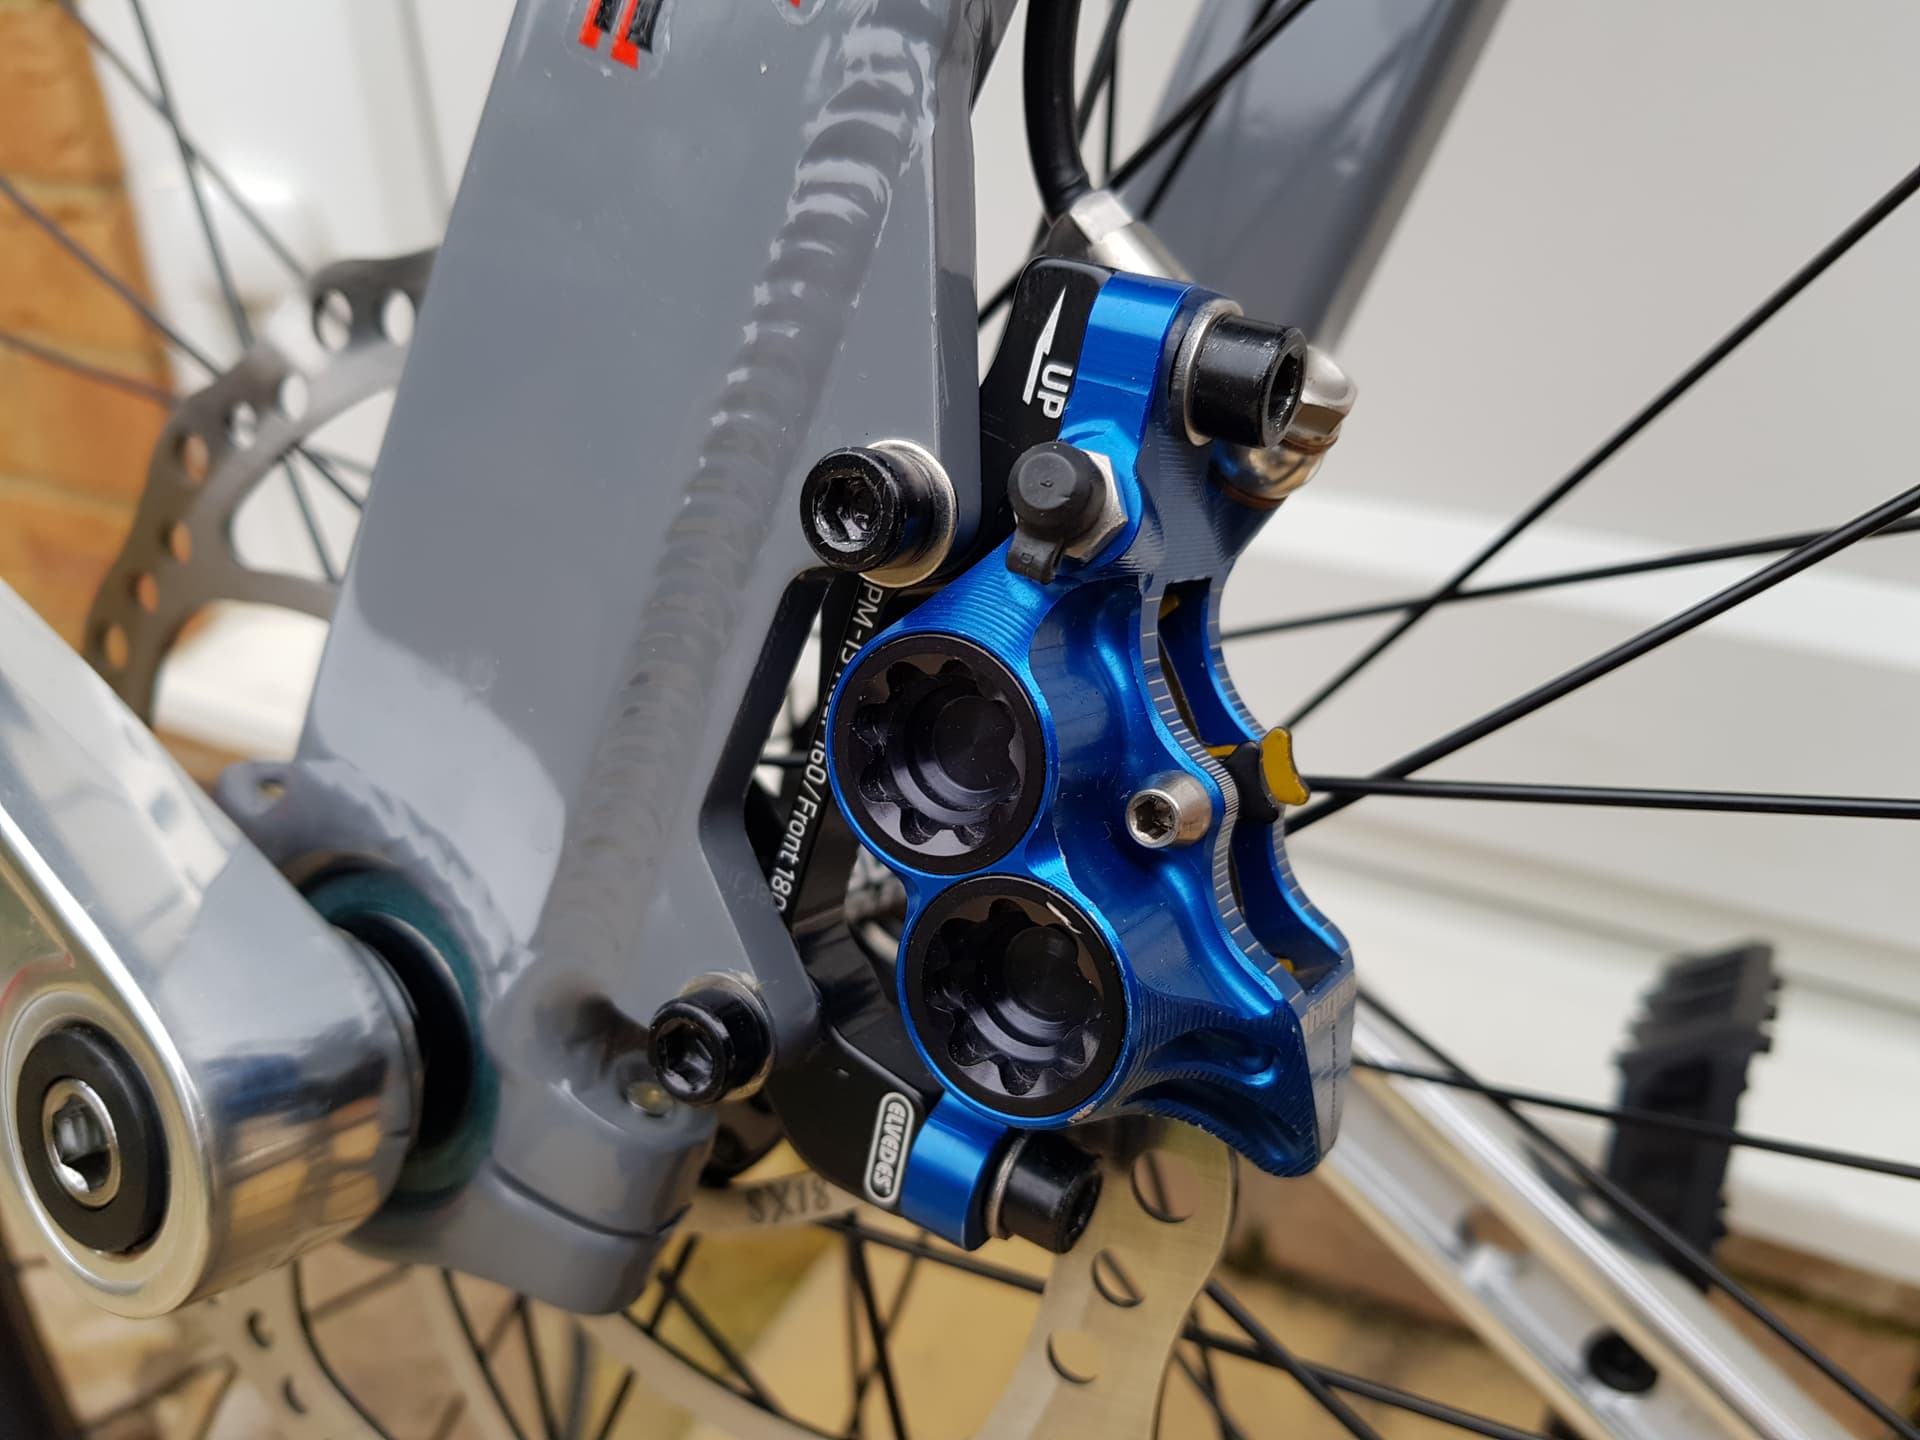
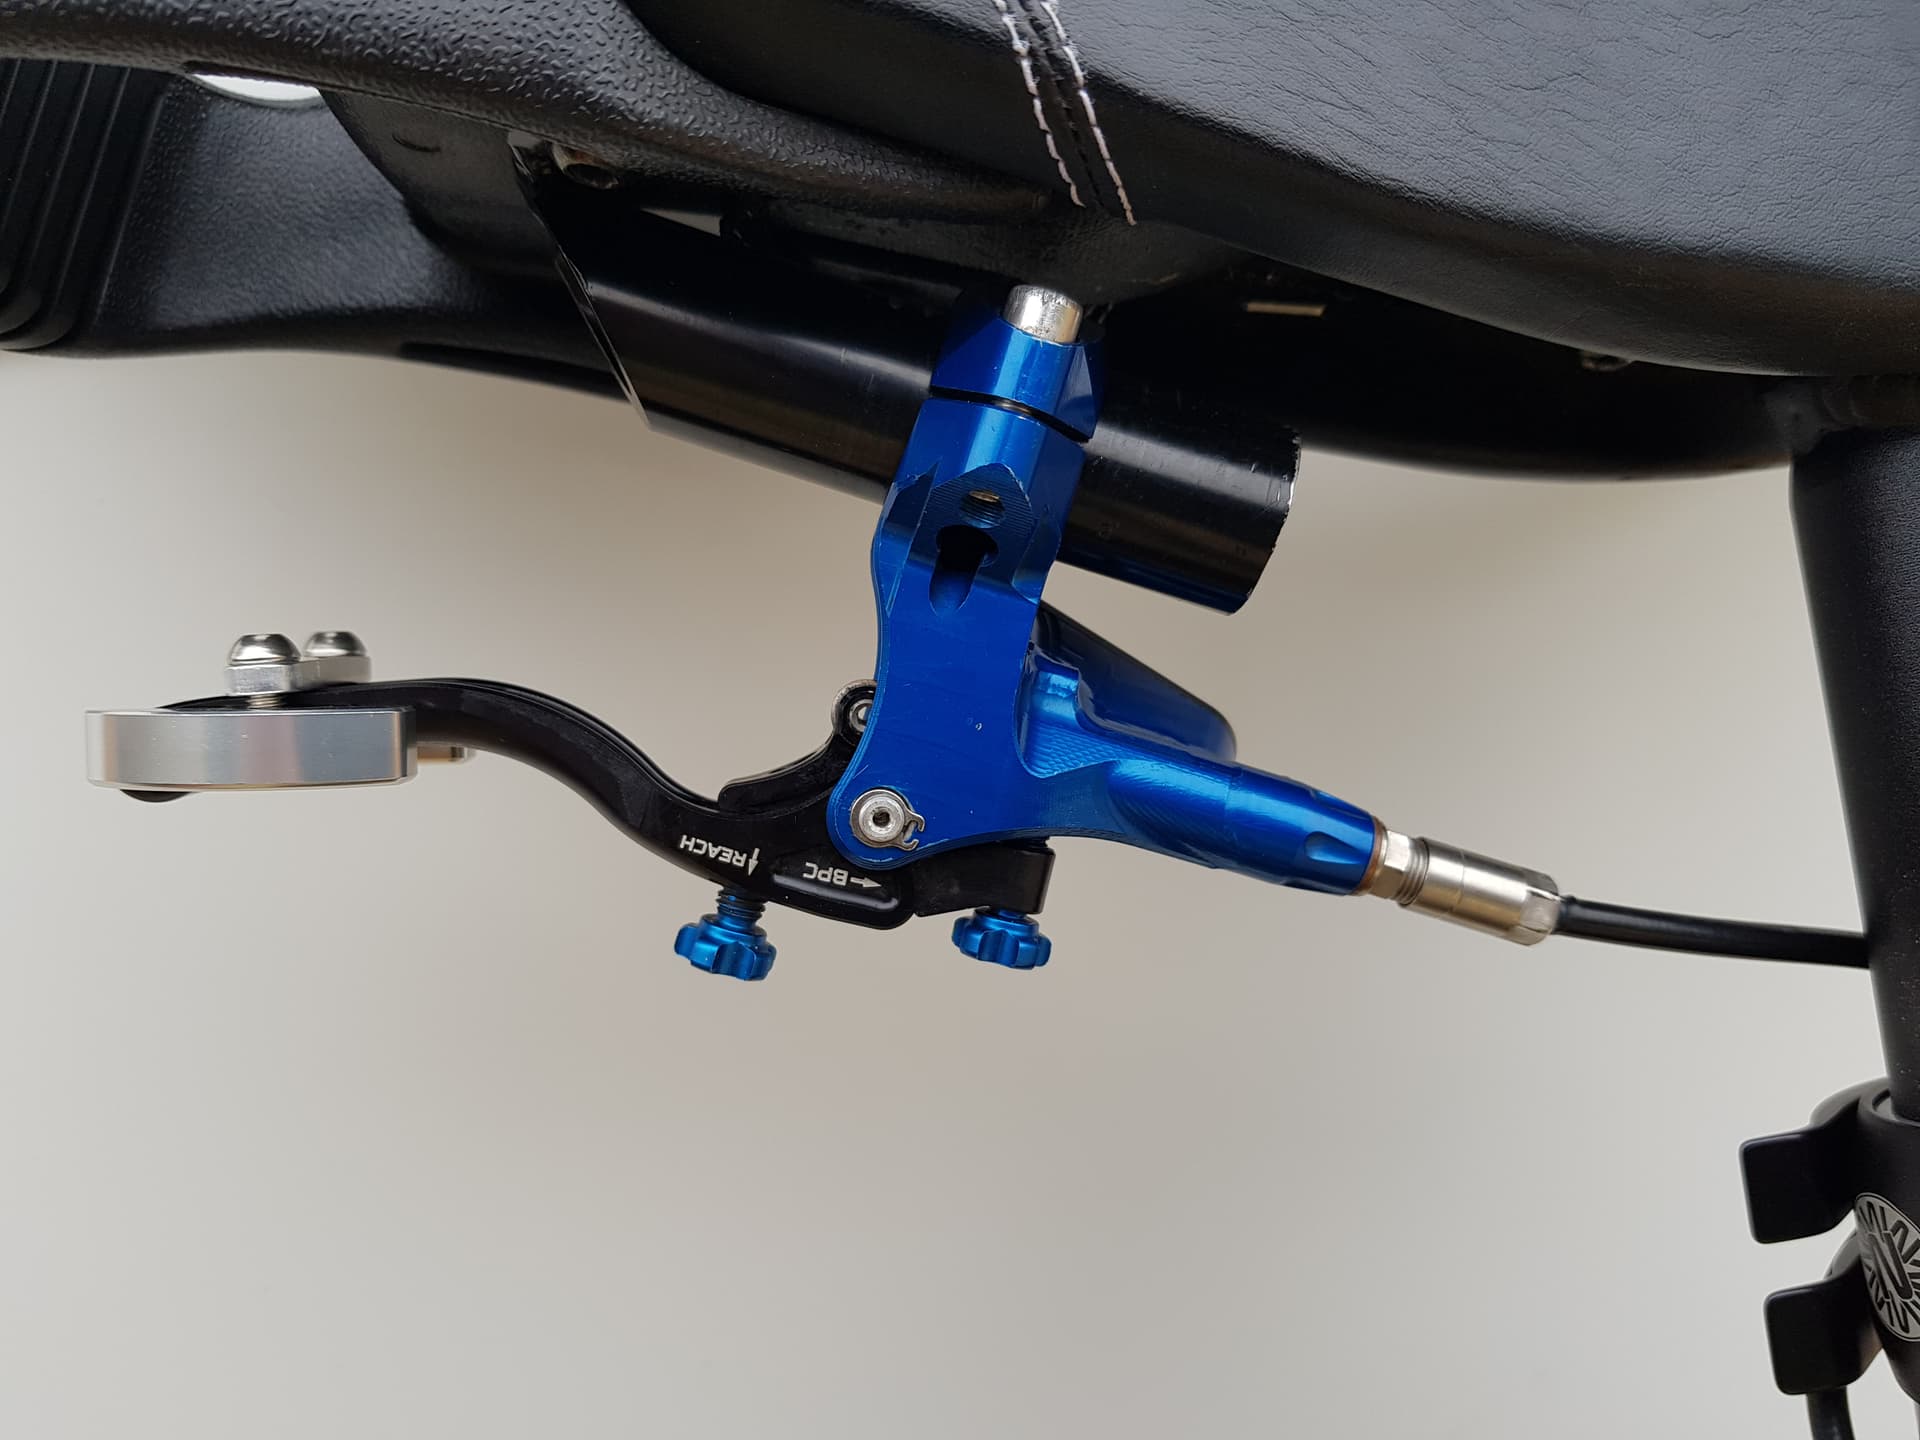
No 1, my first 2 tyre options, 29x3" or 29x 3.25" Carbon fibre hydro dip paint job, M4O handle Saddle, Hope Tech3 E4 4 pot brake set up with Hope 180mm Floating rotor. Kris Holm Star Fighter brake button.
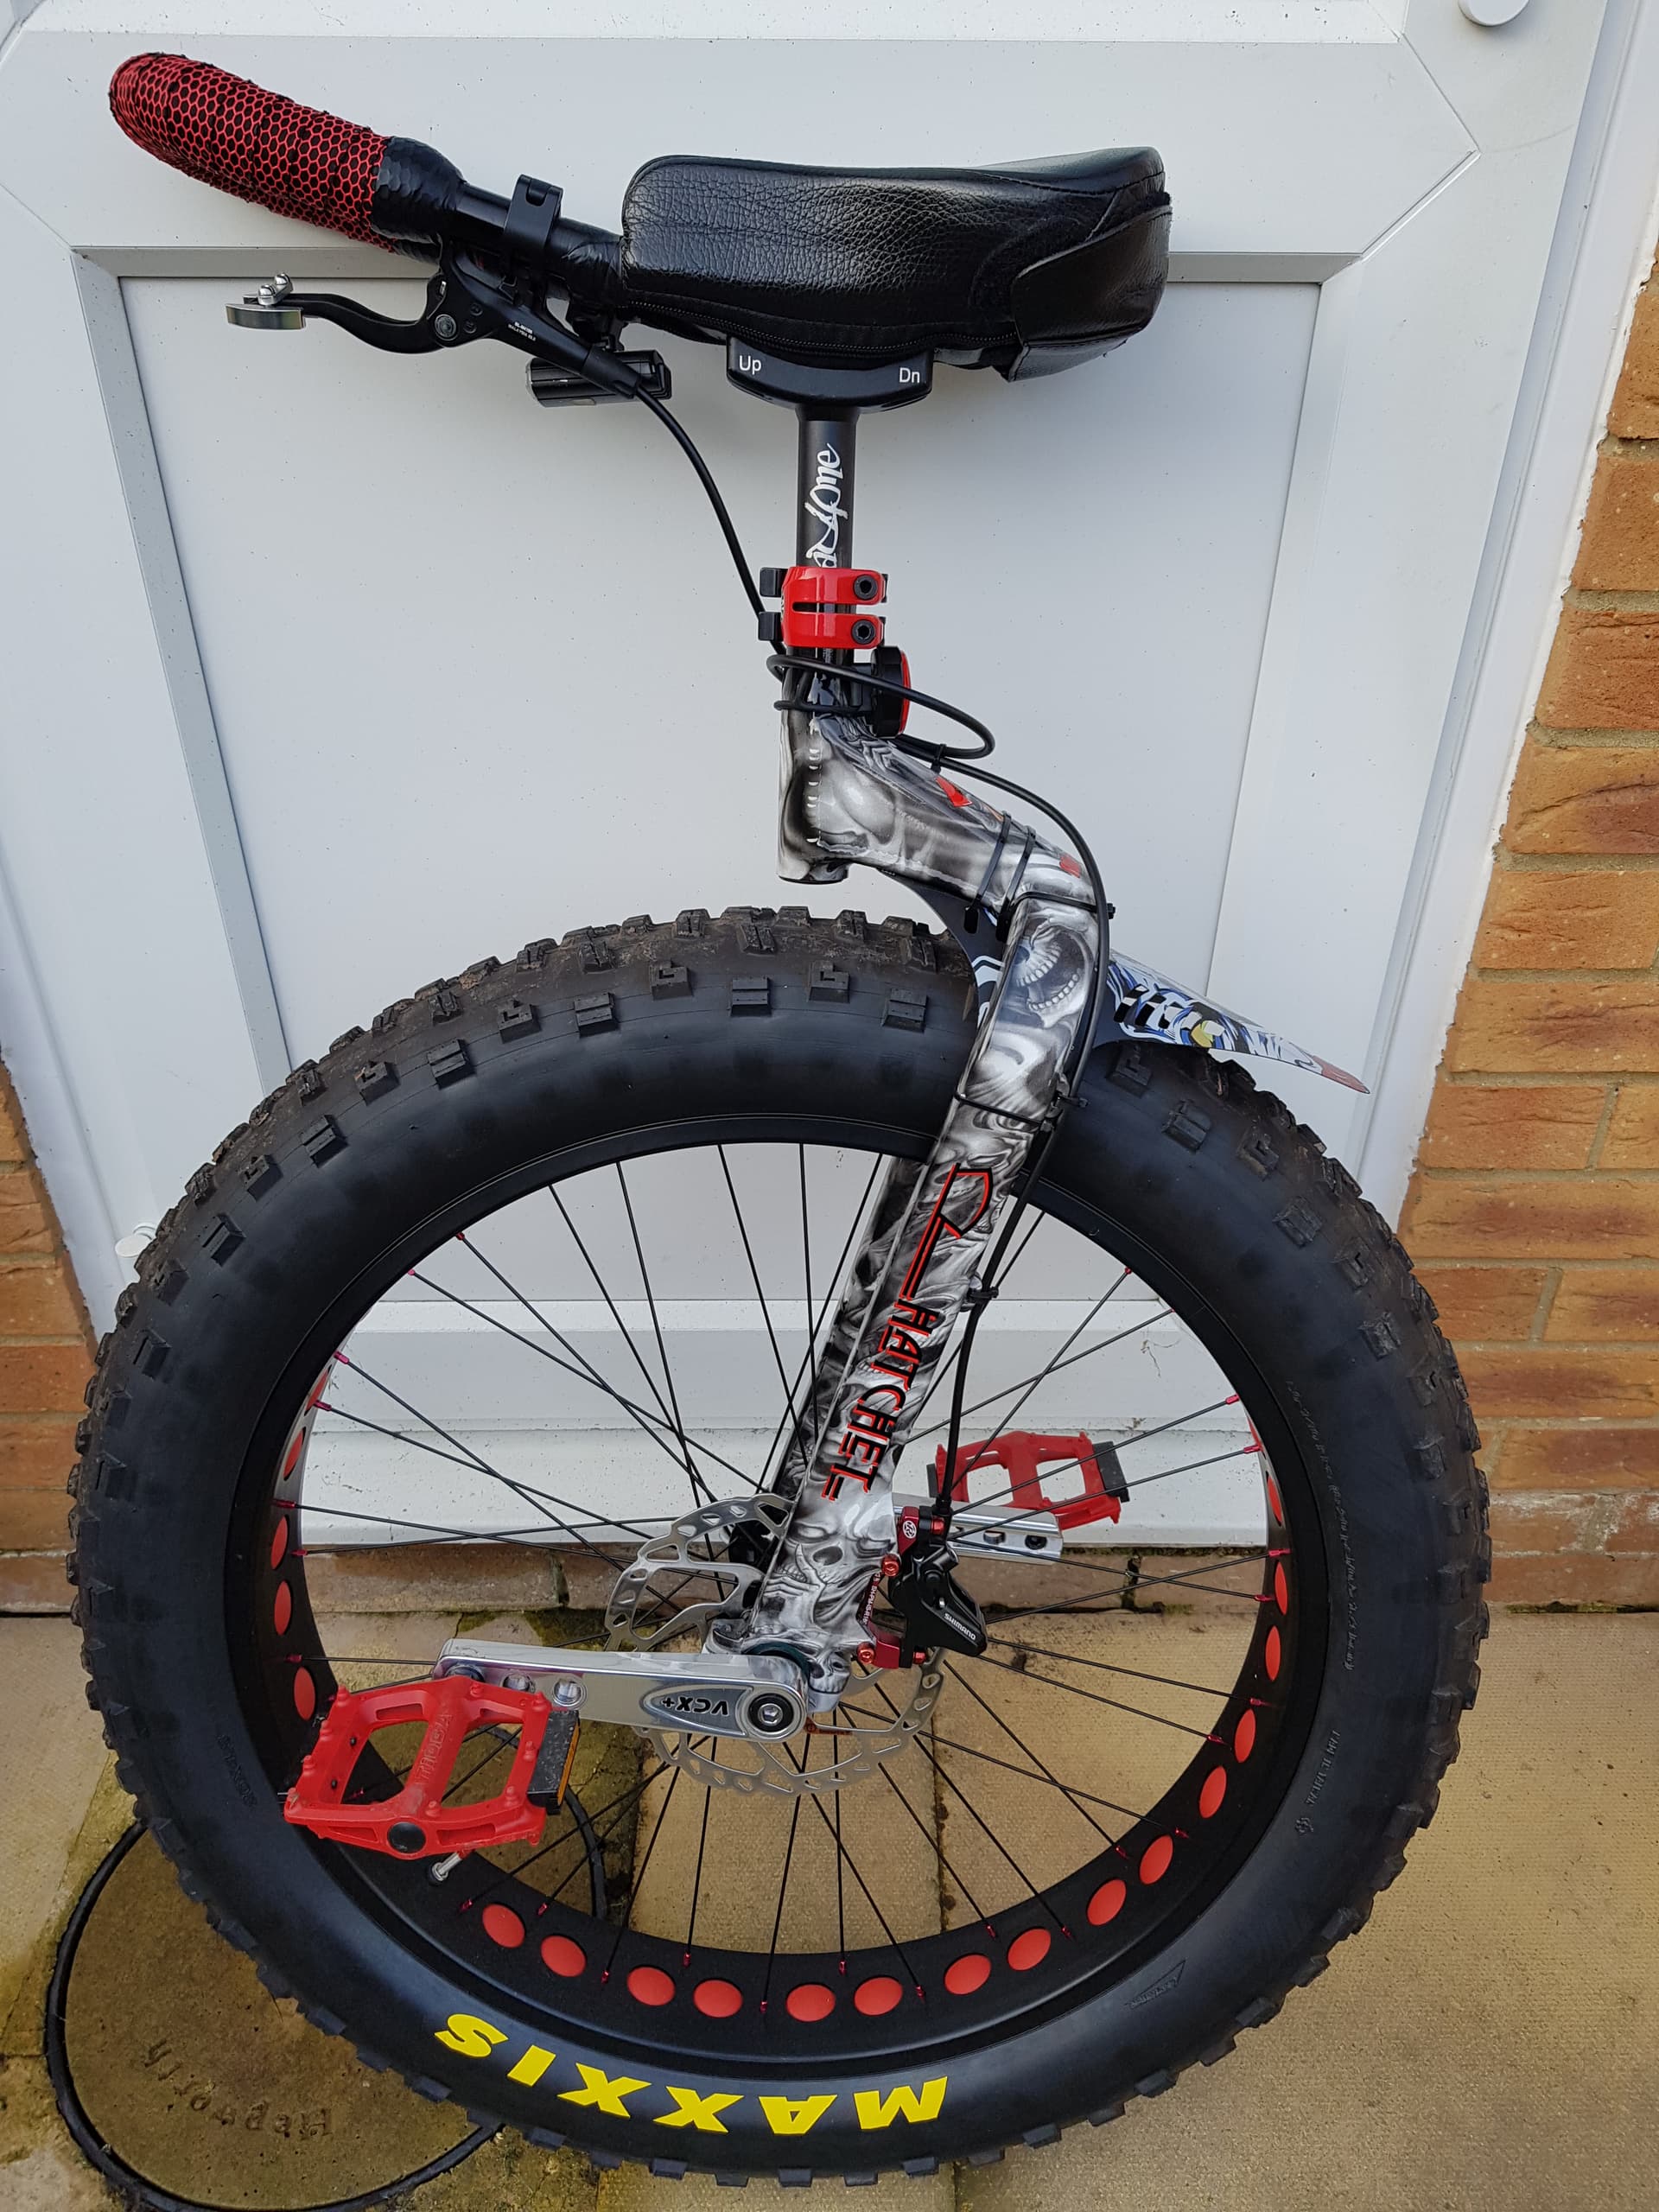
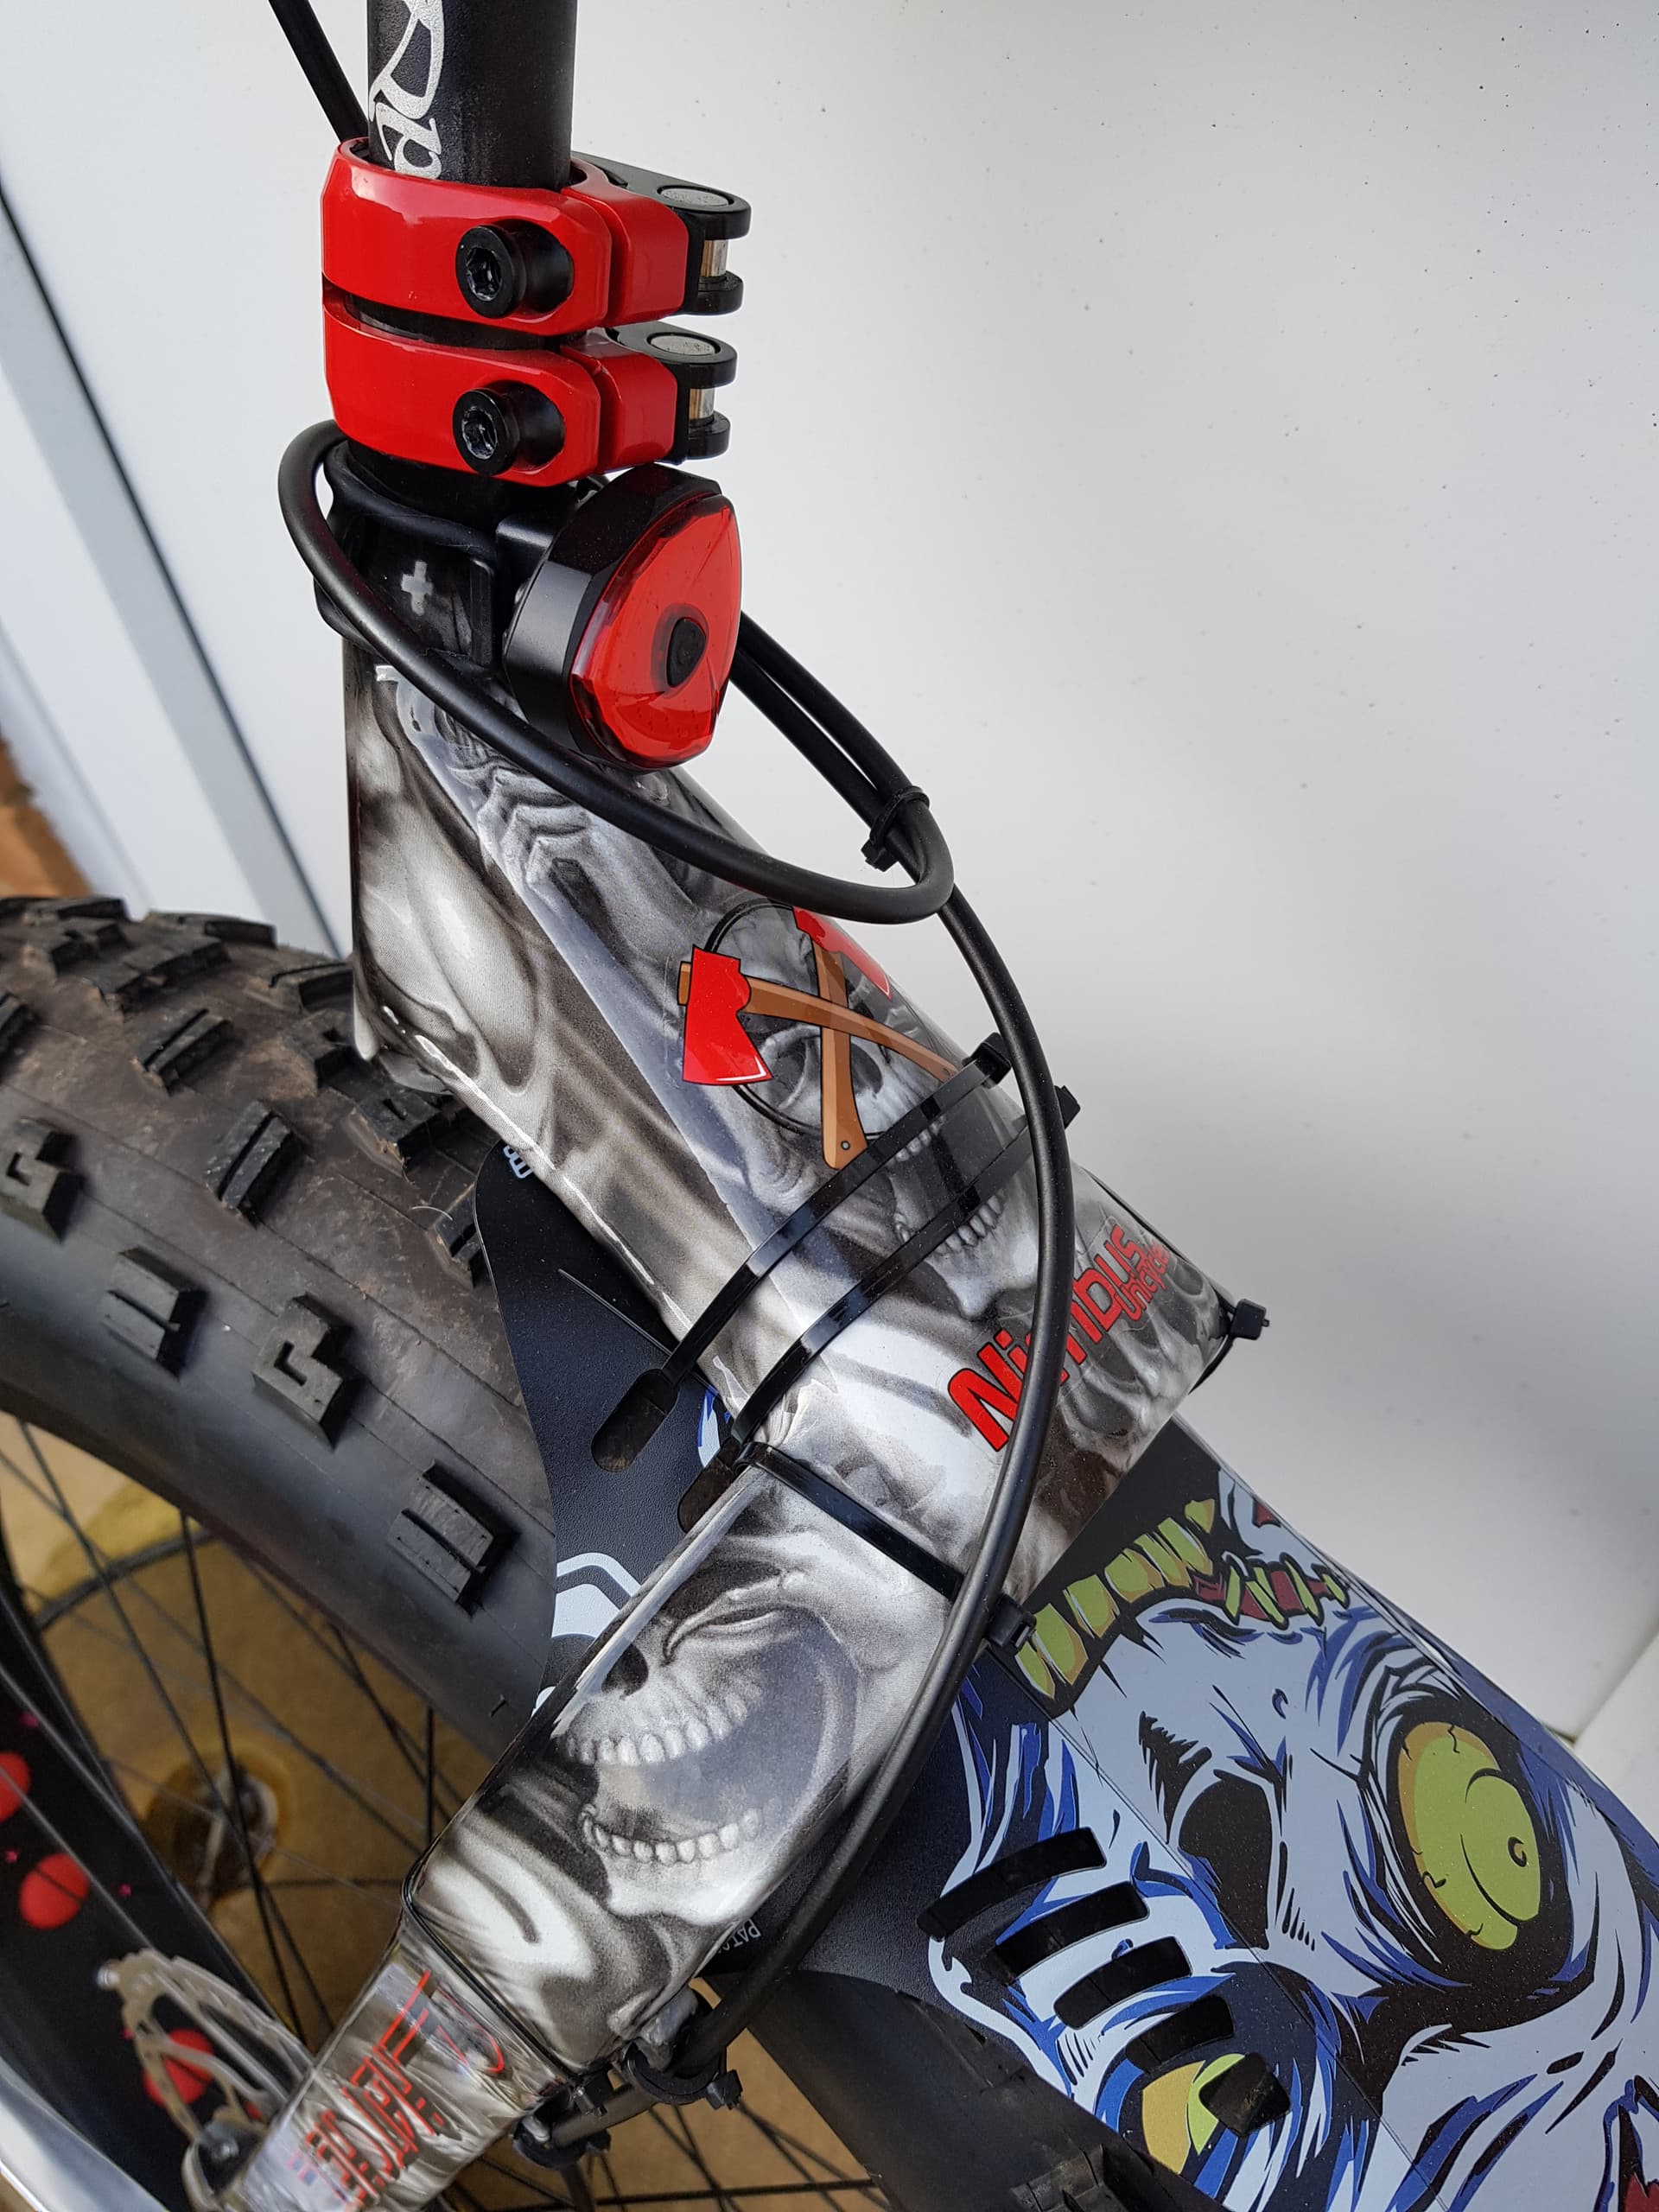
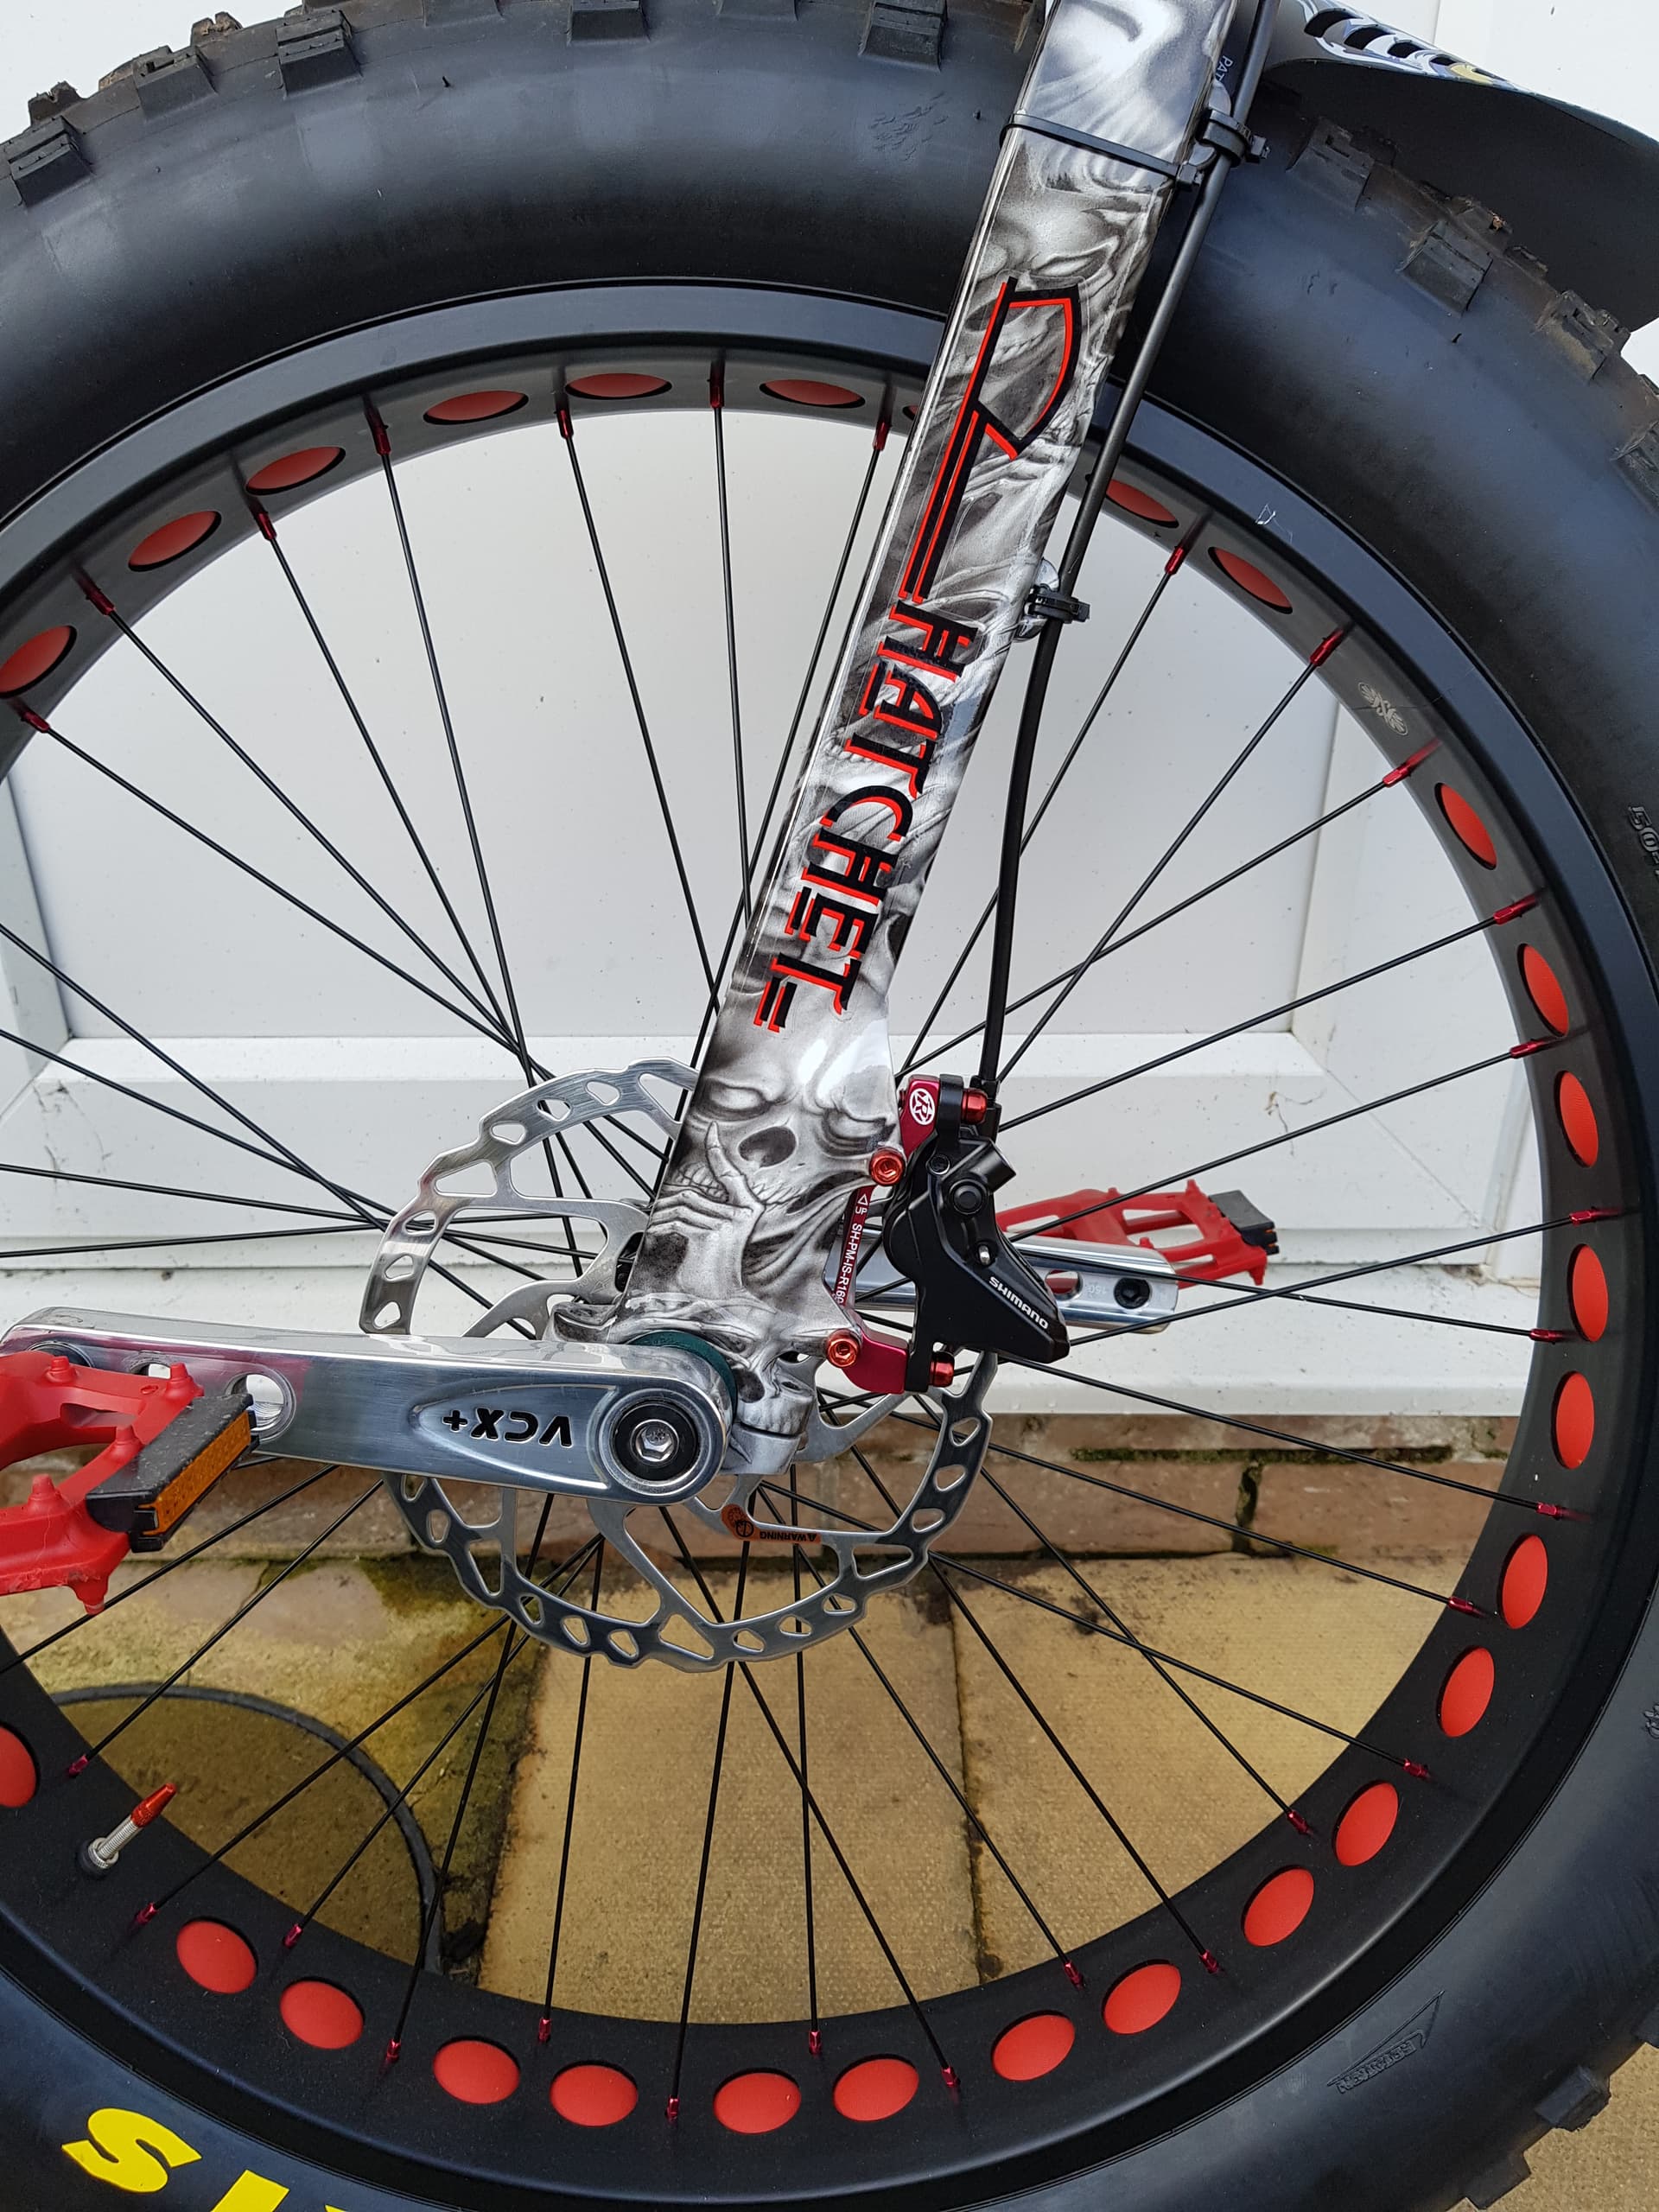
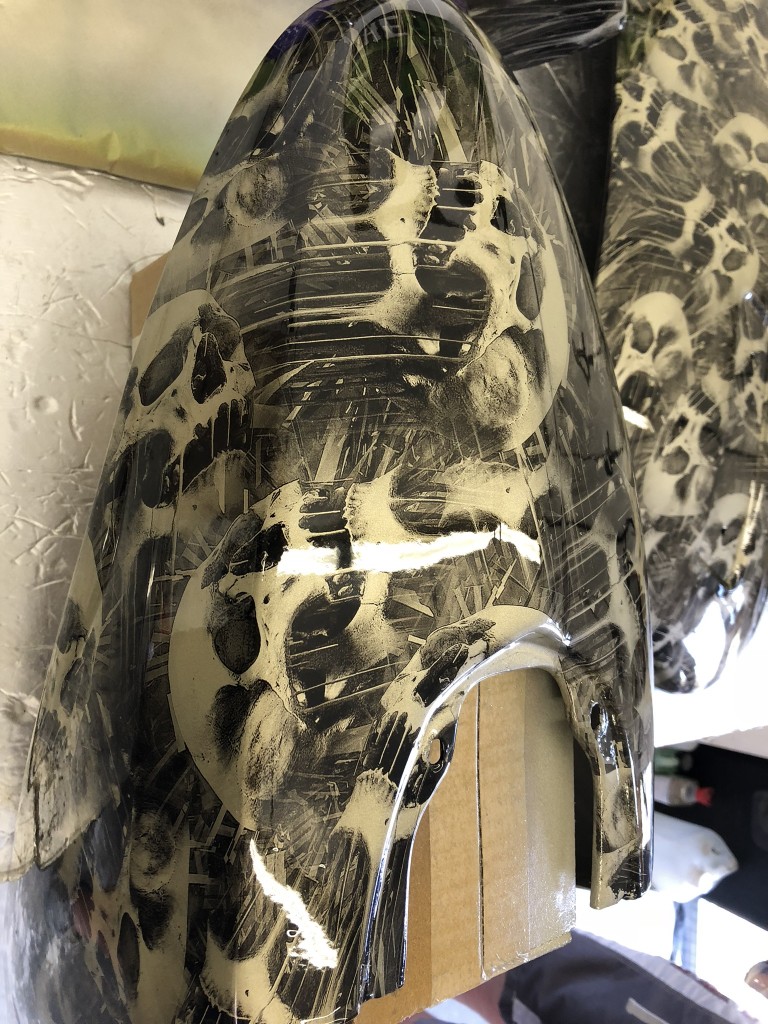
No 2, 26x4.8" Hear No Evil, Speak No Evil, Hear No Evil, Skulls hydro dip paint job 4 pot Shimano Brake, M4O Handle Saddle, Kris Holm Star Fighter brake button.
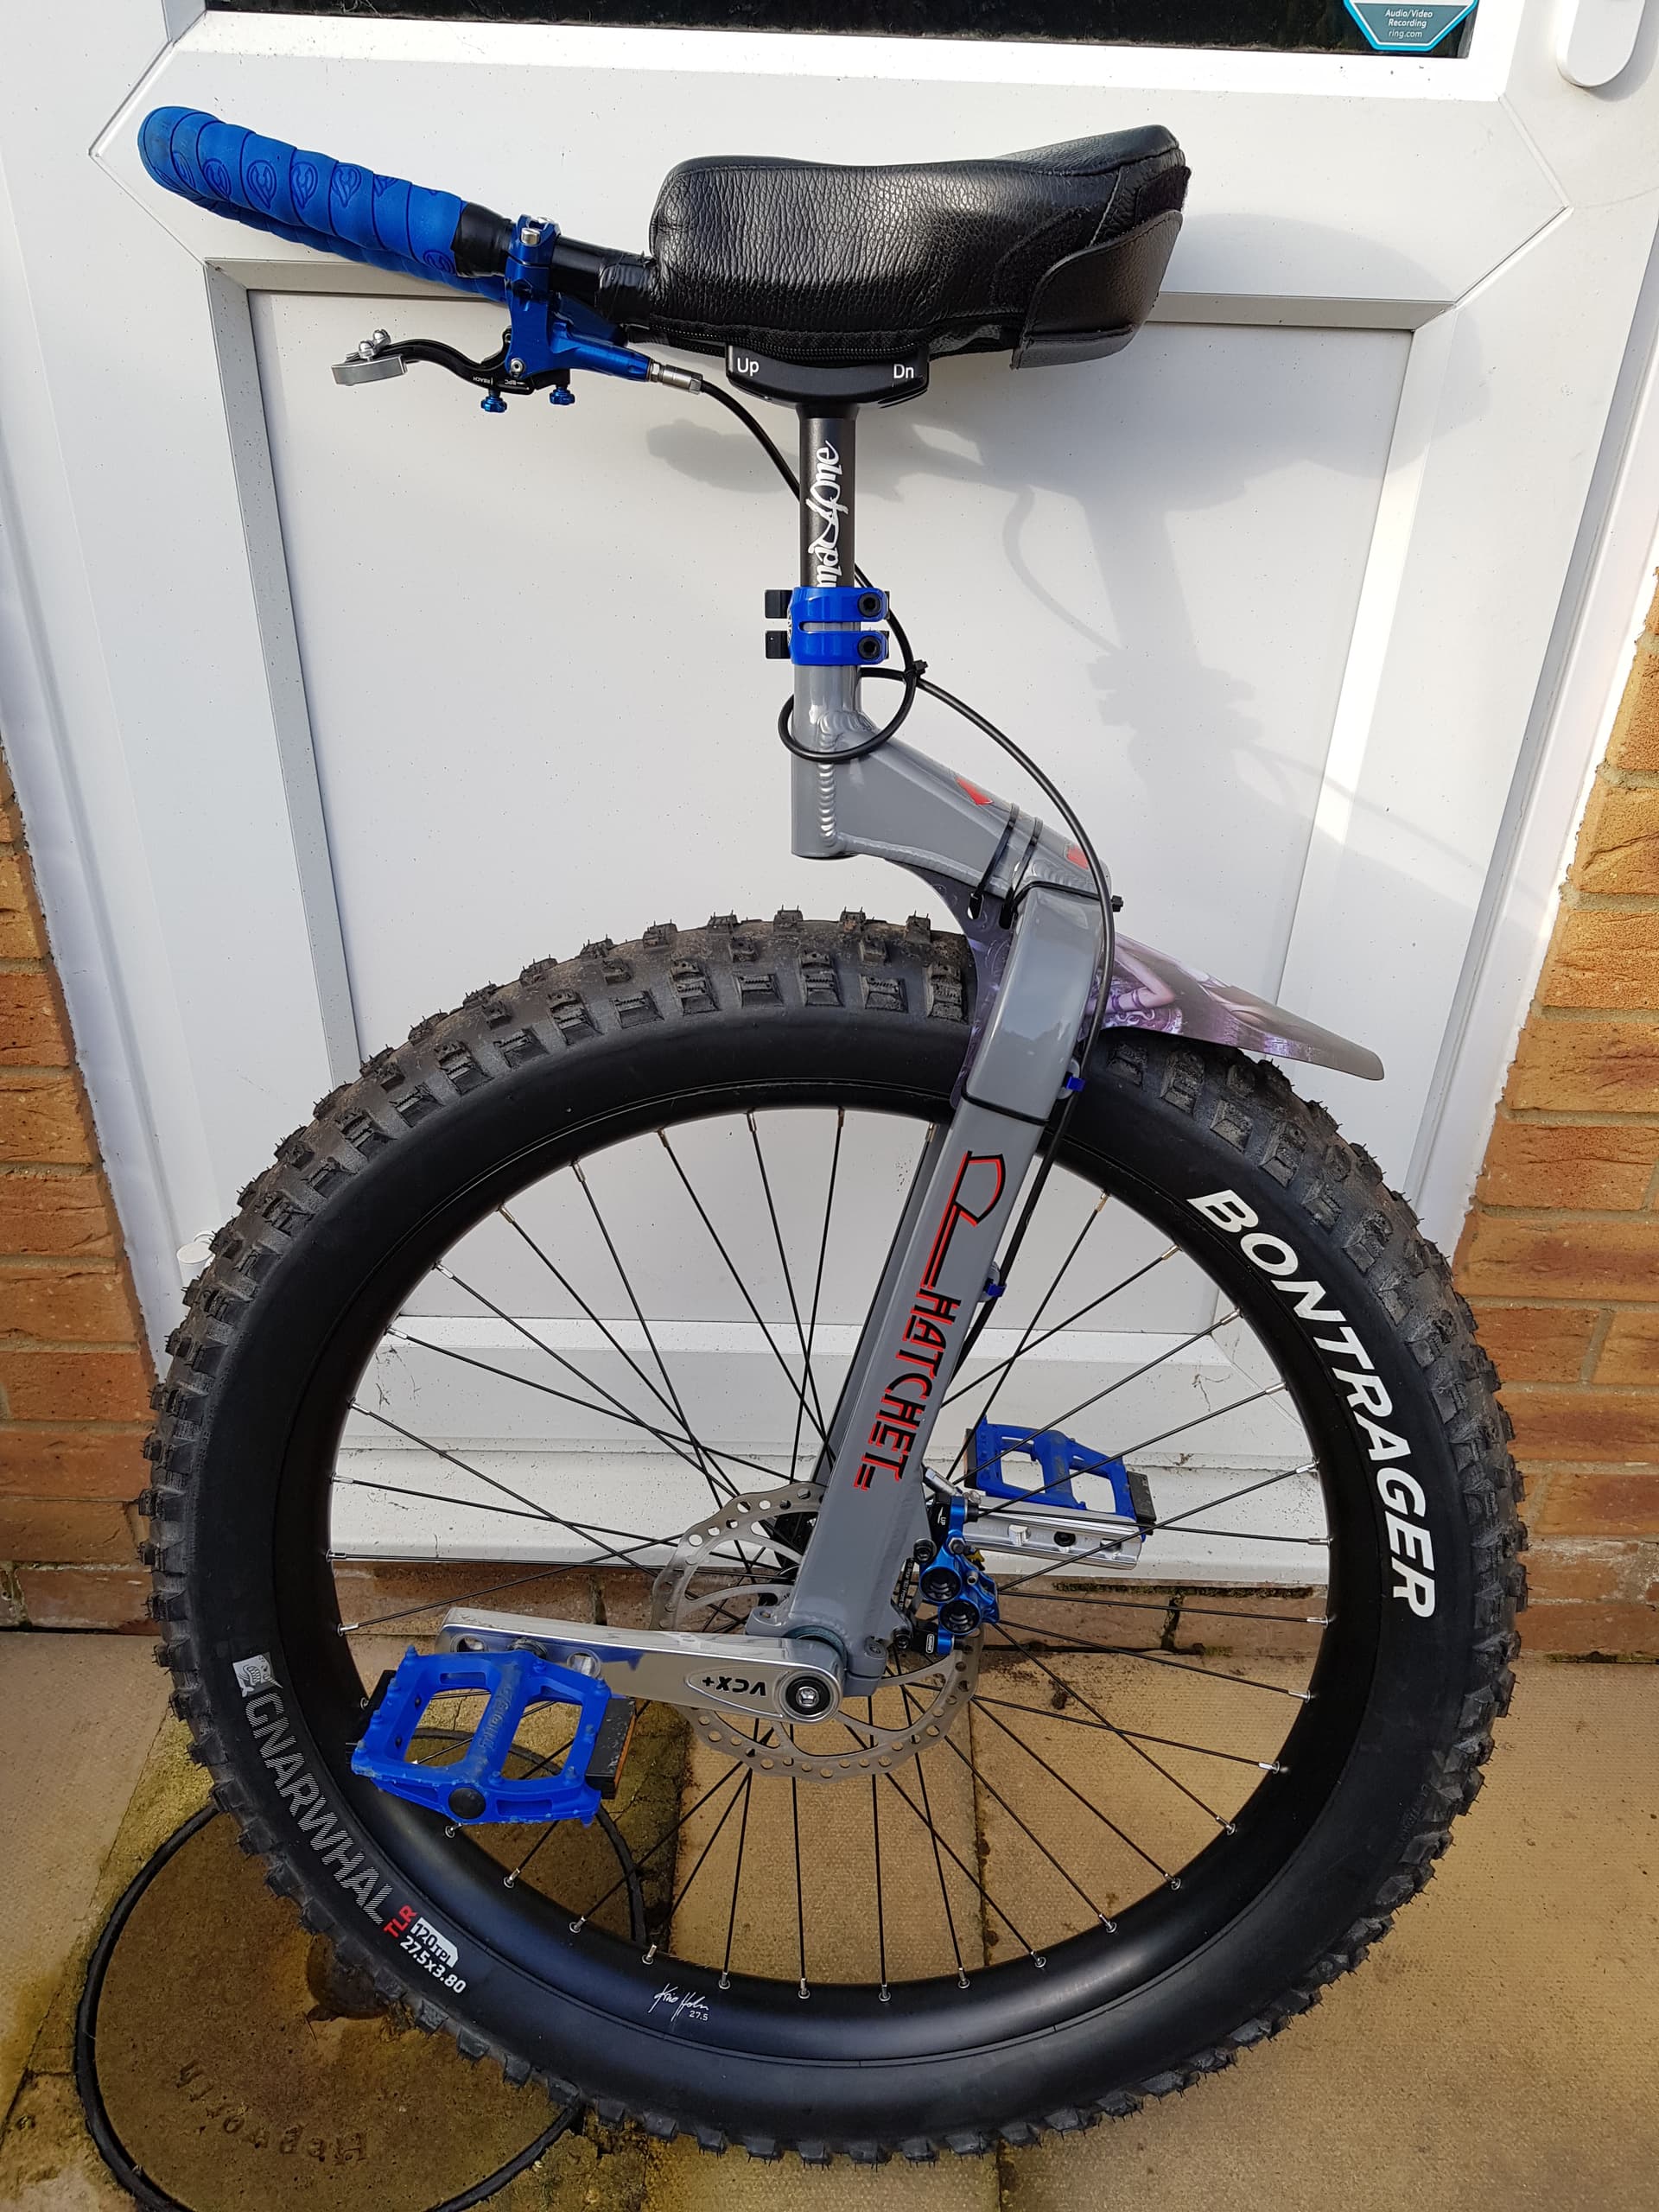
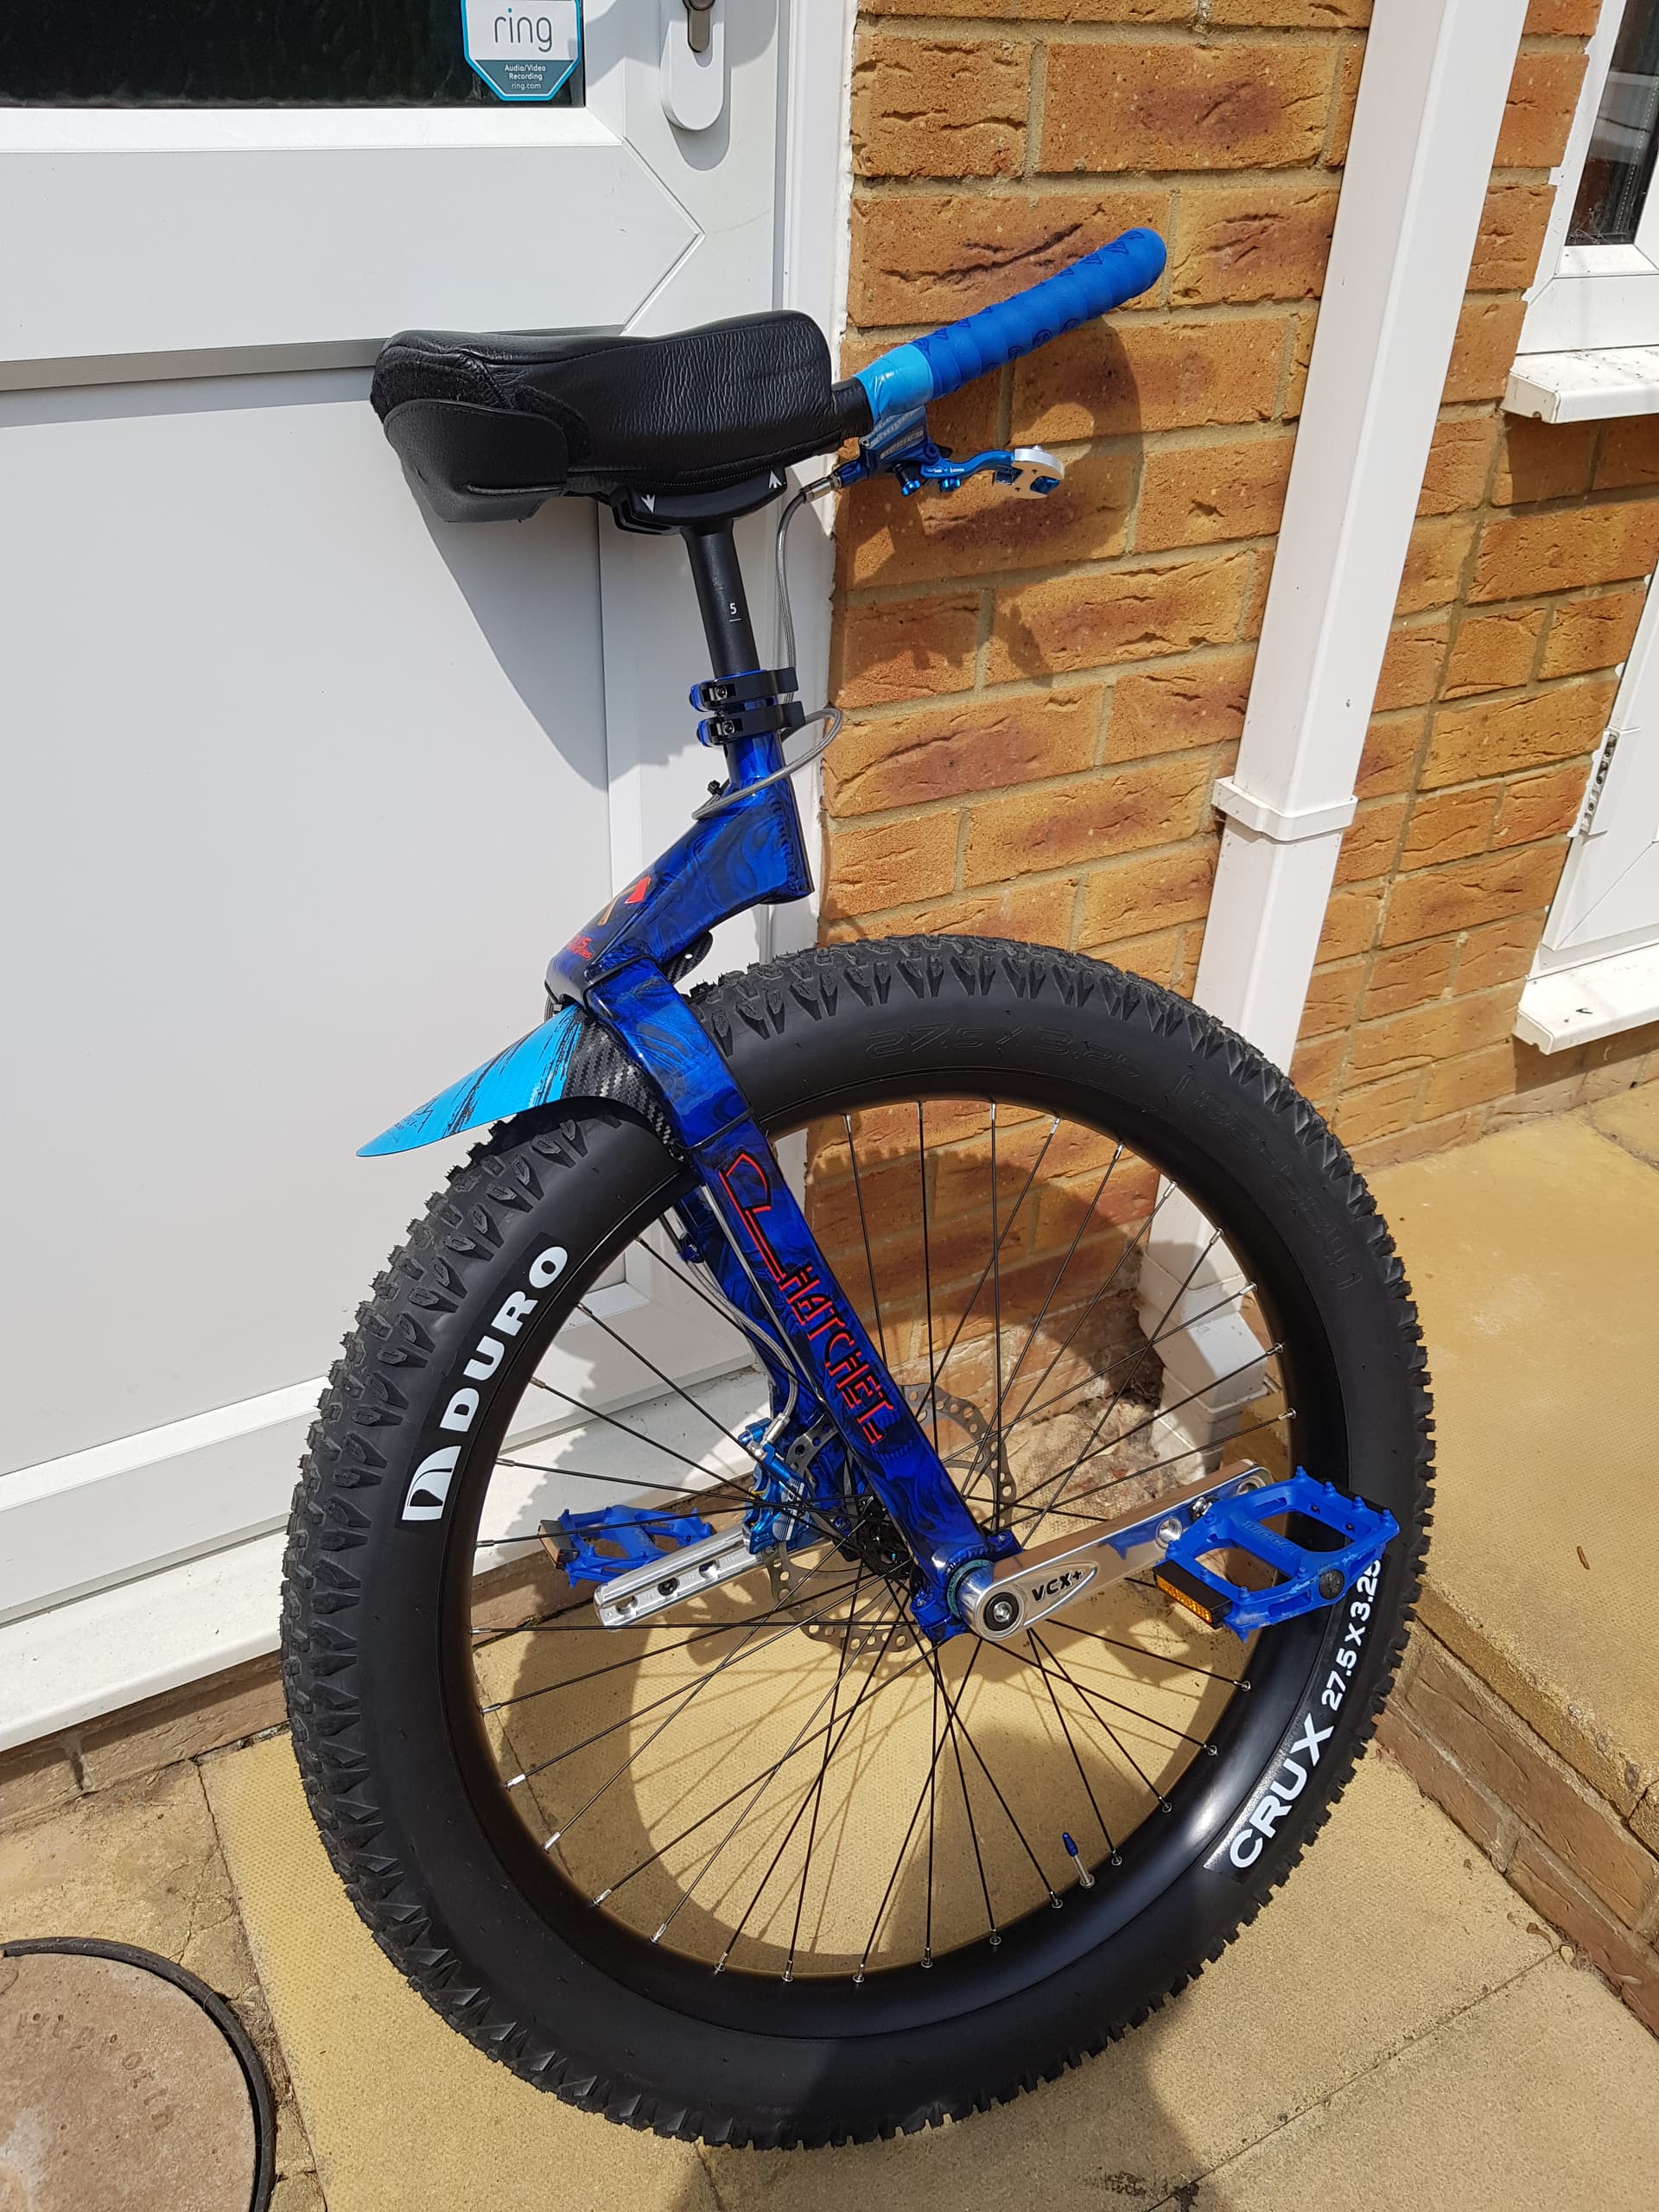
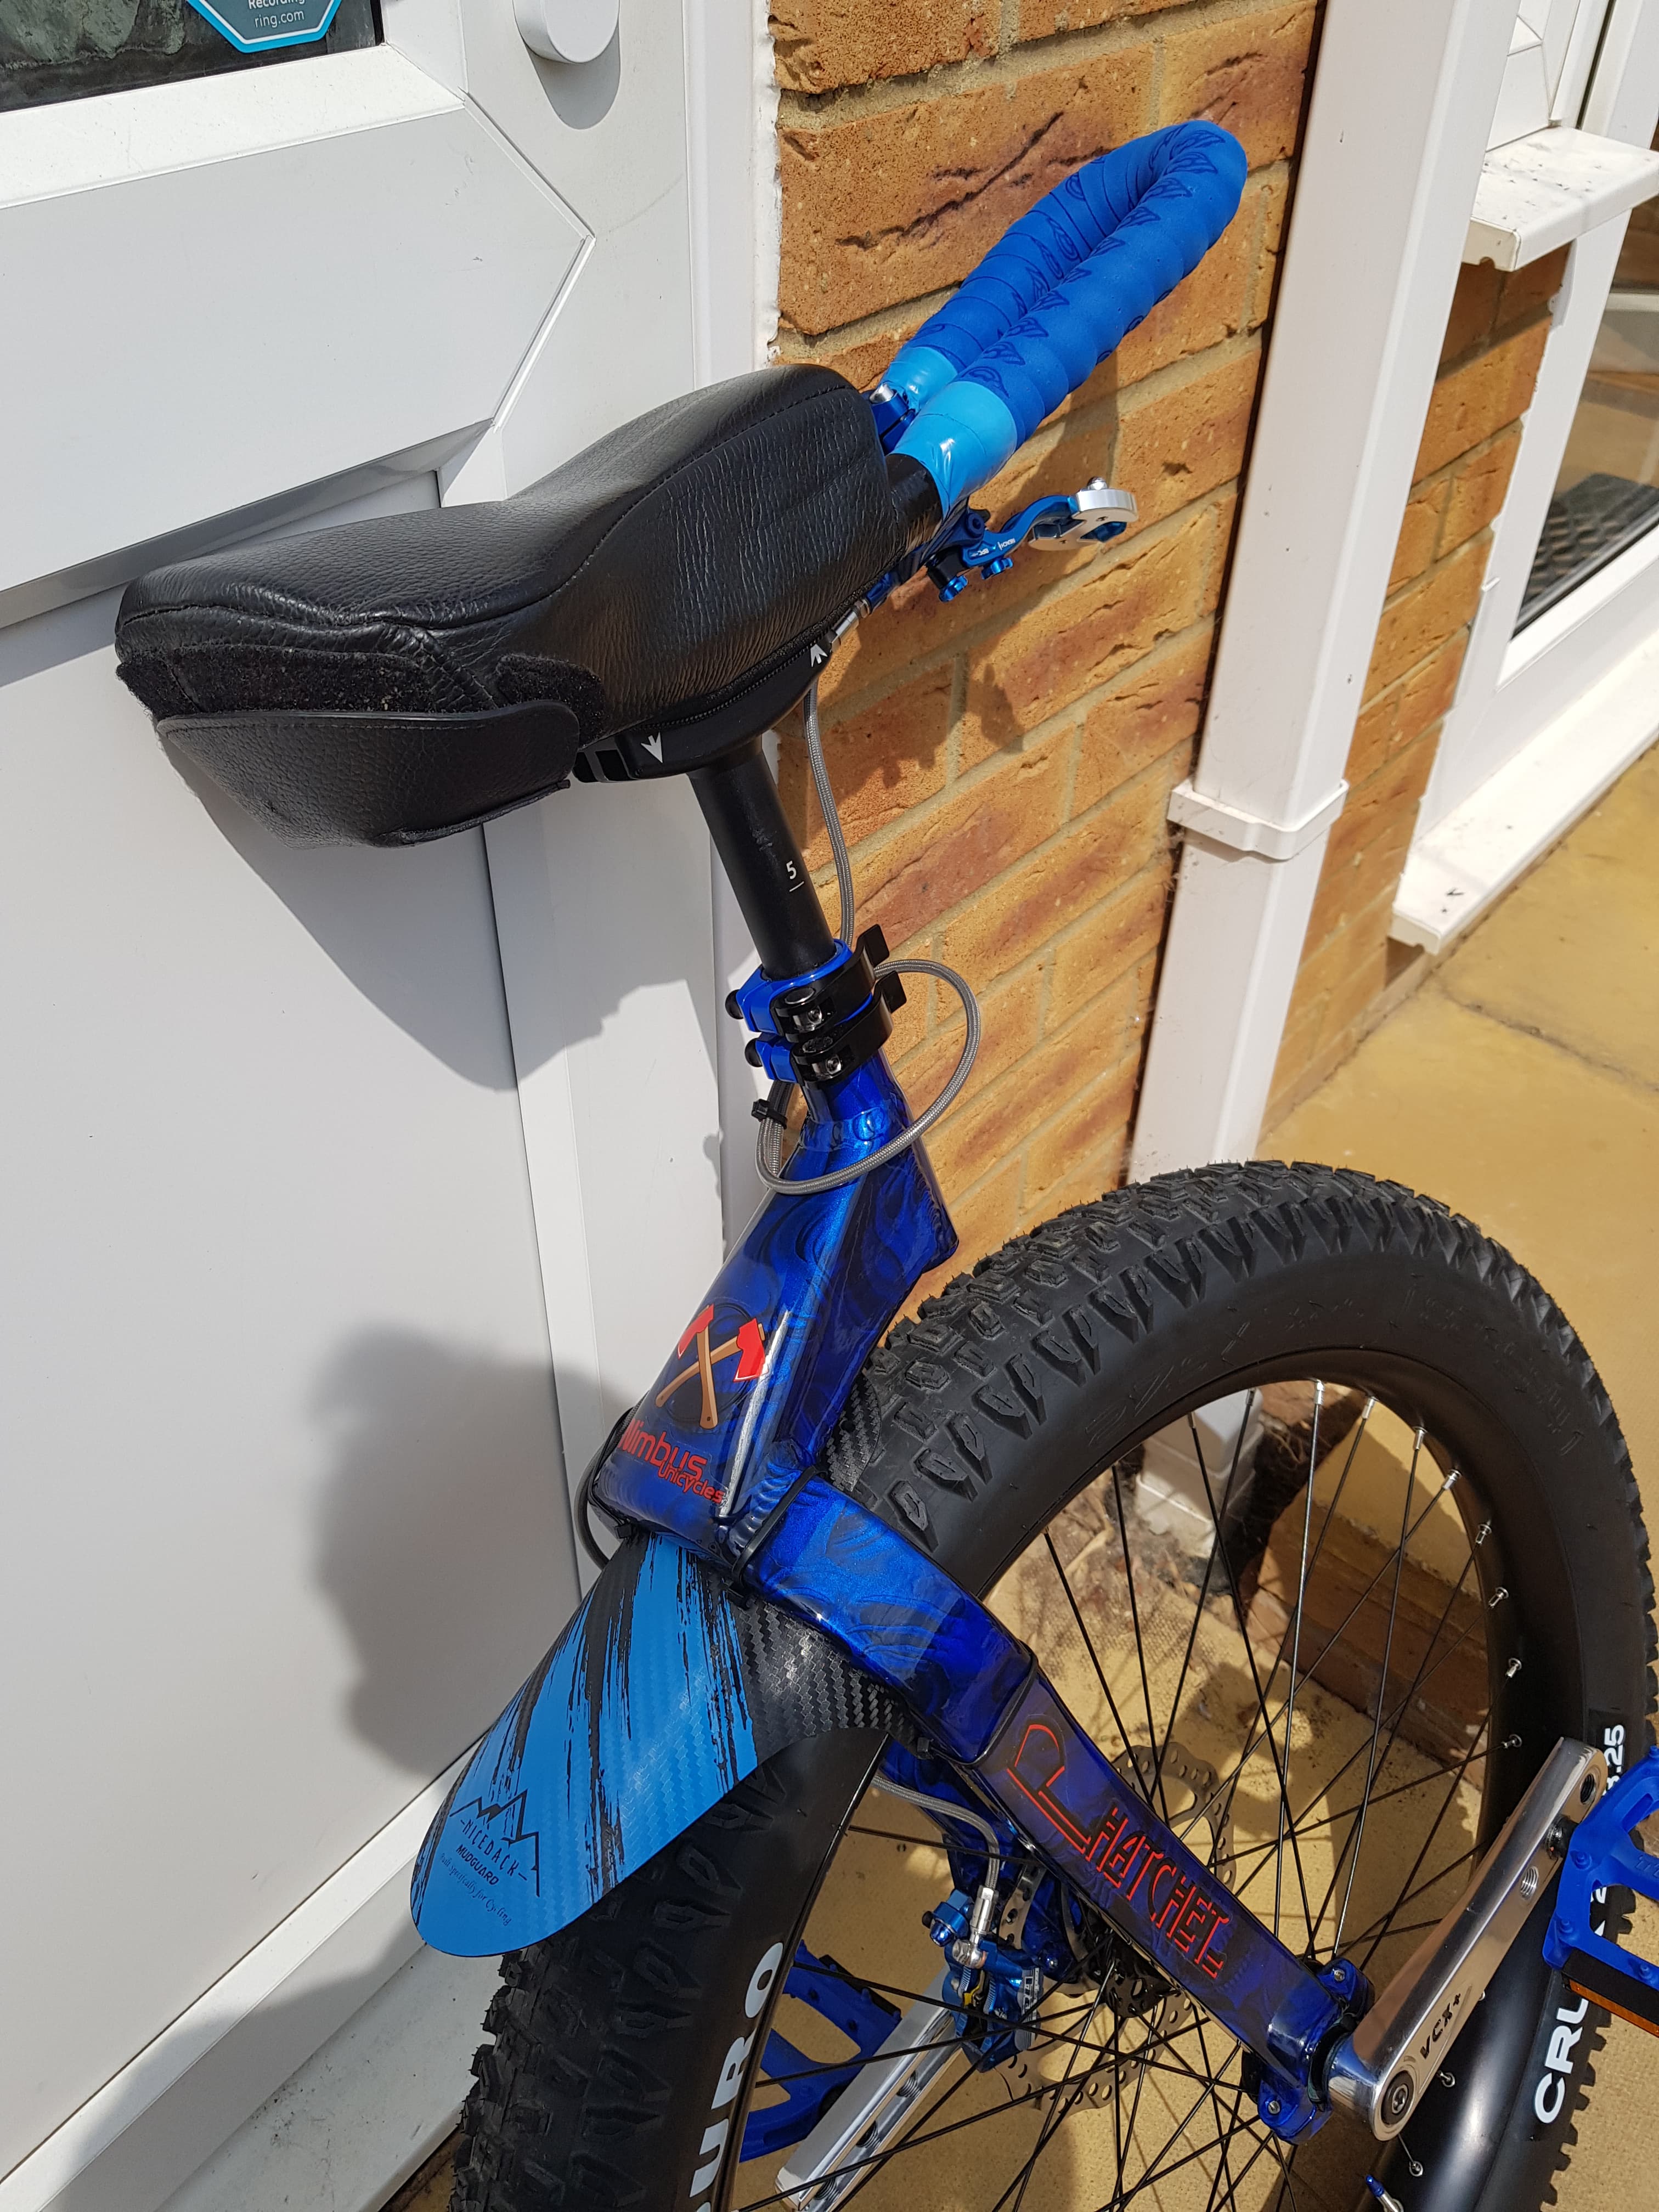
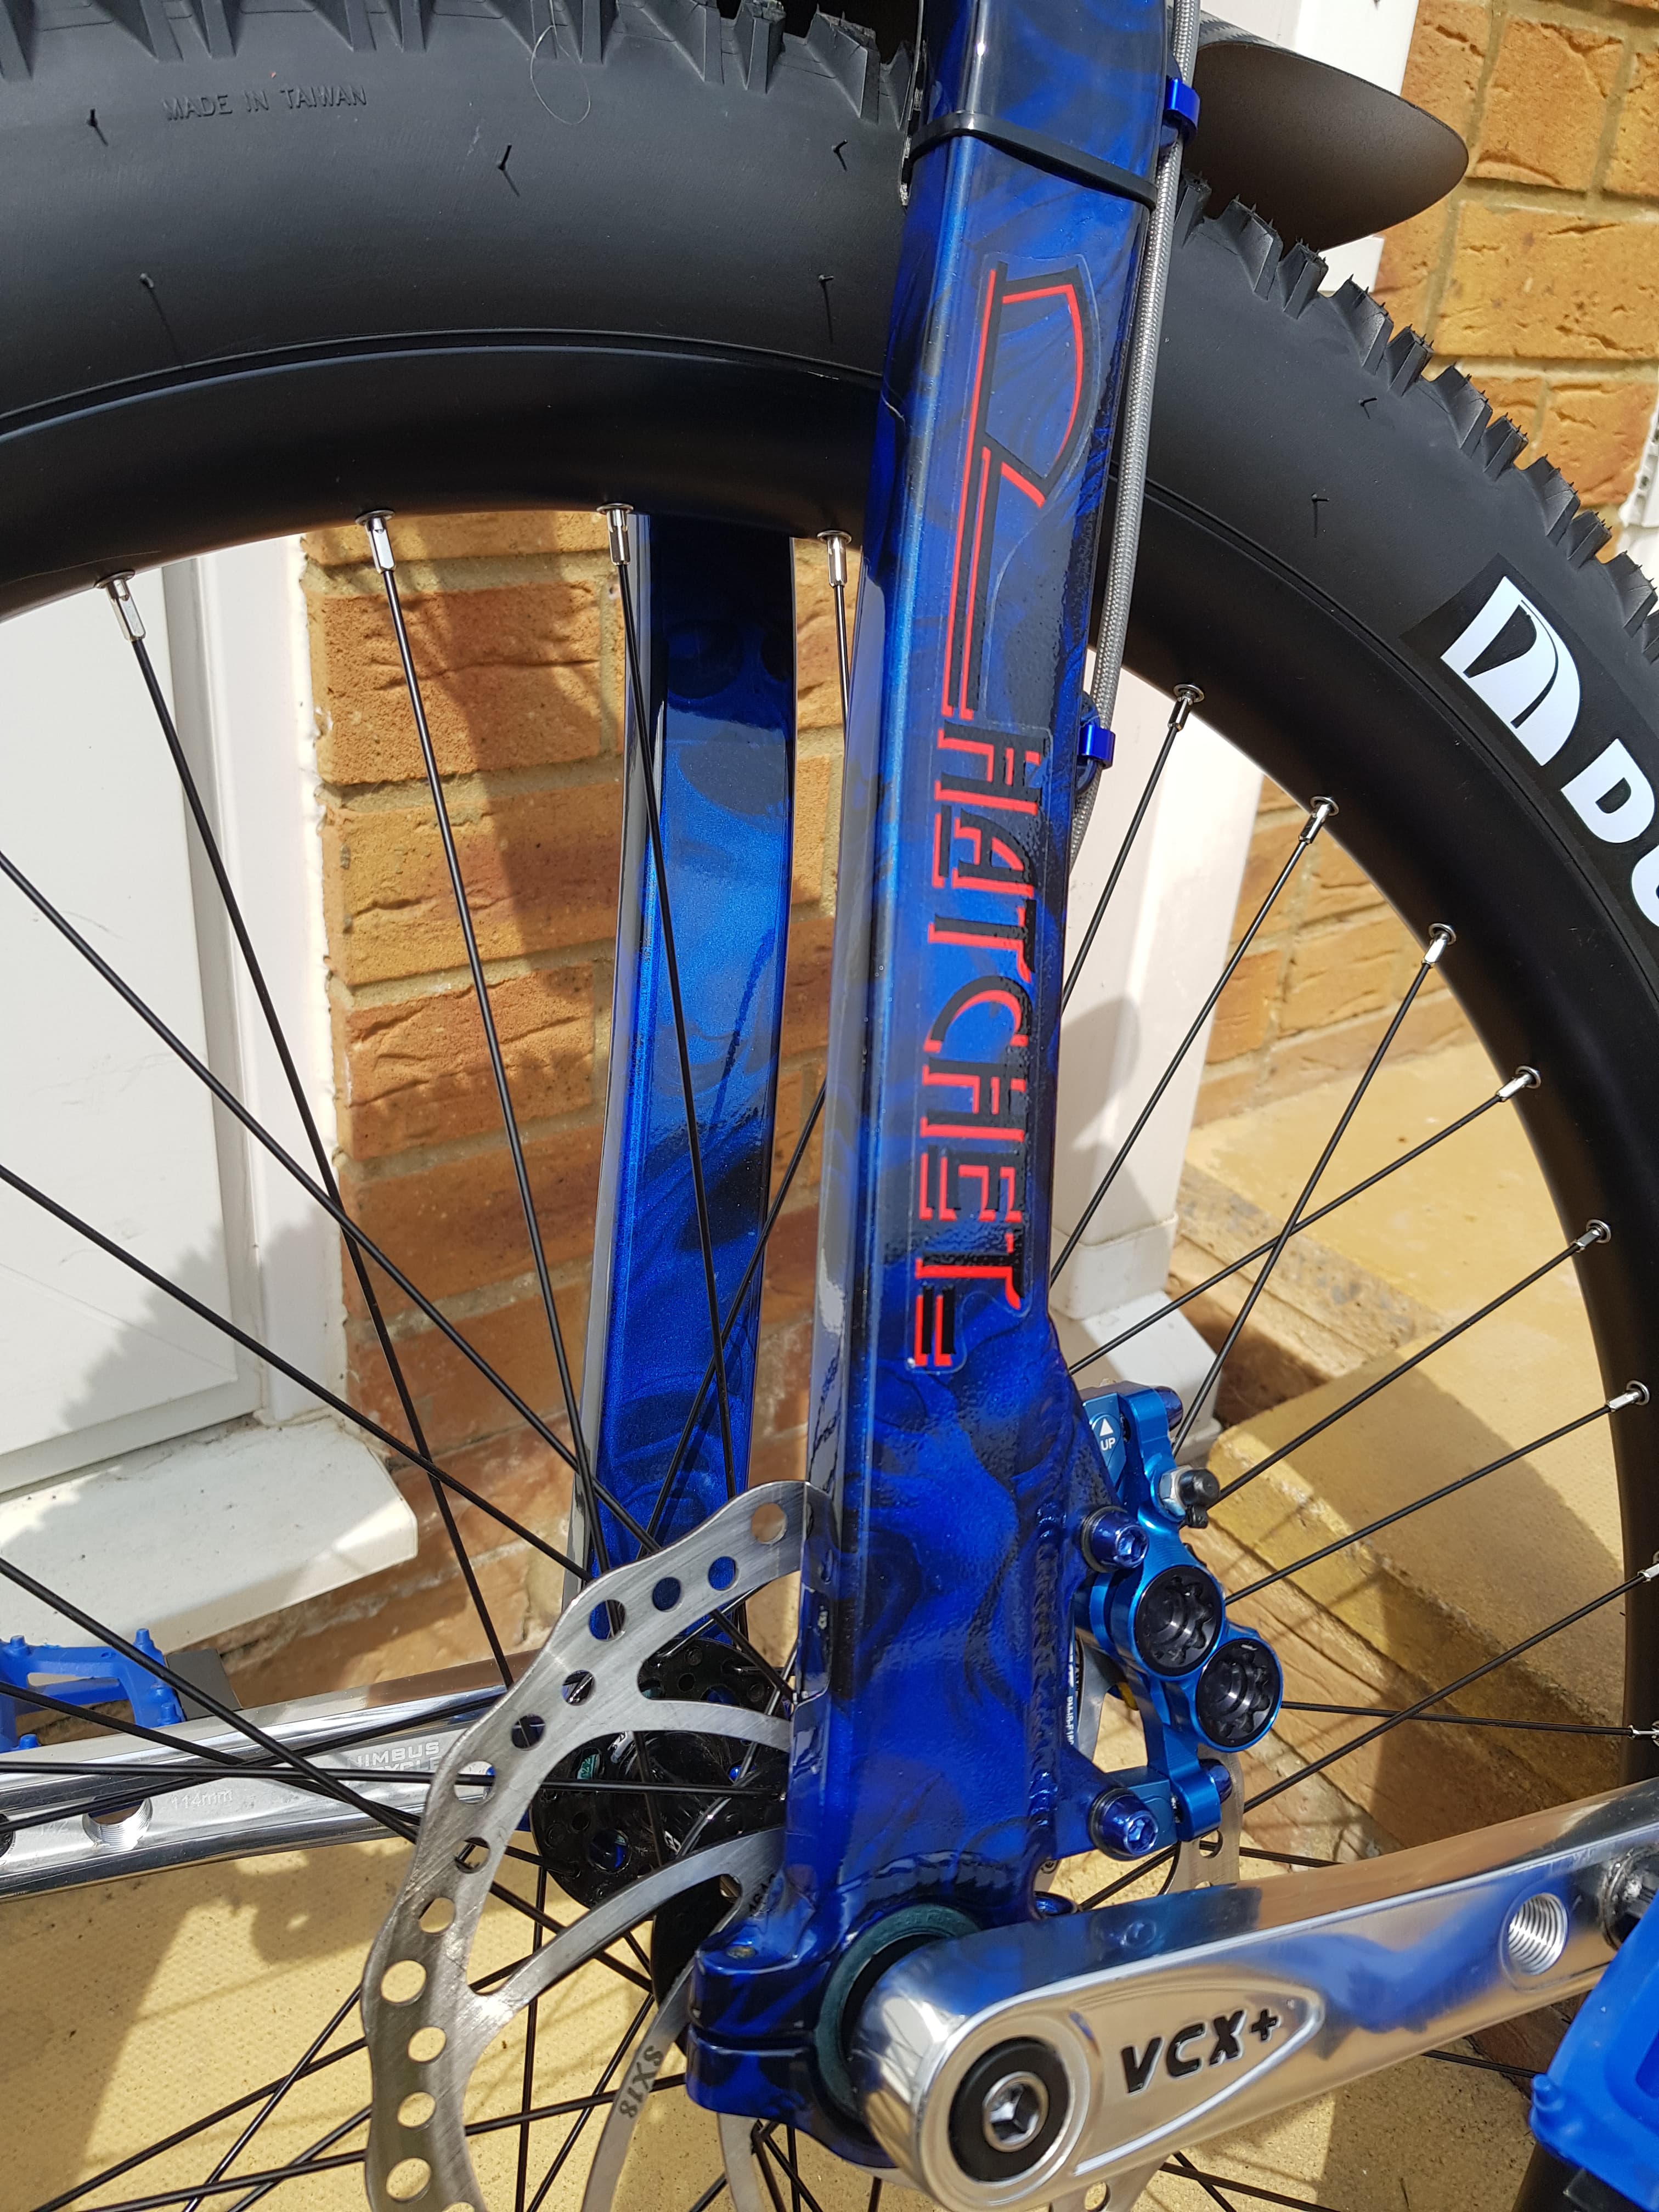
No 3, 2 tyre options 27.5x3.8" or 27.5x3.25" std hatchet grey, blue theme, M40 Handle Saddle, Hope Tech3 E4 brake set up, Kris Holm Free Rider Rim.
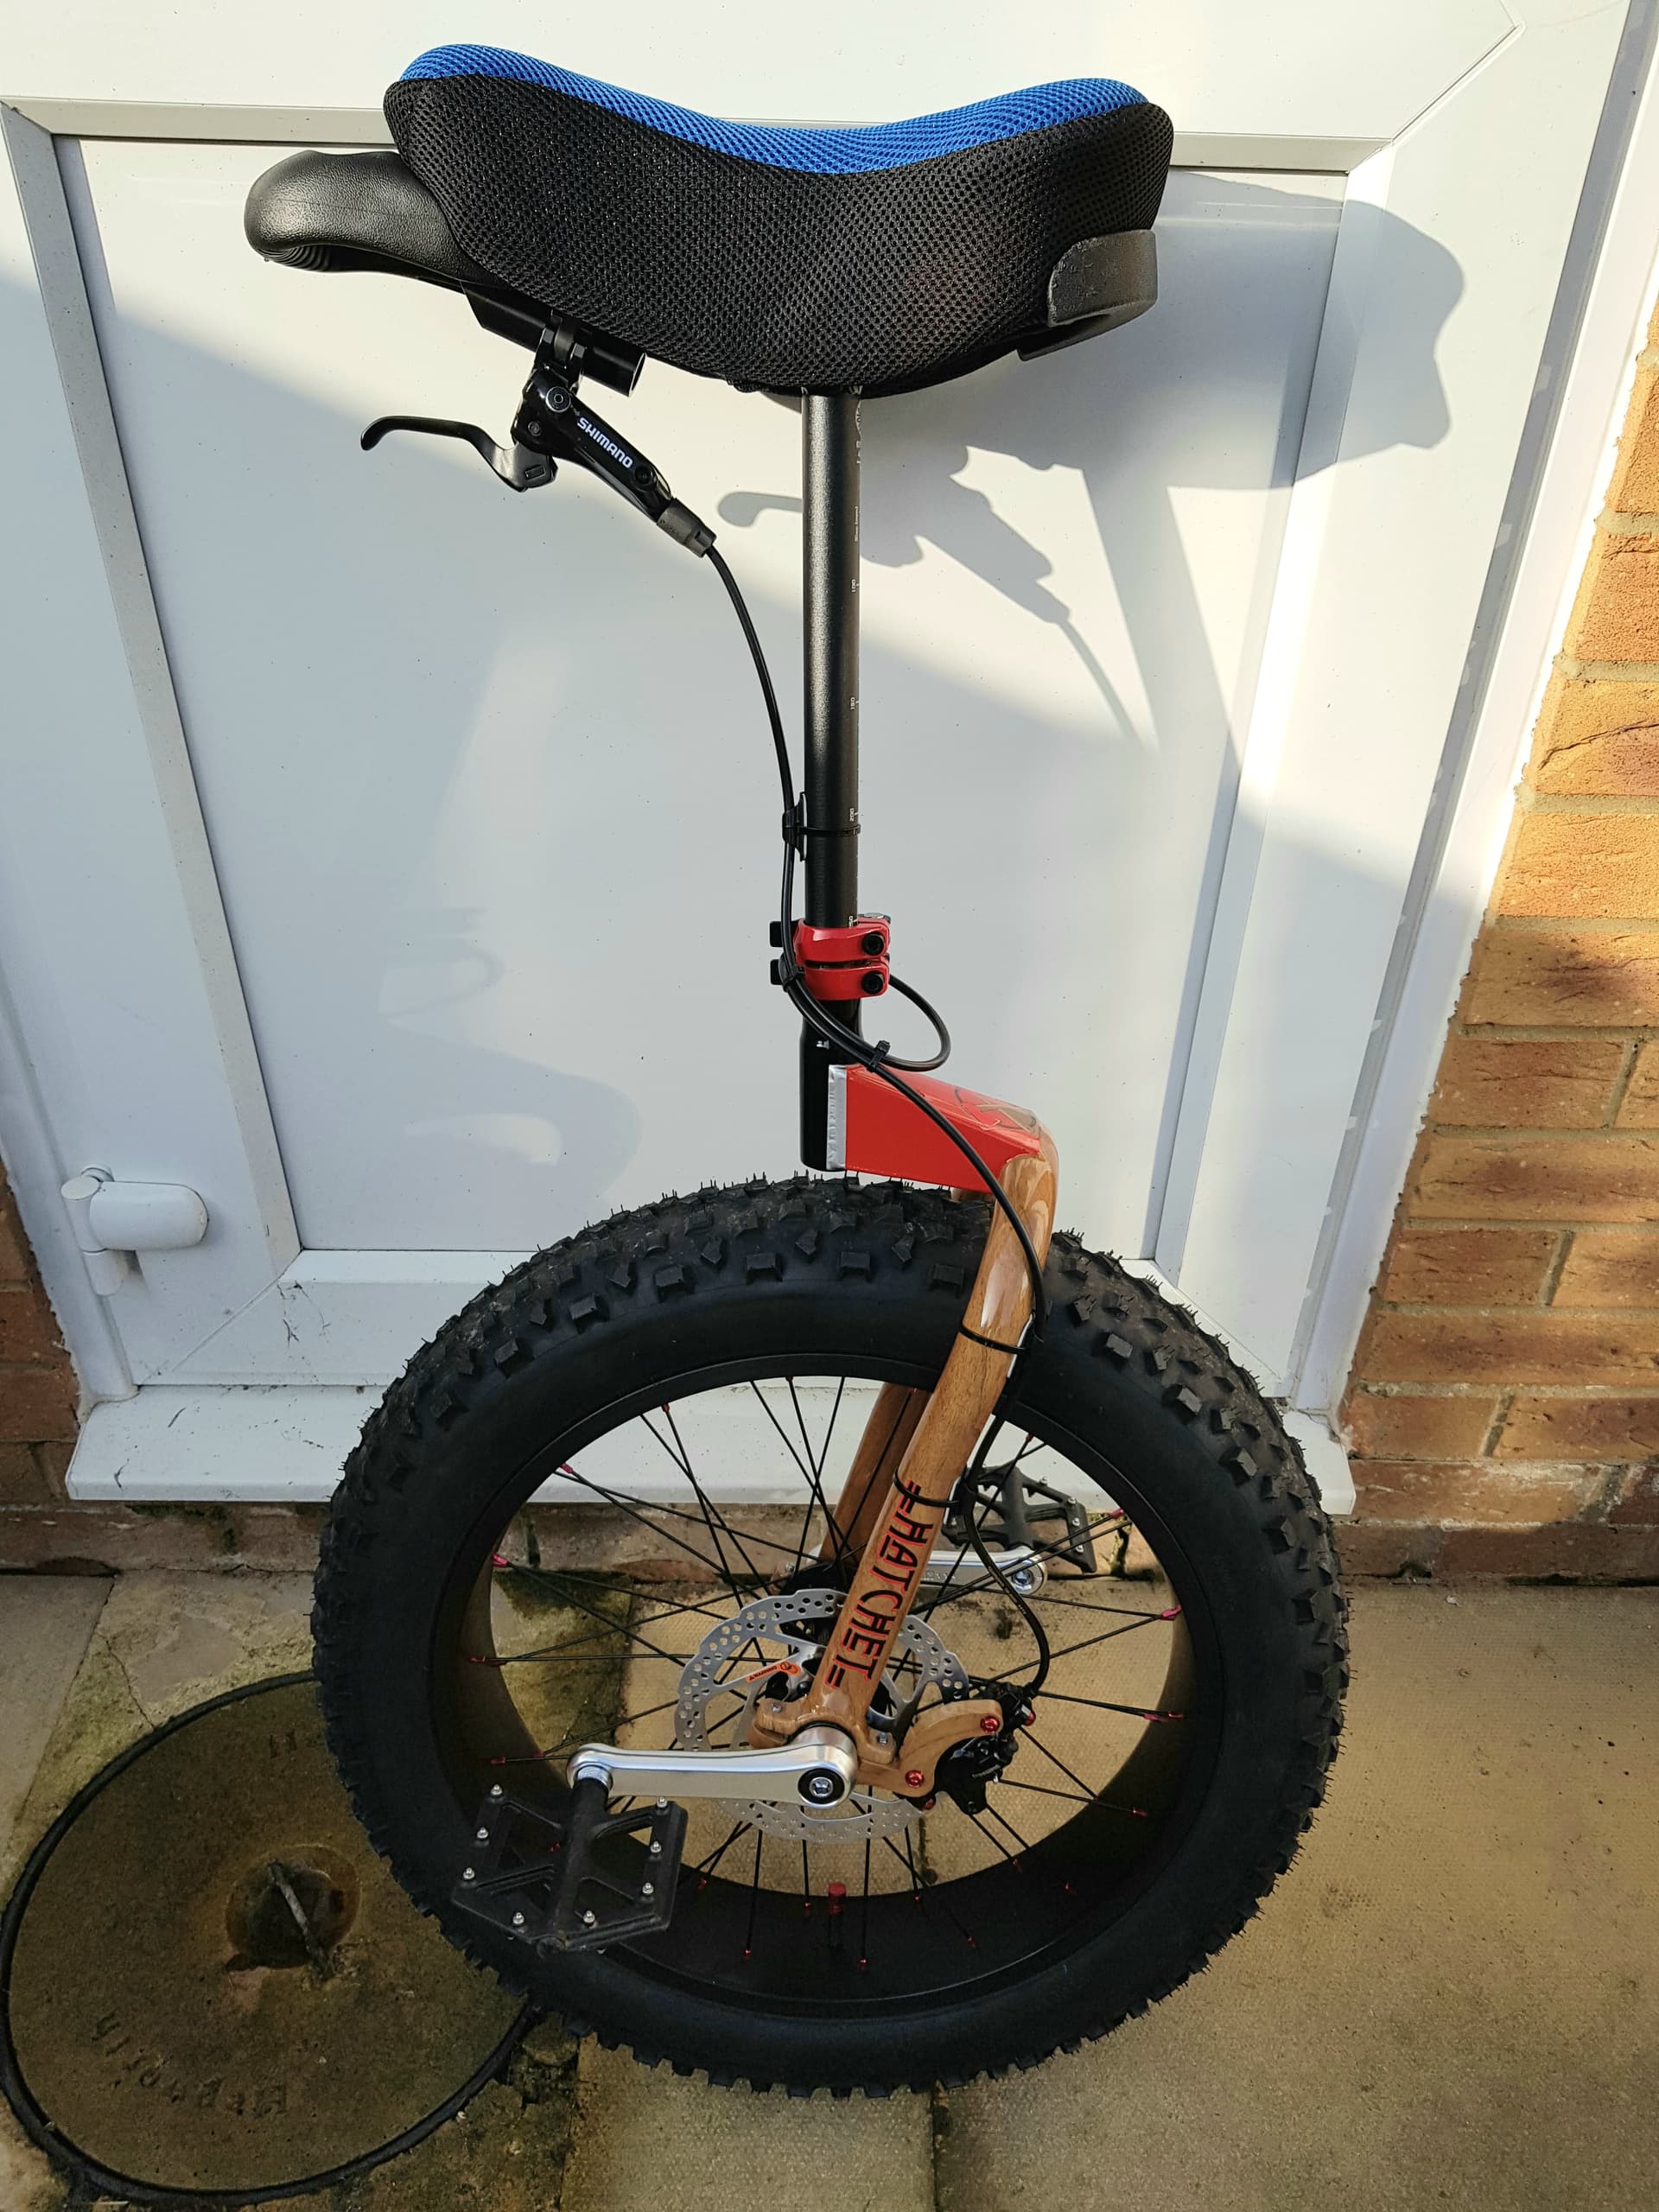
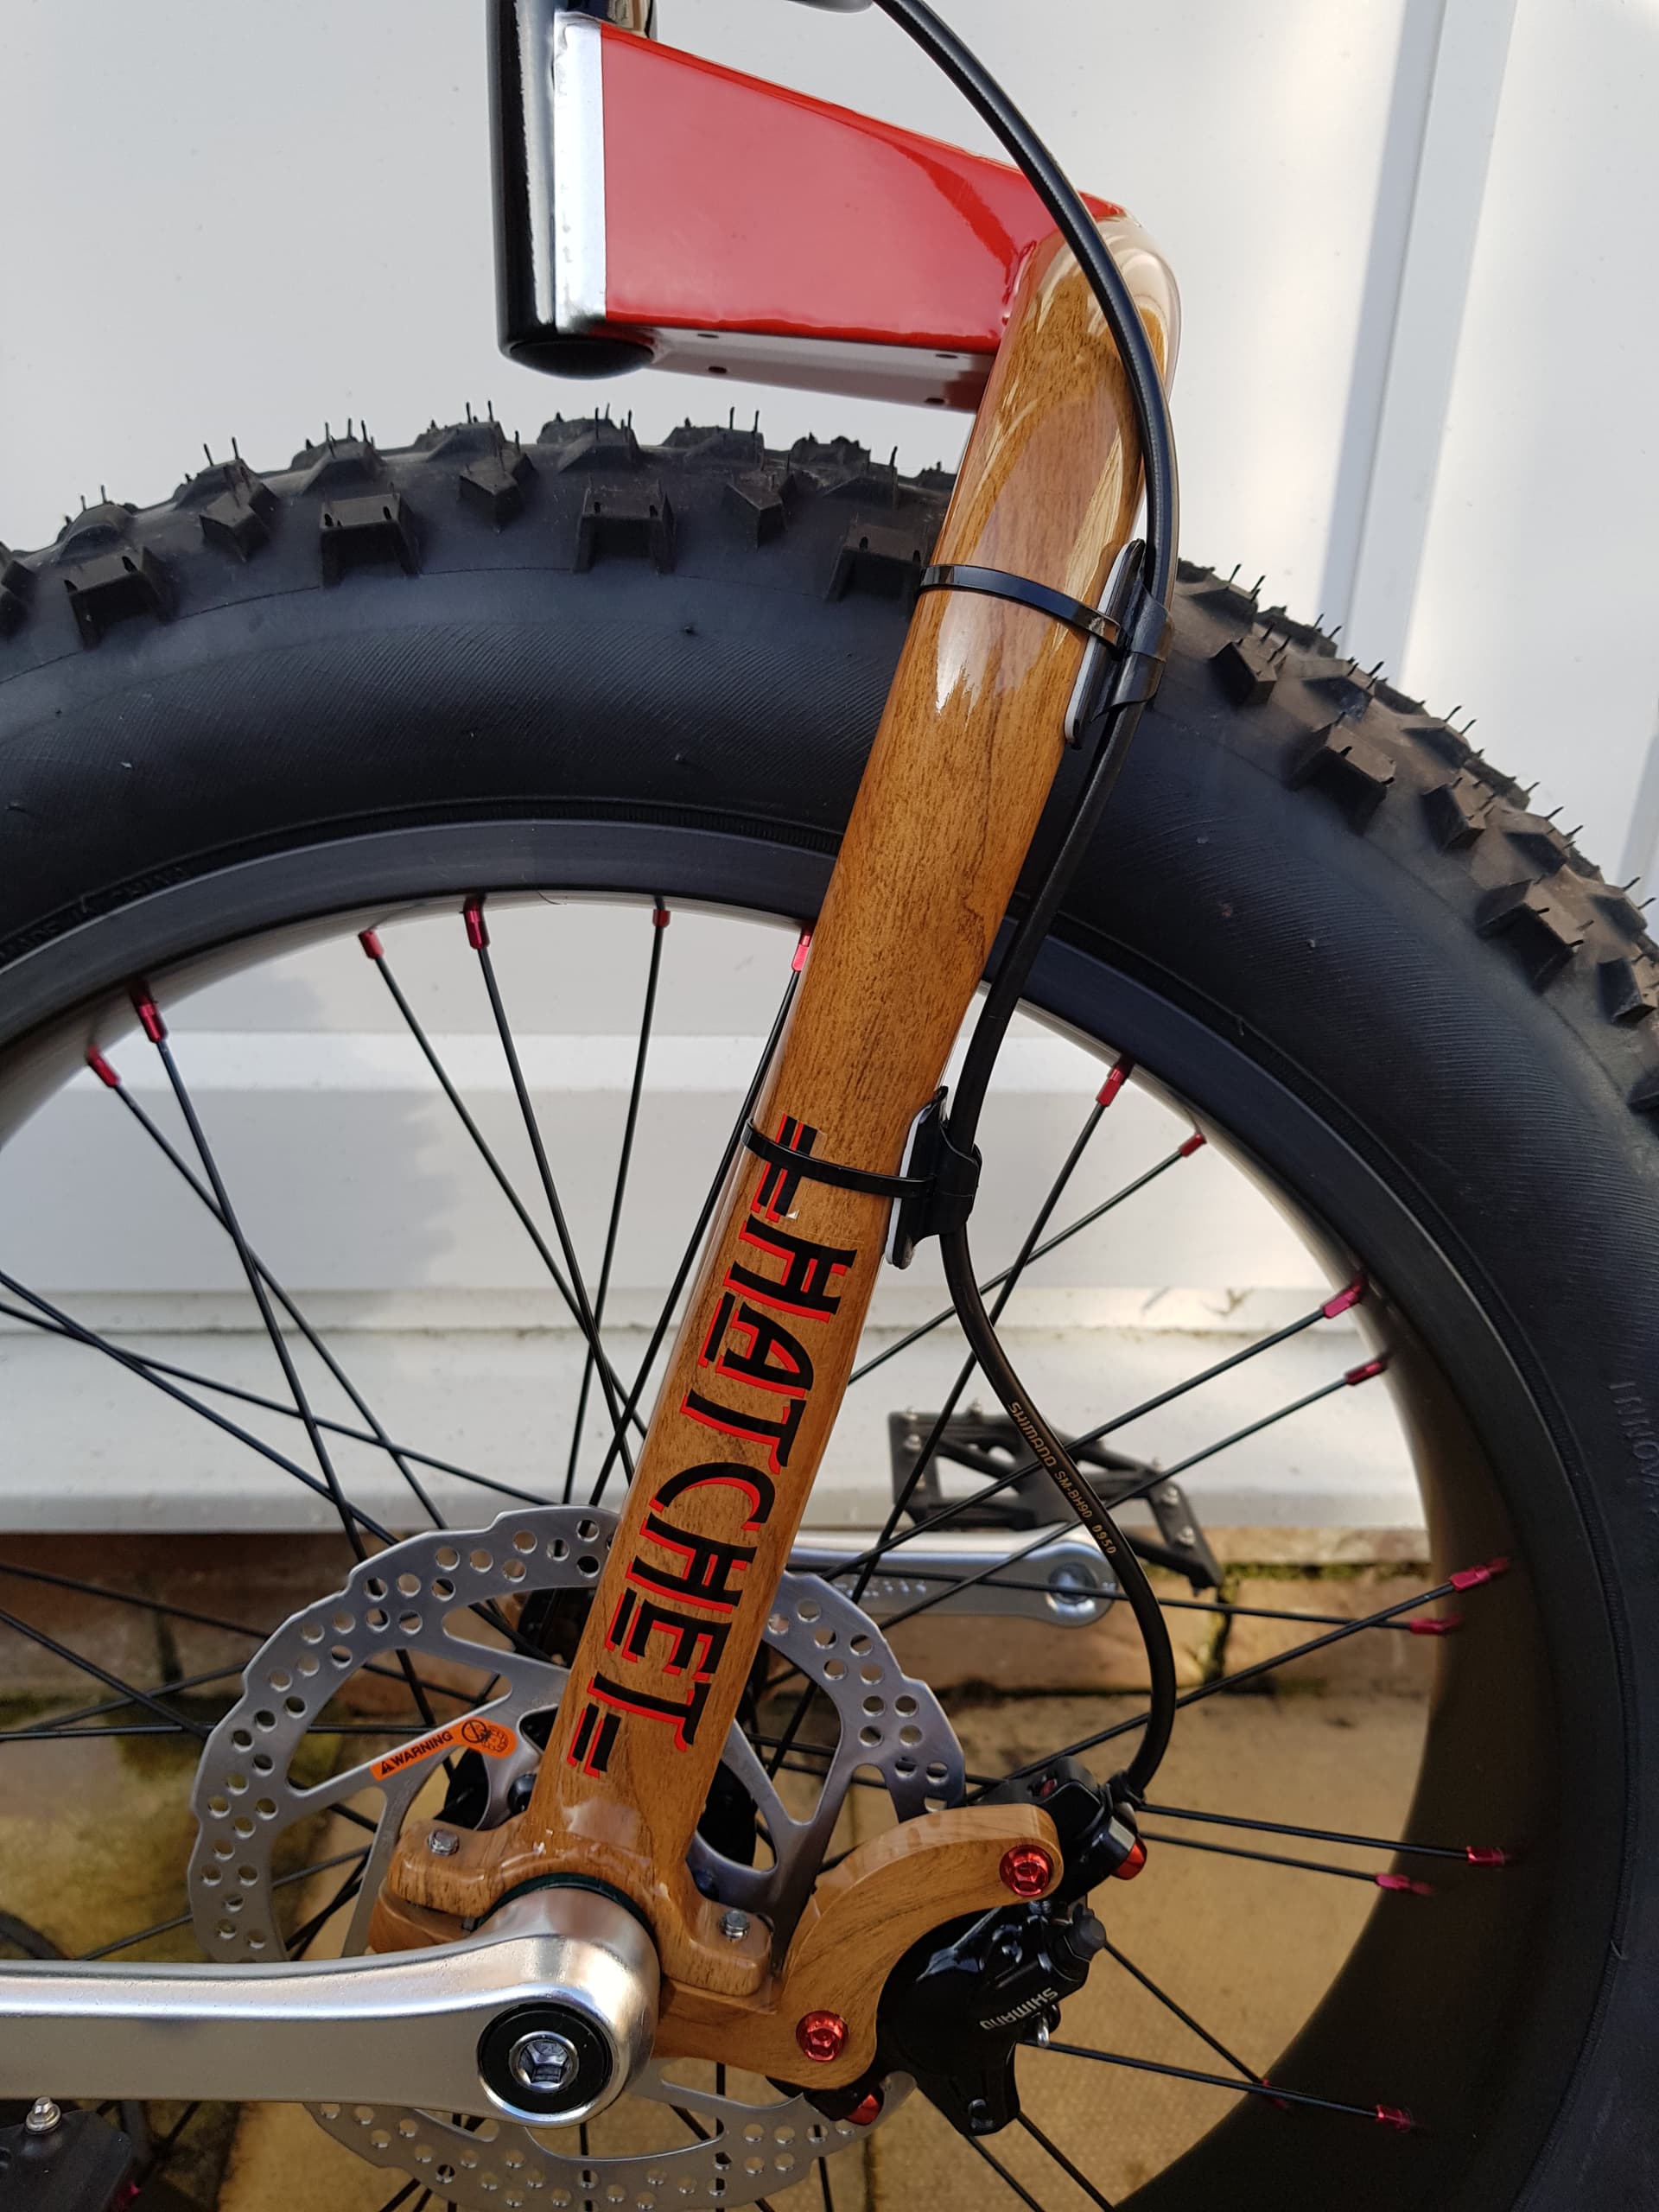
No 4 Mini 20" Hatchet, ISIS Brake Conversion, Hatchet Paint Job,full Nimbus spec bar the cranks
@SirCranky Hi, the frame shape is designed to take fat tyres, and is this shape to stop your legs getting caught on the frame. So its kicked back like a hatchet to stop this. So very functional, but also looks pretty cool as well. I like muni and trail riding which they all do very well.
@Wheelou The tubular frame of the mini looks more like a hatchet/fire axe than a std hatchet with the box section frame. I had to re-paint it anyway, as I had the pressed bearing cups removed and machined bearing cups welded on, which destroyed the origional paint. I get a good deal on the paint work, so gave the guy a brief to make it look like the hatchet logo, he had wood grain effect, so I had it coated to look like a hatchet. The cost not much more than a std powder coating or home job with rattle cans.
Since you have the same frame in different configurations… is there a favourite uni as far as riding is concerned? If so, what kind of riding do you do with it?
@Uni2ONE2 Hi, hydro dip vs powder coating, I would say its about the same. The first 2 I had done about 3 years ago, and wear wise they have a few chips but no more than they would have anyway. Falling off is part of unicycling, so I just accept they will take damage over time. Mostly its pedals and the handle saddle that take the damage. Saying that I dont do anything to extreme, just trail riding mostly. First and foremost they are to be ridden, just depends what disipline you ride.
@Wheelou, yes the same frame, but they all ride differently, I like them all for different reasons. Do I have a favourite, the 27.5" x 3.8 build would be the one I choose most often, its far lighter than the 26x4.8" and my legs dont catch the tyre. Still a big fat tyre, with similar roll over, but easier to get on with. The kris holm free rider rim gives me 2 tyre options, in the winter its the 3.8" tyre, lots of mud, standing water etc. In the summer I can swap to the 3.25" Duro Crux tyre when it dryer. So a more flexible build. Really the one I choose depends on the weather, time of year, but they are all ridden. Mainly muni and trail riding but nothing too wild, I am nearly 60.
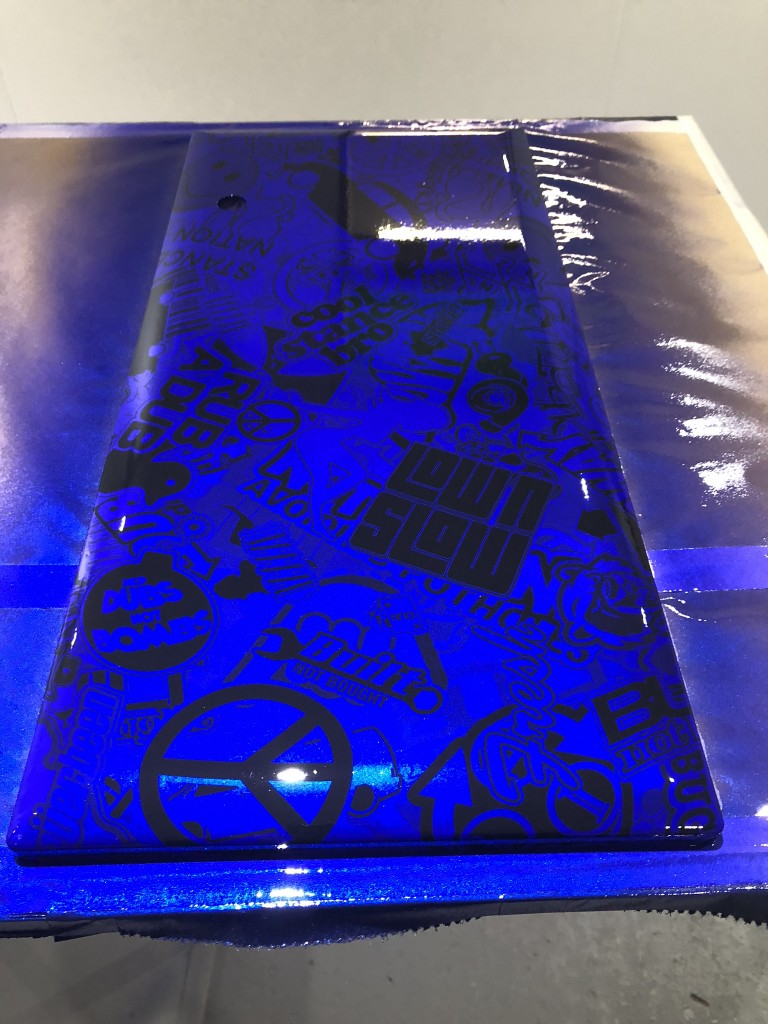
@Uni2ONE2 the hyro dip shop, I use mostly do cars, motorbikes and scooters, so its fairly robust. But like any paint if it hits a big rock it will chip and scratch. Unlike a normal paint job, the design and paint are one, seamless. The variety of designs is huge. I get a good price, because a unicycle frame is different and the hatchet frame gives him a real challenge, wrapping the paint around a 3D object thats a complex shape is a very skilled job, but the results are awesome. You just choose the design and colour choice. The 27.5" is next to be done. So here is the combo I will have done. So melting skulls, bottom image with the black and blue colour combo of the top image
One final note, you can buy a Nimbus Hatchet out of the box, they all have great spec. I bought the 29er as a complete std build. However it can be improved, so I swapped the brake set up first, bought 2nd hand off ebay, the leaver is fully adjustable, reach and biting point, plus it has a 4 pot caliper, so is very useful and a functional improvement, the handle saddle came next, I tried the Qu- Ax first, this snapped first time I dropped it, waste of money, then tried the kris holm set up, thats ok, but not great for muni, lots to get snagged on. The M4O set up is super strong and simple, you can also centre mount the lever, or directly to the bars, so its always easy to reach.
This build generated some spares, so build no2 was a cheap build, just started with the frame.
MTB parts are often interchangable with uni parts and much cheaper, so all the brake setups, were bought 2nd hand off ebay for a fraction of the cost.
Builds 2 and 3 all have a high spec than a std off the shelf hatchets, and were quite a bit cheaper than paying full price.
So all builds have improved functionallity, were cheaper to build, and as an added bonus they all look pretty good to. All tyres were bought from a guy on ebay who sells bankrup stock, so another big saving. The money I saved paid for the paint jobs.
I love that satisfaction of getting secondhand stuff off ebay. One day I’ll buy a new off the shelf uni, but in the meantime all my unis are/have been bought used through ebay/private sales, and are older vintage. Despite only starting riding in 2018 I’m kind of enjoying having unis with a 2008 vibe. That was the era of rim brakes, and when adding some to an old Nimbus II muni I was able to buy a full used Magura set from a trials bike off eBay, then I just used the rear brakes and mounts, separated out and cleaned up the rest, and sold them for a profit overall. I’ve sold on a number of unis and parts after working on them and riding with them for a while, and since there was never a big financial outlay in the first place I think my unicycling balance sheet is surprisingly near breaking even. Great value for a hobby that’s kept me healthy, kept me learning new things, and given me many, many hours of enjoyment.
Forgive my ignorance but doesn’t the hydro-dipped process produce random swirls and such? Like shown here. How did you get such nice clean lines. They do look fantastic by the way.
Hi @haskinsc reference hydro dip, what you see in youtube videos is home jobs, just paint sprayed on water, usuall guitars and similar. A proffessional hydro dip comes as a film with the paint and pattern on the film, the film is laid on a big bath of water, the film is sprayed with an activator, turning it to a back to semi liquid state. As the object passes through the design and paint, it wraps around the 3 D object, giving a seamless design and paint with no raised areas, it is one. Difficult to get your head around, but thats how its done.
Usually there is a base coat underneath the film with the pattern. The choices of designs is huge. A good example for you in pictures
@haskinsc, I think the correct technical name for it is “Hydro Graphic Paint Transfer”. Hydro Dip for short. The designs are pre sprayed on to film, guessing by a high tech, paint spraying printer. I cannot remember exactly, but when the film is laid on water, the activator dissolves the film and activates the paint, giving a pre determined painted design floating on the water. This will rap around most 3D objects. Car and motorbike parts, bycicle frames helmets, hockey masks etc but really anything that can be painted. So if you want metal, plastic, to look like carbon fibre, wood, etc its all doable. The only give away on my hatchet thats its not actually made of carbon fibre are the welds.
You just select the design/effect you want, choose what colours you want it to be and leave the rest to the expert. Usually its a base coat first, then painted design and finally clear laquer over the top. Cost wise, each frame was Uk sterling £140 or 176 USD approx same as powder coating
Here is the latest hydro dip paint job for my black and blue hatchet. Gone Nimus grey, hello metallic blue and black. Why, I just dont like Nimbus grey and I had a cheap 2nd hand brake lever and caliper in blue.