Anybody?
so has anyone tried this since?
anyone know weather/how well Kaycee’s setup worked?
if this thread doesn’t get any responses in the next week or so, i’m just gonna go ahead and try it…
Anybody?
so has anyone tried this since?
anyone know weather/how well Kaycee’s setup worked?
if this thread doesn’t get any responses in the next week or so, i’m just gonna go ahead and try it…
Alright, I’m gonna do it
So, i have a KH freeride saddle and a Thomson post in hand and am about to pull out the drill and dremel and give this a try. I guess i’ll just go by the pics and hope it works. Hopefully if/when it doesn’t work, the new Swallis bases will be available for purchase.
here’s hoping for the best
I don’t understand why you wouldn’t just want to use the adapter…
You can’t make a Thomson work on a KH base. The Scott Wallis saddle has special hardware designed for a Thomson molded into the carbon fiber. You need a rail adapter.
You might want to look at the post you’re responding to.
I thought I did. It appears to me that he want’s to drill and dremel a KH base to attach a Thomson post to it. I don’t think a 2 point mount that close to each other would have any strength at all.
Maybe I’m misunderstanding what he’s wanting to try.
Yeah, i’m not 100% sure it’ll work, but i wanted to try it. It seems, from the first few posts in this thread, that it has worked in the past, though. I’m not sure if it failed at any point in the future though, since KC hasn’t posted anything further on it. I guess the reason i’m trying this rather than using a rail adapter is that it seems like a neat DIY thing, plus I’m pretty curious to see if it will work. These in addition to a cleaner look and lighter weight than a rail post + rail adapter.
As far as my progress, it is in fact turning out to be more difficult than i thought it might be. The main problem i’m facing is that the seatbase is too thick for the bolts to reach up through. Well, the bolts reach the other side, but they don’t protrude far enough to thread into both of the cylindrical nuts at the same time. A related problem is that the rail clamp halves (that’s what i’m calling them anyways-the pieces that go on the top and bottom) only have small points of contact with the saddle base. To solve both of these problems, I am using various dremel attachments to shape both sides of the seatbase to better mate with the clamp halves. I do realize that this may weaken the seatbase somewhat, but it will create a more solid connection between the saddle and post, in addition to being necessary to make the bolts reach.
Sounds interesting. Do you have any pictures of your work?
Ha! It worked!!
Alright, so i started this a while ago, but sort of gave up for a bit, since i couldn’t seem to get both bolts to reach through the base far enough to thread into the cylindrical nuts. This was perhaps a week after i originally set out to do it, cautiously carving material with the dremel for about a half hour at a time. (i’m a slow worker)
So anyways it sat for a couple months, during which i didn’t really ride the uni much at all. Then about 3 weeks ago, maybe as an admission of failure, i emailed Scott Wallis to see if i could buy a base. He said he’d probably be able to send me one about a month from then (about a week from now). Anyways, last week was “bike to work day” in my area, but since biking to work is what i normally do, i decided to mix it up a bit by unicycling to work. The 11.5 mile trip, while not the longest i’ve done on my AX, was somewhat less than comfortable. So i decided i’d try to finish the seatbase mods. I guess i was a little bolder with the dremel this time, since i’m already pretty commited on buying a Scott Wallis base anyways, so it didn’t matter so much if i ruined this base. Anyways, i carved for a little bit, checked to see if the bolts poked through, went back to carving, and so on. After several iterations of this, i was starting to lose patience (as i had in the past). So i decided to try it without the lower clamp/fulcrum piece. The bolts easily fit through with ample thread to go into the cylindrical nuts. There wasn’t any angle adjustability, since the seat base was sitting directly on the post itself, rather than the lower clamp. But the angle seemed pretty good anyways, so i went for a short ride in the park near my house. I did perhaps a half mile, going down curbs and over roots and bumps and stuff, but i noticed after a UPD near the end, that the seat was loose. D’oh! Anyways, I decided to remove a bit more of the material that was causing the interference and try again. After a couple more tries, i was able to thread both bolts at the same time, through both clamp halves and all. I quickly snugged down the bolts and reassembled the saddle to try it again. this time i went a little longer, doing about a mile’s worth of XC type trails, with a bunch of roots and bumps, and some somewhat technical (for me) downhills where i had to pull up on the handle. At the end of that, it felt just as solid as it had when i mounted it up, and just as solid as the AX stock setup. Wohoo!
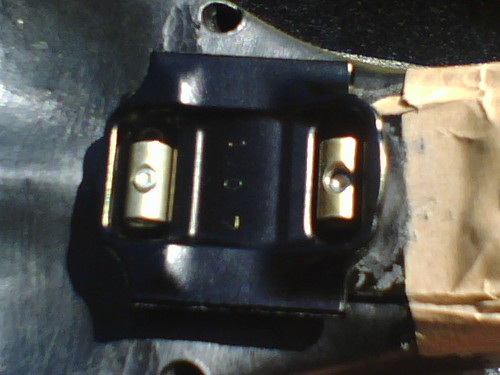
And here’re some pics
From above:
From below:
The whole thing:
And there’re a few more here.
A couple other thoughts and observations:
One thing that i was pleasantly surprised by was that, when sitting on it, i couldn’t feel any specific bump from all that hardware between the foam and the seatbase. In fact, i’m confident enough in it that i think i’ll ride it into work tomorrow.
Also, I’m thinking the reason that this took so much work for me, but Kaycee never mentioned anything about a dremel or anything, may have been because Kaycee’s saddle was well worn, and the stiffener plate was broken. I was finding that a fair bit of the thickness that the front bolt had to reach through was that of the stiffener plate. I feel like, perhaps in his case, all that was necessary was to drill the two holes and put the bolts through. Of course i could be wrong, and he may have done more extensive modification, but i suspect it wasn’t necessary with his saddle.