I was out on a trail ride with my SH MUni recently reassembled with a splined 17-4PH heat treated stainless steel axle that Steve Howard built. He broached a pair of red Kookas to go onto the axle. The crank bolts and pinch bolts all needed tightening twice during the ride. At the end of the ride I mounted on a huge, bear proof garbage container. It was a small area and a difficult mount for me. The container was two tiered with the first tier at about four feet and the second at five. I mounted to the crank on the top tier, which is very stable and easy, on my first attempt and did about a four foot drop to flat. Then, I went from the crank to rubber on the top on my second attempt so was able to do about a five foot drop to flat on that try. The cranks didn’t bend or loosen and the axle didn’t twist. I got Kris to do the same drop but he’s much lighter than I am and lands like a cat, not like a hippopotamus as do I. My test was probably the more stringent but Kris was able to ride out of the drop. I wasn’t.
Steve does outstanding work. I will try hard to break this axle but I see myself being injured many times before the axle gives out. For some reason Kris thought it was odd that I was TRYING to break the axle. He thinks like a geologist, I guess.
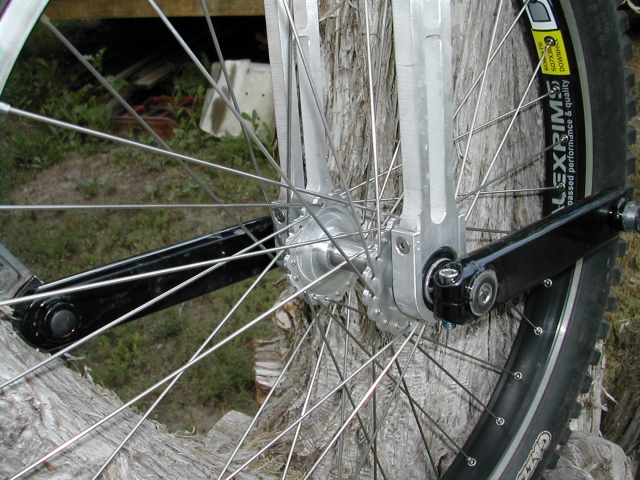
The hub that Harper is using is the KH style 8 spline hub with scalloped flanges by Steve Howard. See page 2 of the gallery to see the hub with the customized red Kooka cranks.
I can see I’m going to have a lot of entertainment on our future Seattle muni rides as Harper tries to break the hub.
Is “broaching” the process of cutting internal grooves by pressing a multi-faceted cutter through a hole? Cool. A new term.
Steve, you have a really cool job. AWESOME work. I particularly like the fact that the flanges are fat, have a lot of meat outside the spoke holes, and are bead blasted. There is no way those will fail, even on a U-turn tensioned Coker wheel that gets stomped.
How do you keep the flanges from coming together on the spindle? The grooves in the spindle are rounded at the ends, so there is either a tiny contact point from a sharp-edged flange nubbin (all-purpose technical term), or the nubbins are rounded and will try to ride up on the ramps.
Elegant design work, whoever did it. Custom flange spacings look trivial to do. Perfect for everything, including U-turn style Coker wheels.
I was on pins and needles reading Harper’s post until I got to this sentence:
I was expecting to read:
“The axle snapped like a twig and I was rushed to the hospital for an emergency saddle-extract-ectomy. Steve will be hearing from my lawyers soon.”
It took Harper about a 1.5 years to twist the first square taper axle I made him. It took about 1.5 seconds to snap the second one. This new splined axle should be considerably stronger that either of them … we’ll see.
cyberbellum - The flanges are kept from sliding together exactly the way you thought - the end of the splines in the flange “bottom out” in the rounded grooves of the axle. In addition to that I made the splined hole in the flanges undersize and used Loctite as a lubricant when I pressed the flanges on to the axle. The axle actually removed (or broached) a slight amount of material from the flange hole when they were pressed on.
I fully intend to make a wide hub like this and build myself a Coker.
I got one drop off to the right side of the container where I wanted it. The drop was steeper on that side and the landing was flatter. The mount was to the crank on the upper tier on the garbage can which is an easy and stable mount. I went from the crank to rubber on the top, then did the drop to the right side of the container. Lots of impact, very little grace or form. I think the photo James Hargrave shows is me failing to go from the crank to rubber on top on the first attempt.
As a reference, my unicycle is 48" from the bottom of the tire to the top of the grip when I am riding it. The first tier on the garbag container was one unicycle height on the right hand side.
It’s so cool that Greg is willing to test this hub. The first of my hubs that he rode finally twisted after about a year. The next one he tried failed right away. From those two failures I think I learned something … and that’s the point.
I built two hubs - Greg has one and I just assembled the other one into a ridable MUni. Just for fun I tried a spoke lacing other than the standard 3 cross pattern. I think it’s called “three leading, three trailing”. I’m sure it’s not as strong as a 3x pattern but it looks pretty swank, especially with the slightly weird “scalloped” hub flanges. I’m keeping this one and will do my best to abuse it. However, I’m not anywhere near doing big drops like Greg is … but I’m not as old as he is either.
No, the point was to build Harper’s trust in your equipment while simultaneously working to minimize the time needed before catastrophic failure so he’d be caught unawares. You were making such great progress with your second hub, and I fear you’ve now set your research back significantly. On the positive side, Harper clearly has short-term memory challenges, since the first thing he did with Hub 3 was start jumping off trashcans.
Let’s again enjoy the final moments of Hub 2’s life: