Hey Corbin, that looks sweet! Will both you and Louise be using that on Uninam?
Just a question, why don’t you make the base plate bigger and do away entirely with the plastic KH seatbase? That way you have something that bolts directly to the seatclamp, with the foam on top. You could make a pretty flat saddle out of that design too…which would be good for long rides.
Thanks! I’m still very new to welding and working with metal.
I do oxy-acetylene welding; arguably one of the toughest ways to do it, but it is a fairly cheap investment. If you look at the other pictures, you can see my setup:
Yup; we will be using these on the tour (I can’t wait!).
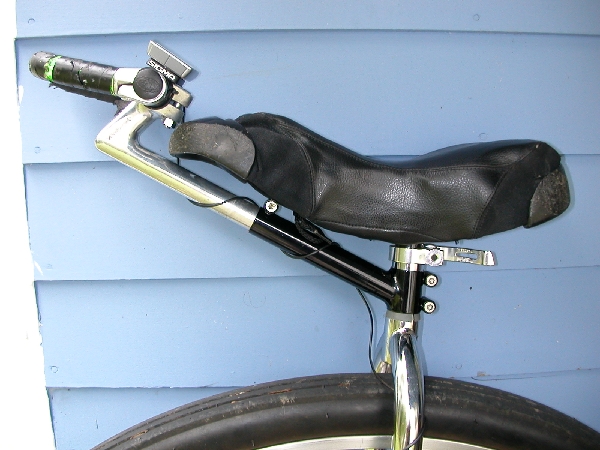
Getting rid of the seatbase! That’s an interesting idea and I’ll definitely experiment with it! The disadvantage might be weight; the 1/8" steel is required to resist flexing, and that is pretty heavy. I also opted to keep the original KH handle on; I find that position ideal for cranking up steel hills. However, I may leave that off in one of my next handle designs in favor of something else to grab onto that is more in line with one’s hand.
Nope! It is actual welding – the process of combining two metals into one by melting them. Brazing is using a slightly different metal (ie: brass or silver) as the filler, and lower heat. From what I hear, brazing can be very strong (especially silver soldering – apparently a lot of high end bikes were made with silver soldering). I use mild steel rods; I have two different thicknesses, and I prefer the thinner rods. The tubing steel is from old bikes (they are in some of the pictures on my picasa album). I didn’t do any of the bending – generally, I try to find the bend I want in the steel tubing that I have.
As Mike also noticed, I am getting better, but painting also tends to hide imperfections – take a look at the pictures for some close up of the welds before I painted them. It is something that just takes practice, and it is a new hobby that I’ve been enjoying.
I notice you’re putting this on a Nimbus 36. Have you tried the T7 handle? I’m curious because your handles look to have a number of advantages over the T7 (curved shape, much lighter and more compact, etc).
It doesn’t fit on a Scott Wallis seat base (which I have. I broke my Death V grip handle.)
It requires a rail adapter, which doesn’t work for short people (I’m 5’6", and my girlfriend is 5’2" – we cut about 1.5" off her N36 frame so the seatpost could go lower!). Steve-o also has the same problem I do (at 5’6").
It seems like it uses too much steel; I was hoping I could get away with a lighter handle. I still need to weigh my handles to find out if I succeeded, but I’m pretty sure I use less steel than the T7. A lot of my handle’s weight is in the stiffener plate, which I could probably shrink down a bit.
I’m also hoping to make a version of my handle that eliminates the need for a separate KH handle.
That’s interesting! I tried a little stick welding (aka: arc welding) in my metal shop night class; I found arc welding to be really hard! Of course, I was using an ancient helmet, and you couldn’t see crap out of it. The auto-dimming helmets are super nice, and would make it easier, but alas, I don’t have one.
I also tried TIG and saw MIG in the class. MIG seemed easier in the sense that you don’t have to hold a stick/rod. TIG was sweet and lets you do aluminum. If I had cash to burn, I’d probably get a TIG welder as it seems the most versatile.