Good Luck...Good Riding Kris!

Pictures

Pictures attached from:
http://www.bcbikerace.com/Media/Blog/

Kris- This is so awesome. Very inspirational as I move into the last 2 months of training before my first “long” ride on my KH 36. Congrats and thank you for everything you’ve done for the sport to make it possible for newcomers like me :slight_smile:

Is it me or does it look like kris has a bobble head in the picture on the left? :stuck_out_tongue:
great pictures, i’d love to ride there some day! :frowning:

Awesome job, Kris.

When you ride on the flat soft-dirt sections, how does the resistance in high gear compare to an ungeared uni?

Also, I like the short T-bar setup. Is it just cut from a stock touring handle?

In flat, soft dirt (e.g. sand or loose soil), I’d probably be in 1st gear - just too hard to push in second.

Pushing 2nd gear also takes some getting used to. In the beginning when practicing in second gear, I often felt like the frame was bobbing back and forth a lot because I’d lean forward and push down, and find I’d leaned forward too much for the amount of acceleration I had in 2nd. Vice versa for braking. This went away as I got used to it.

Also, there were some times in the race where I played it safe and stayed in 1st where I might have otherwise experimented with 2nd, because wiping out (or getting hurt) is slowest of all. Judging when it was worth it to switch gears (e.g. if you see 30 feet of smooth level ground ahead, then a rough section, do you switch or just spin it out faster in first) has definitely been a learning curve. As far as wipeouts go, I hardly ever fell on descents; almost all my falls were on climbs. That said, I definitely made use of my leg armor and wrist support gloves - it was well worth using them despite the fact it was XC riding.

The short T-bar setup is the standard bar cut shorter. The slotted tube is oriented with the seatpost clamp towards the rear (it fits both facing forwards or backwards) to allow the T-bar to be pushed in as far as possible. I really like this setup. I don’t think I would use it for fully technical downhill North Shore riding with big drops, where I’d prefer to grip the brake straight from the plastic handle, but for everything else and particularly in 2nd gear it adds a lot of comfort and control.

Kris

Great result Kris! That looks like fantastic tracks :smiley: Thanks for the write up.

Way to represent Kris! Awesome work in what looks like a fantastic event. This is exactly the type of riding i have been getting more and more into since i moved to a geared Kh24 with custom handlebar about 8 months ago.

It would be great to share some ideas about your riding technique in regards to climbing in high gear, using the handle bar and braking technique.

I used to think the same thing as you with the brake position- that it is most comfortable for tech DH if it is under the plastic bumper with a spooner. If you are set on that idea you should have a look at what Jogi (on the forums) knocked up with a broken KH trials frame and a CF base. I use an old lollypop style uni frame clamped to a KH rail adapter (without the front bumper) with the magura lever on the RH arm (in this set up a spooner is not needed).

Once you get used to a slightly revised braking technique it is as good- if not better than using a spooner. In this configuration you can wrap one or two fingers right around the lever- getting more power to the brake than just getting the ends of your fingers on a spooner. It also makes it more comfortable when using the brake for more gradual braking on fast flowing single track/fire trails because you can maintain good hand positions out on the handles to increase comfort and control.

One other bonus of a handle is the ability to climb. I find that the more i ride with gears and handle bar the better i am at all aspects of climbing. By gripping both arms of my handle bar and getting up off the saddle it is possible to get a much greater amount of torque to the pedals than by using one arm on a plastic bumper. This does mean your side to side balance needs to be more attuned because flailing an arm lessens your purchase on the uni.

I’m also interested about how consistent you were with shifting during the event. I am still fine tuning my sense of when it is best to upshift instead of just spinning like crazy on 125s. Did you find that you had to read further down the trail than you normally do in 1:1? Or did you just up and down shift really frequently?

Would be great to hear your thoughts on these points of riding. I am competing in my first 50km mtb event in a few weeks and am excited to see how a GMuni goes against some keen bike riders.

Keep on pushing the sport- and great write up.
mark

The way the T-bar is set up on my uni, for offroad use, it almost overlaps the plastic handle at its base. Everyone is different but personally I like the choice of the two handle options.

For most climbing I do use the T-bar. If it’s relatively smooth uphill pedalling, then I might have both hands on it. But for me it totally depends on conditions; hence that it’s nice to have both options, partly because the handle position is different. Essentially, the more the climbing devolves towards being closer to trials riding as opposed to just powering upwards, the more likely I’d have my hand on the plastic handle.

I really like having the spooner and brake lever in the middle as it lets me wrap more of my hand around the handle, and because it protects the lever from impact in a wipeout. Personally I want my handle to be as low profile as I can get away with. Note - to put the T-bar in the position I have it on my uni, I cut the width to 120 mm to avoid it hitting my knees.

I’m getting better at shifting through bumps but it definitely is a learning curve and usually I find it way better to shift before I’d get to a place where it would be tough. Learning when to downshift when you’re cruising towards a steeper uphill is one challenge (e.g. how much momentum can you carry up the bottom of the rise, plus you need a bit of “coasting” to take pressure off for the shift). On the downhills, say when downshifting before a technical section where you want to be in first gear, I find it useful to use my rim brake to take braking pressure off my feet and allow a downshift.

For muni I’d always wear over-the-ankle shoes (e.g. Five Ten Impact High’s or Karvers) because I often still seem to miss the shift with the bottom of my heel, and tend to try for that then move my anklebone inwards if I think I missed it. Plus I want to avoid sprained ankles =)

Definitely all this requires reading much further down the trail than in a singlespeed. Partly that is for safety, to avoid wiping out, say, on an otherwise smooth trail with boulders or fallen logs.

Kris

Congratulations Kris! Very inspiring! While I’ve done many ultra-marathon epics myself on FOOT (even some multi-day stuff) I’m yet to take the plunge into multi-day mountain unicycle epics though I think that day is coming very soon. It’s just a matter of finding the right time and opportunity, but I am extremely motivated to give my dream a shot within then next couple of years… Until then I’m experimenting with some multi-day “MUni-packing” on some lovely single track trails in my area this Fall.

Huge kudos to you! All the best in your recovery!

Kris,
Can you post close-up pics of your handle setup?

Thanks!
Chris

Very cool Kris. Having done a handful of century+ cycling events on one wheel, I feel pretty cool when I can keep up with a group of cyclists for the day rather than just getting passed all day long until I reach the finish. To actually rank well in a competitive field is fairly mind blowing. Good job.

Cheers,
Z

Here’s one.

The slotted tube can be flipped either way, depending on what you want - I put the seatpost clamp facing forwards if the bar is extended, and backwards for this setup so I can move the T-bar as close in as possible. As mentioned above, the bar width was cut narrower to 120 mm width, to avoid my knees. It also brings the brake lever closer to your fingers, making it less tiring to grab.

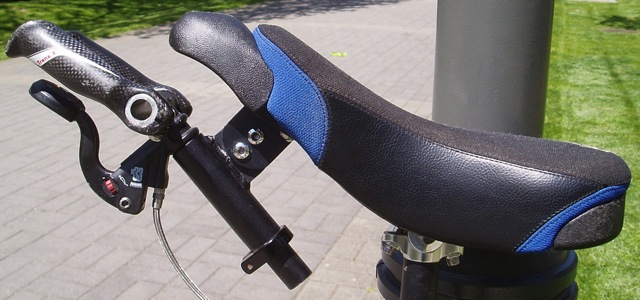
The photo shows a set of carbon fibre bar ends. The stock setup is good, but I like these ones too. They are too expensive to ever be part of the stock setup though.

Best is to set it up approximately what you want, and then take a hex key on the first ride and adjust it until it’s the orientation you want. Canting the bar up and the bar-ends down slightly moves the lever closer to your fingers. Also, tightening the angle adjustment and bar ends enough to stop movement, but not so much that they won’t move in a bad crash, significantly helps resistance to breakage. The setup feels stiff to use, but likely has slight elastic flex in a crash which also helps avoid brittle failure. So far I have dropped it lots of times without a problem.

K.

T-barshort.jpg

Completely off topic…but it must be really cool to get on a unicycle and have your name stamped all over it!! :smiley:

Kris,
Great pic. That’s exactly what I needed.

Where can I get the T-Bar and seat connector? I looked on UDC and couldn’t find anything that looked like that. The only ones under seat accessories were actually whole seat mounts that connect the seat to the seat post.

I also need to figure out how to attach brakes to my nimbus that doesn’t have brake mounts.

Thanks,
Chris

Awesome ride and nice writeup Kris. Way to set the bar high (again).
Ro

WOW Kris and congrats. That is awesome! Can’t wait to shake your hand the next time I see you. I wonder how all the two wheelers feel being beat by you?! If you had to guess how much of it you rode in 1st gear and 2nd was it about 50/50?

Thanks. More than 50% was in 1st gear - all but the gentle climbs were in 1st, and lots of technical sections on the flats and downhills were in 1st. But interspersed with that there were some beautiful flowy singletrack sections that were good in 2nd, all doubletrack and dirt road sections from gentle climbs to descents were good in 2nd, and on the last day we rode down a twisty bermed jump trail in the Whistler bike park, and some other manicured DH trails, that were 100% rideable in 2nd.

The 2nd gear was also invaluable in that, on several days, the race started in the middle of town, and headed on roads to the trailhead. Without the 2nd gear I would have been way, way behind before the trail started.

Kris

Kris, I want to join on the bandwagon in expressing my congratulations and thanks for the inspiration.
+1 is totally inadequate, so ++++++++++++++++++++++++++++++++++! :slight_smile:

Nice setup also with the T-bar. I’ve been experimenting with mine for XC use, and really like it for this but have been beating the heck out of my upper legs. I’ll definitely be trying out a narrower configuration.

Pretty much as everyone has said so far… Congratulations … certainly very inspiring. From pushing the boundaries in the sport, to designing and marketing your own brand of unicycles, to competing against MTB’ers in a grueling race … simply … wow !! Nice one Kris.

Love the Uni setup, and after reading your write-ups I would love to fit a schlumpf to my 26.

This thread was fun to read, and that quote was icing.

Stories like this always remind me of that cute short-lived ‘More than human?’ television show where they determined that Kris is indeed more than human. Robot, actually. (As if there was any question…)

Fantastic event Kris, you are the man. The daily massage would almost be worth the price of admission. Maybe the early miles on the WRT had some overlapping benefit? Keep up the hard work, glad the knee is healed and performing well. Allot of the patrollers I work with claim their “repaired” knees are better than the old knee. Enjoy some rest, and get back on it!