It won’t take long before you are balancing the wheel between your lags better. I think it would be more work to do it with the pedals wider since the rim has more room to move. I’m pretty sire your improvement curve will be much faster than mine considering your knack for one wheel locomotion.
I was reading your thread from 2009 about the pedal brackets. Do you know of they now make 9/16th right/left nuts to fit standard pedals? I lover the stacked washer idea to keep the nut from working it’s way out of the wood. Did you just tap the nut into place or did you epoxy them in as well? Also, do you think using just wood screws would be sufficient to attach the washers to the 3/4" plywood?
The 1/2x20 nuts are standard hardware, but 9/16x20 seems to be mostly unique to bicycles. I did find that some older american autos used 9/16x20 LH theaded wheel lug nuts in the 60’s. Those lug nuts may work with a little work.
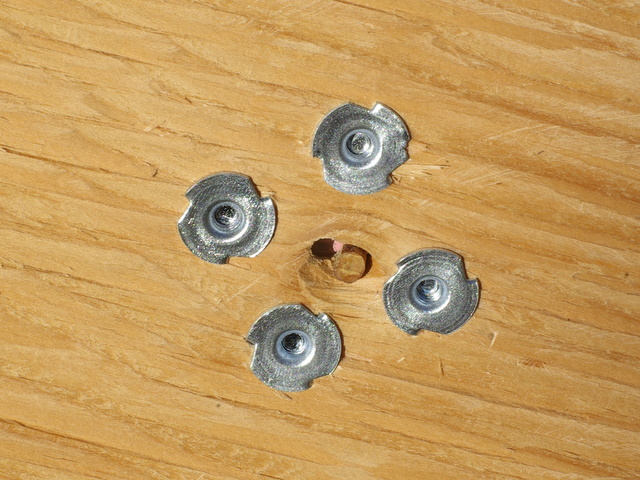
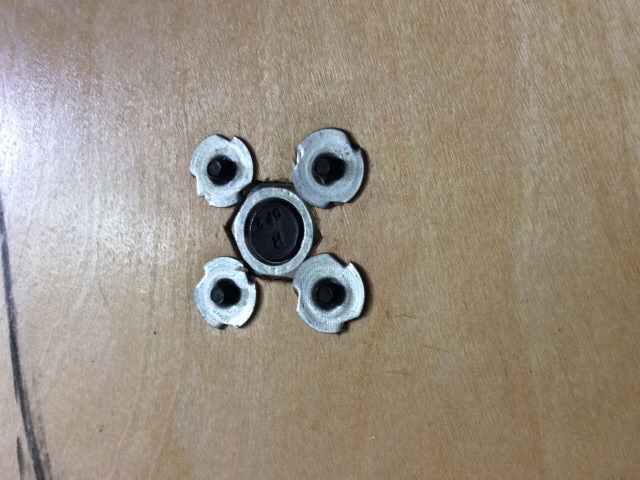
I didn’t glue the nuts in place. I drilled a hole, and then used a chisel to fit the nuts perfectly. The nut clamps the washers betwen it and the pedals, and the washers are pulling against the Tee nuts on the other sided. So, you can see that the pedal is mounted to the washers, and the washer is mounted to the wood. The tight fit in the wood is so that i can remove the pedals if I ever need to without having to take the whole assembly apart. I don’t think wood screws would work for very long before they either pulled out, or started pullling apart the plywood. Another way I have though of doing this is to back it with a single piece of metal the same diameter as the washers, then thread it to accept the machine screws. The tee nuts work very well though, so i don’t know if I will ever feel inclined to make a nicer set.
When I first came up with the idea I was looking for 9/16 nuts with very little headway. I came across the 1/2" LH nuts by accident and remembered that I had an old set of 1/2" BMX pedals sitting around. I have since upgraded the pedals to 1/2" Twisted PC’s.
Those are the same pedals I use on my trials, but in 9/16. Good to know the 1/2" vers. is available, as I think I will try your method. (Is the the correct size? It looks too low profile. Do I need a standard hex with fine thread?) But I’m thinking that it might be even stronger to add a solid round plate to the the opposite sides as well, and use machine screws and nuts to clamp them together, with the 1/2" nut in between. The reason for this is because when the UW hits the ground during UPD’s, the pedal(s) hit the ground, sometimes straight down and hard, and soon can cause the embedded pedal bolt to break though the other side. Was the reason you didn’t drill all the way through, mainly because the bolt would not be flush with the pedal side?
Ran out of edit time. I could drill all the way through, but fill the excess space on the non-pedal side with small washers that fit in the drilled space, then cover with the large round plate to secure 1/2" bolt. This would prevent the bolt from breaking through from numerous pedal strikes. Also wondering if the 1/2" bolt would, over time due to the torque from foot pressure, start to round out the shaped space it’s in, and start spinning inside? I can imagine not wanting to over-tighten the bolts as that also could cause the chiseled sides of the wood to round out, especially since they are only press-fit and not glued.
With the big fender washers there is really no chance of the pedal spindle breaking through the other side. The whole washer would have to break through. I didn’t drill through all the way because I wanted the nuts to fit as tightly as possible in the recess. So I drilled only as deep as the nut is thick.
When I first put it together I was worried that the pedal pressure, and impacts against the ground would loosen the bolts. That ended up a non-issue. I did use blue loctite on the machine screws which I would recommend. I think it would be better to use tee nuts than to use a piece of metal, and nuts on the other side. If I was going to use a piece of metal I would tap it and have it replace the nuts altogether.
FWIW, when I remade my wheel with nice baltic birch plywood, and generally better attention to detail, I moved my mounts from my old wheel and they were as secure as the day I installed them. I changed the machine screws for countersunk allen head bolts, and moved to 1/2" plywood which isn’t thick enough for blind holes. The wood is much lighter, but seems just as stiff as the 3/4". I think it is that the wood is higher quality, and so makes up for the lighter weight.
My thought was that the 1/2" bolt could be pushed through the other side by pedal strikes, since the pedal is free to spin and the round washer on the pedal side, which has a hole in the middle, can’t fully prevent the 1/2" bolt from being pushed out, other than the fact that the pedal’s body is so close to the round washers that it would stop the pedal from pushing through. Because the washers are not directly attached to the 1/2" bolt, that was my thought. I can imagine it easier without the large washers being there, the bolt would be pushed through from pedal strikes. The washers then, seem like they are used mainly to keep the the nut and pedals intact on the pedal side.
I also like your idea of using 1/2" ply to save weight. Found this which looks good.
The pedals are firmly attached to the washers. That’s kind of the point. So, the nut attaches the pedals “to” the washers. Then, the unit of pedals, nut, and washers is attached “to” the wood.
I just remembered that my original inpiration was the UW mounts that George Barnes made under his GB4 label. I would have bought those, but they were no longer available by the time I caught the UW bug.
I seem to remember seeing posts showing pedal “protectors”. These were some kind of hard rubber “caps” that fit onto the outside end of each pedal, to prevent damage from ground strikes. I’ve done google searches and nothing came up. I would like to find a way to protect the pedals from this kind of impact, which will be much more of a common occurrence with the UW. Oh, and I’m thinking of going with oak vs birch, since oak is harder wood.
Oak would be nice. I used the baltic birch because I had a large scrap left over from a project. When I did it I really thought that it wouldn’t handle the stress since every DIY Ultimate Wheel starts with 3/4" plywood. I’m sure that the heavier sheet is stronger/stiffer, but if I ever want to MUW (mountain UW), I will probably do it a bit differently.
I have an extra 32" wheel that I want to eventually make into a UW. My idea is to make a very large hub that can be laced into the rim, and have the pedals mounted directly to it. Something sort of like the kite winding rings that are available.
Yeah I thought the wooden UW would be too heavy and awkward, but to my surprise, the weight didn’t seem to affect my ability to ride it and, in fact seemed to make it more stable. I currently run a resist nomad 700 45c. Although it is a fairly narrow road tire, wouldn’t the 45c be almost double the width of your 23c? The 23c sounds like the way to go at high psi, would not be much wider if at all than the rim, which would mean less leg rubbing on the tire? I did use duct tape on my tire and that definitely helps reduce friction.
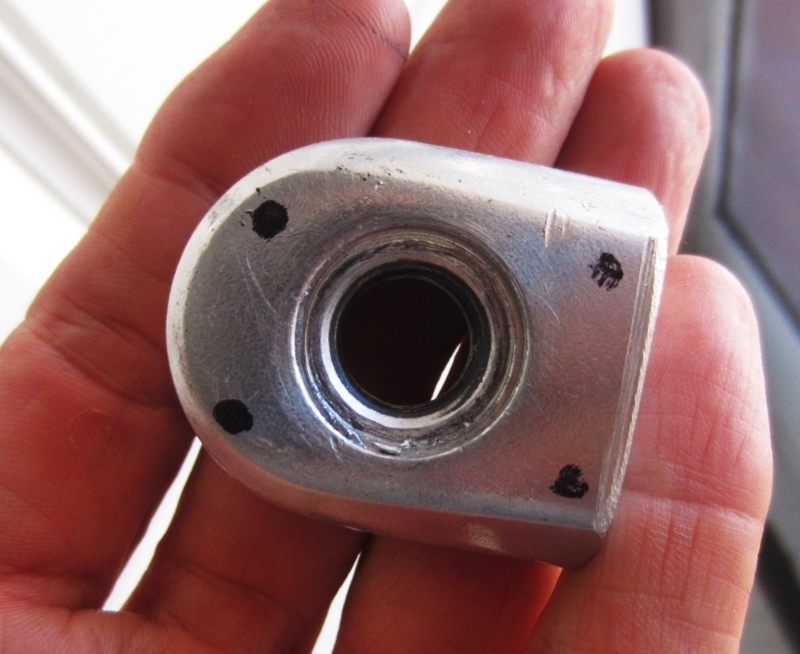
Found a pair of old cranks and cut them down for use in my next UW. Orignally planned to attach on top of wood disc, hence the hole marks, but decided to embed them flush as usual, and cover with round fender washers like Jtrops. One advantage over a hex nut is that I can still use standard 9/16 pedals, and also the non-symmetrical shape will be less likely to spin around in the wood slots after a lot of riding. But I think in addition to the washers I will also use marine epoxy.
You may want to see if you can round up a pair of steel cranks to scavenge the threaded bits. If you are clamping a washer between the pedals and the crank end you will lose threads to the thickness of your washers. It may not be an issue, but it’s a thought.
But if the center hole of the washer is large enough, then the pedal could still be tightened all the way to the crank, could it not? Is it necessary for the washer hole to be exactly the same diameter as the pedal thread? The crank part is far larger than even a 1" diameter hole. Also, I just acquired another rim so I can make another UW using 1/2" thick BB plywood. I wanted to ask you if the inner part of the rim has to be flat. Almost ALL the narrow 700c rims I’ve seen are “V” shaped, not flat. Would a moderate V shape be ok, as long as screws are used in every spoke hole?
In my version the pedal mounts to the washer. If you want to make it so that the pedal mounts to the nut, or threaded end of a crank, then you have to figure out how you are going to attach the nut to the wood.
As for the fit with the rim, a flat cross section would be ideal. I think it would work with any cross section as long as you can figure out how to attach it securely. One idea I had a while back was to leave a gap between the rim and the wooden insert. Then use furniture nuts with matching machine screws to attach it through the spoke holes. The machine screws would essentially become very short spokes. This sort of construction would certainly allow for more leeway.
If you look around at some bike shops you should be able to find an old road rim that has a flat cross section, like a Mavic MA2, or MA40. For that matter you could use a Mavic Open Sport, or a Sun M14A.
Do you actually mean that the pedal mounts against the washer, and not actually to it, since the washer has no threads? And the washer, I assumed, was basically acting as a retainer for the embedded nut. I’m still wondering what the difference is between the crank part and a hex nut, when both are threaded and do the same thing essentially, with the main difference simply being the shape.
The nut is being used to fasten the pedal to the washer. This may be more semantic than anything.
If I take two pieces of metal, and drill a hole in each one. Then run a bolt through the hole and secure it with a nut on the other side. I would say that I attached the two pieces of metal together with a bolt. I wouldn’t say that a bolt is holding them against each other even though it is true.
The washer is essential to the mount, it isn’t passive. If you have a chance look up the GB4 Ultimate wheel mounts. That should give you an idea about how I came up with this.
Ok, I just looked at those, and is one piece, basically as if you were to WELD the hex bolt to the washer, Then the pedals would be attached to both the bolt and the washer. With your setup the washer is separate from the bolt, which is all I was trying to say. But I get it, the pedal threads secure the embedded nut against the plate and vice versa, so in effect it is attached. Btw, it says the GB4 mounts are made in America, but that website is in Germany! Do you if they are available anywhere in the US? I would really love to get a pair of those! Also, do you know if they are standard 9/16 threads? They don’t specify that.