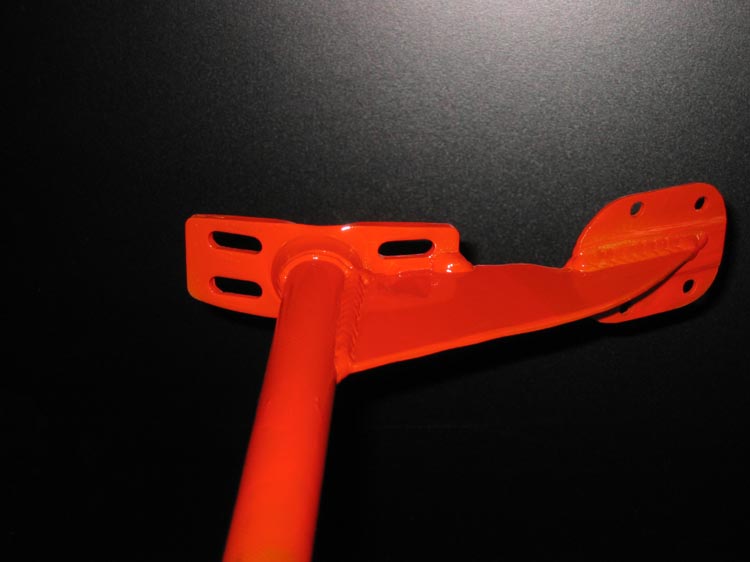
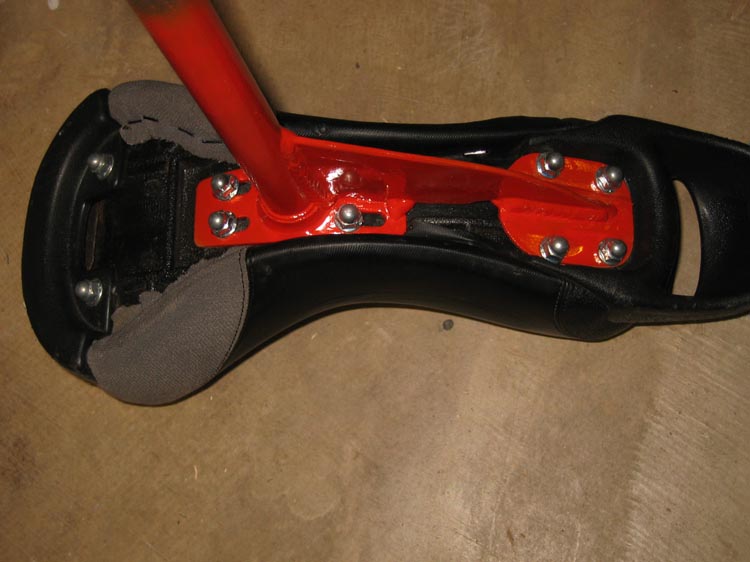
a while ago, my brother broke his KH seat. badness ensued. he had been bending the tongue on the seatpost routinely, and bending it back into shape, and now he broke the seat. A little while later, I bent and broke the seatpost on my brand new trials uni. I was pissed. luckily, we had a spare seatpost laying around, so I could still uni. now, we were determined to fix this problem. thanks to a picture posted by johnfoss, we got the idea to make a reenfoced über-seatpost. so, here is the finished product, in all its wonderful glory and awesomeness.
I’m with DigitalDave on this one. You might be able to sell the design. It looks like a heavy piece of equipment, but it also looks like neither the seat nor the seat post has any chance of breaking.
Nice. I really like it. Did you use the setpost that broke, or are those new ones?
As it happens, I just broke seatpost today. It’s a stock Torker LX post that I was using with my Summit trials. The only reason I was using that one was that I wanted to use my Torker (Miyata) seat with my Summit uni.
Would you guys be willing to make one for me? How much would you charge?
Looks beautiful. I’d like a chrome one! This is the way to go for non-adjustable angle posts. You can stick any additioinal handle onto the front of that seat and post, and you should never have to worry about stiffness or breakage of the post.
Lightness:My original one was aluminum. That was sweet. It was on my super-light, super-custom track unicycle, which was stolen at Unicon X. I think that one had the seat post base plate running all the way up to the front bolts. Miyata seats have changed since then. It was still very light.
My current one is steel, but has less metal in it. Definitely heavier than the racing one though. But if you want non-breakage, you have to put up with a little extra weight too…
After riding it, it feels VERY different. I need to get used to the stiffness, but I think it added about an inch to my hop height, which is great. it probably could be made lighter by putting in more holes or something, but I don’t notice it too much.
Dave: I should sell it to bedford or something… that’d be great… I need to figure out the copyright stuff, though. it was john’s idea, right?
Daino: I don’t think I could make you one, because that would require a miyata seatpost, and also I’m not really looking to go into business.
Aaron: I got it welded at a local welding place, because i don’t know how to weld. I don’t know how much that cost, but I doubt it was much.
Over all, i’m very happy with the finished product, and I think it should be very strong indeed. The only way I can see it breaking is if it crushed the seatpost tube in at the corner of the weld, though that would be pretty crazy. If that ever happens, I’m gonna be sure to send you pictures.
In all seriousness I am feverently against doing stuff such as copywriting. It breeds an environment of competition and hostility. This is too small a market to start trying to prevent others from seeing designs. I think unicycling should stay open, allowing people to make whatever they want. Also, you didn’t even create the design, so why would you go and copywrite it? That is exactly why people copywrite things in the first place, so to not steal the design and copywrite it means that noone else has to. If everyone is fostering to open design sharing, then everyone benefits.
Otherwise a very cool design. Does it help with seat out?
This is exactly what excites the heck outta me…we have so much room for improvement and innovation in every uni part.
Beautiful work Fuego!!! And continuing props to Foss too for his great ideas!
I really would like to post the same negativity back at you, but, I wont.
Copywrighting does not mean the designs are not shared within an industry. I think you are confused.
well, I forgot about this thread, so I’m bumping it with a report on preformance and a tutorial for those interested in making their own:
I can’t really feel the weight difference yet, but I think it’s not too much. We used a rather thick piece of steel, so it probably could be slimmed down a bit, not to mention the holes I drilled for sexyness could be larger/more, that would shed some weight. However, I cant feel too much of the differance.
It’s really a LOT stiffer. (As in no bend at all). so it takes some getting used to. I still can’t quite hop as high i think, but on the other hand, all my unicycling has been to and from school with a backpack of books, so that changes a lot.
The one bad side I did notice is that a stiffer seat seems a bit less comfortable, though this is a small sacrifice.
LITTLE, BAD TUTORIAL:
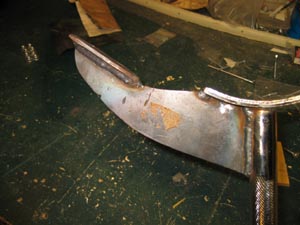
On the whole, it wasn’t too hard to make. All we did was cut a thin cardboard pattern that fit the countours of the individual seat, (this is important. all the angles will screw it up if you don’t get it right. not PERFECT right, but it has to fit. Then, I etched the pattern in with a punch. (not hard at all. I’m making a tutorial here, ok? bear with me. SOMEBODY doesn’t know how to do it.) I cut it out with a hacksaw, which was medium hard, and time consuming. (oil your saw and notch. it helps.) I made it fit well on a grinding wheel that we recently acquired, and smoothed it out with a file. The grinding might be the single hardest thing for people who don’t have equipment. You could probably get it to work with a file, but that would be a lot of work. I really don’t know how else you would do it, though. Then we took it down to a welding shop, where we got it welded. This cost $10 per seatpost, so it wasn’t that expensive at all. Then, all I had to do was paint it, and you can do this however you want. Personally, I just spraypainted it over a coat of primer, because it was easy.

 that’d be great… I need to figure out the copyright stuff, though. it was john’s idea, right?