Question for wheel builders

I have been truing the wheels on my 3 unis (20",24" and 29"). I know how to true rims, but what experience I have was 20 years ago and was on skinny 700c rims. So I have lost the ‘feel’ for a well built wheel.

The 20 and 24 have gone smoothly and I have the tension up from the machine built tension.

But the the 29" keeps going out over a large portion of the rim with small changes to a small group of spokes. I seem to remember from my bike days that this is an indication that the wheel is too tight and that is why the rim tacos with small changes. I’m talking 1/8 turns on 3-4 spokes and a wheel that was coming close to laterally true now has half the rim out again.

This is on a stock nimbus II 29" tourer. (the faster blue color)

Does that sound like a wheel that is getting too tight on a 29" rim?

Never mind I found the confirmation of my thoughts in a thread from 2004. I know I should have searched FIRST.

I was thinking about slacking some of the spokes by checking the vertical (roundness). Seem reasonable? Or better to go around and slacken them all by some amount. What would be a good start? 1/2 turn, full turn loose?

I don’t like guessing about how the tension is on a wheel. When I work on wheels that have really uneven tension I start be de-tensioning the whole wheel. Once it’s detensioned I can see if the rim is really bent up, or if it’s still basically straight. If it has obvious bends I use the edge of my bench with some carpet and bend it back to relative straightness. I don’t worry about flat spots because I don’t have a flat spot puller, and they are very expensive.

Then I bring the wheel back up to tension, and dish and true it. I just did this for a friends bike a couple of weeks ago, and it took a bit over half an hour from start to finish.

jtrops said what I was going to.

I’m not a pro wheel builder, but I’ve built a few over the years. Overtightened, a wheel will become more fragile. Keeping in mind that the rim is straight to begin with, the spokes are simply the means used to string the rim and hub together. The spokes need to remain resilient, yet strong, so opposing spokes reinforce each other while allowing some up and down movement of the rim as it flexes. If you overtight spokes, they can creat too stiff of a wheel, which can cause cause the rim to go out of true easilly oe at worst rim failure.

Last year I ordered a 36er prebuilt, when it arrived it had come way put of true, had a wave throughout. So I detuned the rim until it was straight and the threads were just showing on all spokes at the nipples, then I gradually increased the tension equally. I took it off road the other day and it’s still straight as an arrow :slight_smile:

Spoked wheels are dynamic, so be prepared to tweak things, you may not get equal tension always, esp if you need to dish the wheel to compensate for a frame that is crooked.

I’m sure there are others who can wax more poetically about wheel building that me. Suffice to say that wheel building is a lot less mystique than simply taking the time to do it. In point, I made my son spoke his 24" muni wheel. He followed my direction and some instructions printed off the internet. It took 3-4 hours to complete the job, but at age 14 he built his first wheel. He still rides it, haven’t had to true it since it was built, that was over a year ago with regular muni use. Not bad, not bad at all :slight_smile:

Thanks guys. I know and understand the things you are saying. I was just hazy on remembering that a wheel that goes potato chip on you meant that the wheel was too tight since until I found that old thread I was recalling that info from about 30 years ago. I was 95% sure but wanted to get to 100% sure before reworking that wheel.

I guess I didn’t make it clear enough that I did all my own truing 30 years ago on my two road bikes. I did pretty much all my own bike maintenance starting when I was about 15 and tore down my BMX bike to paint it and then figured out how to put it back together. The first time I had my wheels trued the mechanic had me watch and in the future he let me use his shop to do my own wheels.

As I said the 20" and 24" went smoothly and that included pulling the 20" over a couple of mm to get it closer to center so I’ve got some skillz, not a complete noob on wheel truing.

I took my time, over an hour for each wheel since this is my first truing in 30 years and first on Unicycle size rims.

I used chalk and marked both sides as I worked. I just spun the wheel up using the cranks without pedals and held the chalk in till it was just rubbing. The wheel and the chalk did the rest. It was like automatically marking what spokes need to go which way all the way around the wheel. I loved it and don’t plan to go back to cable ties. I haven’t used it yet but I’ve prototyped some squeeze clamps and a six inch plastic ruler for checking vertical run-out.

The chalk cleaned up easy with just a wipe of fingers or at most a slightly damp paper towel or rag. Even after hundreds of markings I saw no evidence of the chalk use on my rims.

You don’t have to clean between each revolution of adjustment because as the wheel comes into true the mark the chalk mark gets longer. But I did clean after about every third revolution of adjustments. Fresh marks really helped gauge where I was at. And it was easy to get those two rims in very close to true. Like no visible wobble and getting a chalk mark all the way around no matter how I held the chalk.

I see no downside except for a little chalk dust but it says right on the box “non toxic” right next to where it says “a product of China” so I’m probably inhaling Melamine dust.

When I did do the rim cleaning is when I grabbed pairs of spokes and squeezed as I went around to bed the spokes.

Does anyone else do something similar?

Anyway back to my 29" rim. This is the first time I’ve pulled a wheel too tight. I don’t think it’s close to being ready to implode. I am right on the edge of the whole tacoing thing because I only came up about an 1/8 turn from where the rim was close to true. Some spokes I didn’t turn at all because of how much pressure I was putting on the spoke wrench told me far enough on this spoke mister.

About the 2nd time half the rim snapped out of true I knew it was time to step away and rethink what I was doing.

This time I will get it right since I now know what too tight feels like.

Thanks for the input and I’m not sure how I’m going to proceed. My plan is to check the vertical true since I did a lot of back and forth laterally and then decide.

I like the work so I have no issue taking my time and bringing it back up slowly, checking often with my trusty chalk (did I mention how much I loved using the chalk?)

slightly off topic here, but I’m looking for a little advice with tensioning/truing my wheel :slight_smile:
Basically, the wheel has been left to it’s own devices for about a year now, and it’s at the stage where I think it probably will die unless I sort it (this is my trials wheel by the way)
I’ve got myself a spoke key, and so far, have been far too scared to even consider starting work on it. The whole wheel is incredibly loose, I was wondering whether i should go round and just tighten everything up a turn or two before i get it 100% straight again?
or would it be best to get it straight while it’s loose then tighten it up?
Yeah, I’m bad at this. :slight_smile:
any replies are much appreciated.

Normally you tension the wheel, and then true it. I can’t give exact advice about how much to tighten the spokes without having the wheel in front of me. I would say that if it has enough tension for you to ride it you probably don’t want to go more than a half turn, and it could be more like a quarter turn.

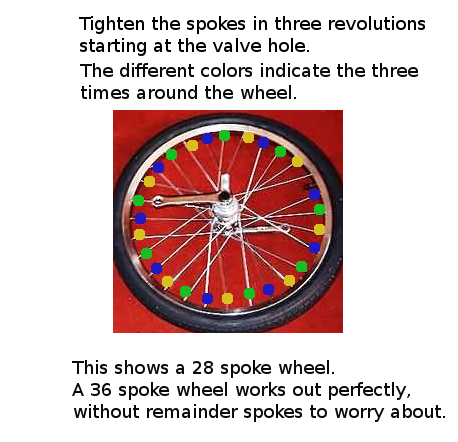
Tension the wheel by starting with the nipple at the valve hole, and then count three spokes, and tighten that nipple, and continue around the wheel this way until you get to the valve hole again. If you have done it right you should end up on the spoke you started on with a 36 spoke wheel. Now starting with the next nipple, 2 away from the valve hole, continue tightening in the same pattern you did before. Once you get to the valve hole move to the next spoke, 3 away from the valve hole, and continue as before. After three revolutions of the wheel you will have tightened all of the spokes. This will bring the tension up evenly around the wheel, and reduce stress on the rim, and hub.

thanks jtrops, do you do three revolutions on one side, then three on the other, or one on one side, one on the other?
Also, is it best to take the tube/tyre off for it? :slight_smile:

When you’re tensioning you don’t worry about sides. The sides of the wheel come into play when you are dishing and truing.

The goal is to bring the tension up on the whole wheel evenly. You start to have problems if you do one side at a time, or if you tighten all of the spokes sequentially.

Here’s a quick diagram that I threw together. I couldn’t find a good uni wheel photo with 36 spokes, so it’s a little off, but you get the idea.

Wheel tensioning.png

This was great advice for me to, thanks.

Glad to be helpful. After almost 30 years of building wheels I sometimes have a hard time explaining it.

Here’s a video tutorial on building a 36 spoke wheel. It’s for bike wheels, but I imagine that the technique is basically the same for uni wheel.

http://www.youtube.com/watch?v=qTb3x5VO69Y

Now you guys are going to make me want to build a wheel .

I wonder if the KH 20" ‘Flat’ rim is available . . .

Oh crap, just checked an its available on unicycle.com. It’s going to make me spend money I don’t have.

How much would you estimate a uni wheel build to cost, labor-wise? Let’s use a 36er/36 spoke 3x wheel build as an example. They would have to tear down the current build, and re-lace with new spokes.

At the shop I worked at we considered that building a wheel from scratch, with new rim/hub/spokes, should take about half an hour, and so it was $25. If we were re-using parts from an old wheel the cost would be up from there based on shop time.

If you aren’t saving the old spokes most shops would clip them to make it faster. Better shops would detension a little before clipping to reduce the stress on the rim and hub flanges. Saving the spokes adds a bit of time to the tear down. Also, used rims are unpredictable as to how straight they are, and that can add time over the same build with a new rim.

Since rates have certainly gone up I would say it’s reasonable to assume the build would be $35 and up based on the same considerations I mentioned. I could see a problematic rim easily going up to $60 or more.

The four wheels I built for friends this Summer were a lot like this situation along with saving the spokes. They got pretty good deals with the friend price of FREE.

I will definitely not be saving the old [defective] spokes. And the stealth rim is relatively new, as is the hub, which is the most current KH isis. I was thinking about cutting/removing the old spokes myself, and bringing in the rim, hub and new spokes with nips. I’m thinking myt LBS may not even charge me, since they are a sponsor. But I will pay them for there time anyway. :slight_smile:

jtrops gives good advice but I would add that with a half trashed trials rim it is probably quite a bit out of round. I would start from scratch as far as tension goes and loosen all the nipples until you just see threads (equally on all spokes) go around the rim using the every third spoke technique until you are about half way to your desired tension.

This is when I find all the high spots and give them a bit more tension to bring them down. Don’t let off the tension on the low spots though, they need some tension to keep your wheel true.

After you brought down the high spots check for true, when you tighten a spoke on one side loosen the same amount on the other side. for example if you need to tighten two spokes on the left half a turn each loosen the middle spoke on the tight half a turn and the two spokes on the outside of the spokes you tightened a quarter turn each. That will keep you rim round.

Keep de-tensioning your wheel by stepping on either side or whatever your favored technique is after every step and re-check your work. Once the wheel is both round and true you can bring it up to final tension using the every third spoke technique. As you near the end you will be doing smaller and smaller adjustments.

If you are cutting the spokes loosen them by at least one turn first so you don’t end up with massively uneven tensions on your rim in the deconstruction process.

Bring them your 36" frame as well as they probably don’t have a truing stand that will fit a 36" wheel.

If they are fatigued spokes I would definitely clip them, it will save time. It’s a good policy to follow the same 3x3 method (count three spokes and clip, 3 revolutions) for clipping spokes as I described for tensioning a wheel. I have seen rims taco when the spokes were clipped sequentially. I would imagine that it would be more likely with such a large wheel.

EDIT: I agree with Eric that it’s best to detension the wheel a bit before clipping. Campagnolo insisted that wheels be slack before clipping spokes due to uneven stresses on hubs that had resulted in flange failure.

We used a small bolt cutter, about the size of normal pliers, to clip spokes and it was quick work. I would imagine that you could use linesman pliers, but that it would need a bit more muscle.

Thanks for the advice. Similarly in piano restringing, proper de-tensioning and removal of old strings is crucial. Improper, uneven tension can damage the soundboard and crack the cast iron plate. The average medium sized grand retains as much as 20,000 lbs of combined string tension! A concert grand about has more than 20 tons of string tension!