What rim are you working with?
qu-ax (qx 36").
Hi again @Nurse Ben,
The guy at the LBS said that after reading the instructions you have posted he still can’t find a solution for the valve implementation.
Usually, what he does is getting a tube that is a bit larger than the rim and then he glues it on the taped rim and cut the leftovers.
For 36" he of course doesn’t have such tube, so his question is how to apply the valve and the inner tube part (on top of the taped internal rim)?
Thanks a lot,
Shay
What they’re talking about is a “ghetto tubeless”. You don’t need the rubber tube if you use tape. The tape seals the rim, the valve seals to the rim tape, the tire seals to the rim hook, the sealant keeps everything sealed.
Have they never used a separate valve and tape?
That’s exactly what I understood from your explanation also, but according to the LBS guy the tape that goes on the rim isn’t enough and the valve is not an easy task for them to be sealed onto the rim hole.
I would have done this myself if it hadn’t been for the risk involved in case I fail to succeed (being my first time doing it, etc.); because I ride this uni to work every day I am very dependent on its functional condition ![]()
Valve’s aren’t a problem. Check out 949 racing’s valves, I posted them on a similar thread, I’ll do some digging and find you the link.
Just a couple wraps of Stans yellow tape, then put the valve in (which would just be tightening a nut) and then dealing with the tire.
Edit:
I won’t sugar coat it, tubeless can be frustrating to set up and IMO almost isn’t worth it. BUT, once it is setup it’s pretty nice to have.
Thanks a lot for the info!
Guys, thanks a lot for all your help.
One last thing I need to ask you is to please post me a link to where I can purchase the tape, sealant and the valve (large one - I think it’s German) from.
As far as I recall these are the three elements I need - but if I forgot something please correct me.
Thanks a lot!
Llke Killian wrote, the valve will seat fine on the tape. I just did another one the other night, it took me fifteen minuties to go from tube to tubeless.
It’s not hard to do it yourself except when it comes to getting the intial seal, that will take an extra set of hands and a high pressure air compressor.
The links for parts are posted in an early response, Chain Reaction Cycles in the UK should be able to ship direct, they have good prices and service.
36er tires can be a pain in the arse, so here are a couple things to consider:
First, the tire bead must “stick” to the rim edges (hooks) in order for the tire to dry seal. You must get a dry seal before adding fluid or you wont get a wet seal.
Because you have a deep V rim, the tire beads are going to gravitate to the center of the rim, which makes it hard to get a dry seal. When working to get your dry seal, think about how you can manipulate the tire beads outwards to the hooks.
I use a one inch webbing strap with a cam buckle, some folks use a piece of rope with a truckers hitch. The idea is to force the center of the tire into the rim which causes the tire beads to flare out toward the hooks.
When you start to inflate, you may want to use soapy water to help the bead and hook engage, the soapy water helps fill the void. Remember to remove the valve “core” before starting to inflate.
A high pressure air system like they use at a auto tire store is really helpful, but take care not to overinflate as this will blow the tire off the rim.
It’s a fine little juggling act to get a 36er to go tubeless, but it will work.
Watch a whole bunch of You Tube videos before trying tubeless.
All of this will make sense once you have completed your first tubeless conversion.
I love tubeless, it makes sense for most applications, it’s lighter, provides flat resistance, and improves the ride on most tires.
FWIW, I use Gorrila tape to seal my rims - you can cut it to fit exactly and it sticks like nothing else. A quick google popped this tutorial. The surface of this tape is much smoother than duct tape, and the material is thicker.
That said, I could not get my 36er to seal, even with this. But I was trying to do this with an older ribbed Coker tire that doesn’t fit the rim very well at all and is stiff so its hard to get it to confirm to the rim wall - I’d bet that any newer tire/rim will be a lot easier. I’ll try again when new tire time comes.
Sam
Another piece of advice:
On my 36er, I absolutely could not get it to dry seal once I took the tube out, my beads just didn’t want to seat. What I ended up doing, was putting a tube in to seat both the beads, and then popping one side carefully so the other side would stay seated. Then I had to gently pull the tube out, install my valve and put the other bead back in. That way, you’ve already won half the battle, and only need to get one bead to seat rather than two.
For folks struggling with trying to get tire beads to seat, one tip I picked up a while ago is to use soapy water around the beads when first inflating. It works like a charm to let the beads slip/slide on the rim/rim tape and position themselves to seal. I’ve done a bunch of MTB wheels this way now and have had real good luck.
My procedure is to soap the hell out of both beads and inflate (without sealant), then release pressure or let it drain slowly, quickly add sealant (through the valve stem, if possible) and hit it again with air. Usually works like a charm. It also helps me if I hang the rim from a hook when adding the sealant so that I disturb the shape of the tire as little as possible once seated.
Generally speaking, this is also a good test of whether your rim/tire is gonna work. If you can’t get it to seat with the soapy beads, it’s not likely to do it with sealant either. If it fails, at least you don’t have a goopy, expensive mess.
Hi @Nurse Ben,
You are right, your links of your posted items have the purchase option too - sorry for not noticing that before.
I just wanted to be sure - the Shrader Valves are the thicker once, right?
Regarding the rim tape width - I should probably get the 10Yds x 25mm for my rim which is at 42mm width, right?
And which size of sealant should I get - 1 Pint - 473ml or 1 Quart - 946ml?
Thanks a lot,
Shay
Hi @Nurse Ben,
I’ve watched Stan’s videos over and over again and I have a few questions just to verify that I got it right, please:
1- First, I clean the rim with scotch and anti-grease with a towel.
2- I apply 2 layers of the tape on the internal part of the rim but because I should use two strips overlapping one another in the middle. Use a towel to remove any trapped air under the tape.
I guess I should apply first the tape on the one half width of the rim, then on the other half width of the rim - and this is one layer, then I should apply the 2nd layer, right?
3- The valve seem to be very simple - just use its screws to install it onto the rim without any extra tape, etc.
I thought this would be the problematic part; am I missing anything here?
4- Install the tire onto the rim, then use soap water and brush on both sides of the rim edges.
5- Detach the tire and put in 4 ounces of the sealant and then put the tire back onto the rim.
Inflate the tire using a compressor - BTW what is the max PSI I could use for my TA 36" tire as a tubeless?
6- Then it’s the part of shaking the sealant all around in circles and observe when the bubbles of the sealant stop appearing.
Go over this process for until the bubbles stop showing.
BTW - I found out that you already explained me about the Rim size - 25mm before, so ignore please my question from previous post.
Am I missing anything?
Thanks,
Shay
Make sure the tire will inflate WITHOUT sealant first, or you could potentially burn through a bottle of sealant like I did.  Once the tire is seated WITHOUT sealant, DO NOT detatch the tire, instead, remove your valve core and squeeze the sealant in through the valve. I speak from exprience, it’ll save you a LOT of frustration.
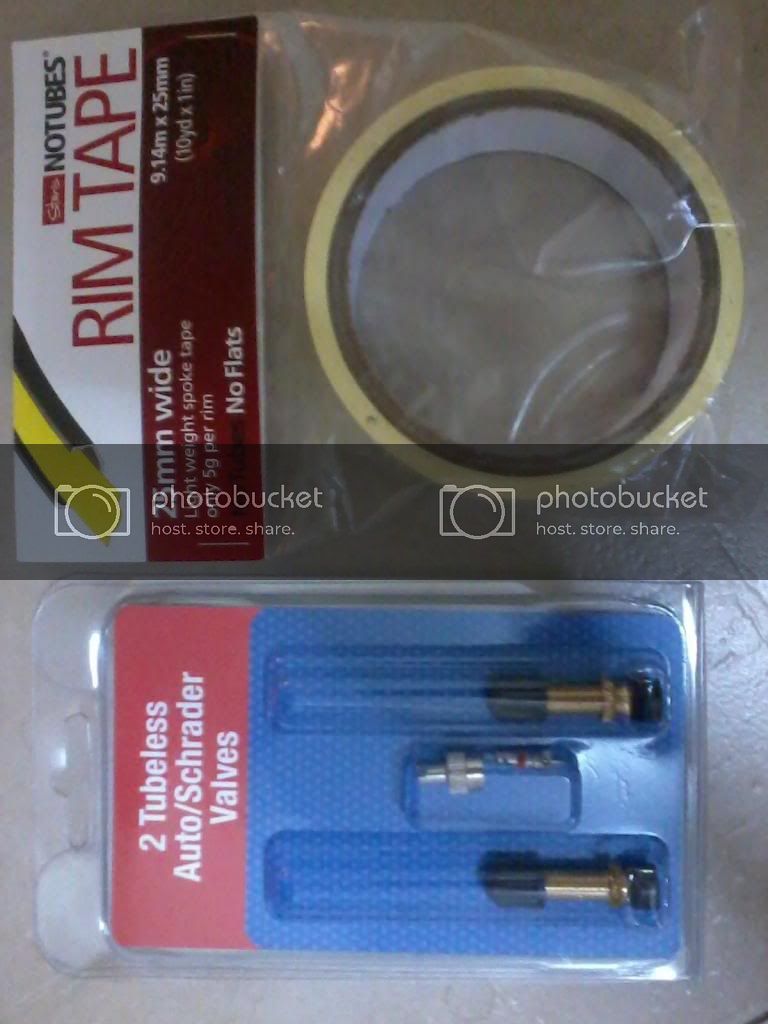
Look what just came in via mail!
Tomorrow I’m going to undergo the tubeless conversion process - wish me good luck! ![]()
Good luck
Take a look at some of the home tubeless videos where they used a strap, rope, or zip ties to press the center tread downward, this may be necessary to get the intial seal.
If you need more air pressure, an auto tire shop may be able to help you out.
Don’t get impatient, it can be a pain to get the 36er to seal initially, but it’s well worth it once you’re there.
After you get a dry seal, carefully deflate the tire, then remove the valve core to add sealant, then pump it.
After pumping it to a fairly high pressure, say 30psi, swish the sealant around in the tire by spinning and “wobbling” the wheel, the idea is to coat the inside of the tire and rim.
Last, you need to fill your sink or tub with water and look for leaks. If you find a leak, then swish the fluid around the leaking area and recheck. You want all leaks to seal.
The next day swish the wheel around again.
The tire may lose a little pressure at first, but it should hold most pressure over night. If you ever lose pressure, consider the need to add fluid. If you add fluid, go ride or swich the wheel around.
Have fun!
@Nurse Ben, thanks a lot for all your help. It is most appreciated.
I decided to take no risk and do this process at my regular LBS which has experience in such conversions.
I just wanted to get an advice regarding one thing - should I use two layers of rim tape or one would be enough?
I saw on one of Stan’s clips that he recommends on using 2 layers.
Thanks,
Shay
Actually, I don’t think I have other options except 1 layer - as 10 Yards long won’t be enough for two layers.
Unless, maybe - I’m not sure if it’s a good plan, to use one layer of the two overlapping strips and a third strip only on the center of the rim width for reinforcement.
What do you think?