ce qu’il veut dire est ‘‘unicycle’’!!
he means a unicycle. in spanish unicycle is either monocicli or monocicleta
So anyway… Back to the original question: How does one build a homemade unicycle?
Not sure myself but I’m sure others could answer instead of changing the topic to how to say unicycle in different languages.
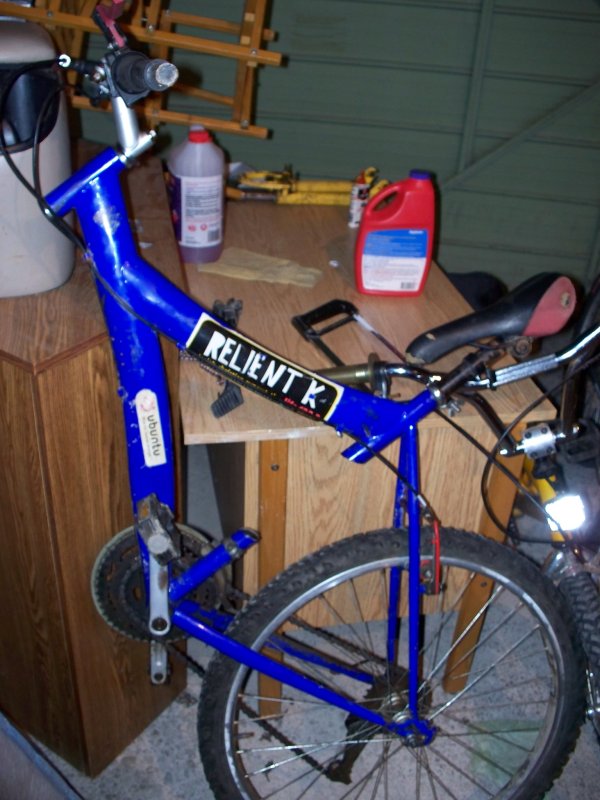
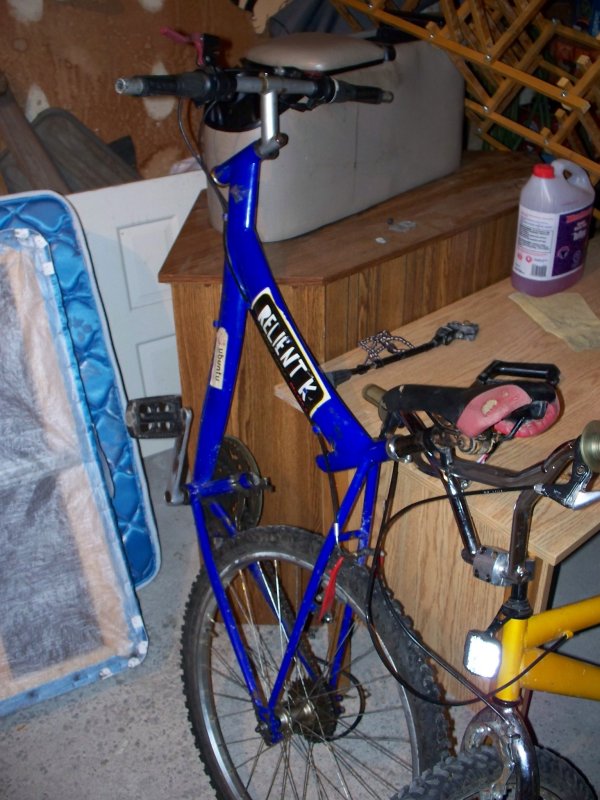
Right now I’m working on my balance on home made a uni-bike. I removed my front wheel and fork on a bicycle and am figuring out how to reattach the handlebars correctly. The wheel is not direct drive so, all I am working on doing is a constant wheelie. No going backwards on this thing yet. I may post pics.
Well me and Mr Charm will be working on a homemade unicycle project soon enough. ![]()
1) Like this??
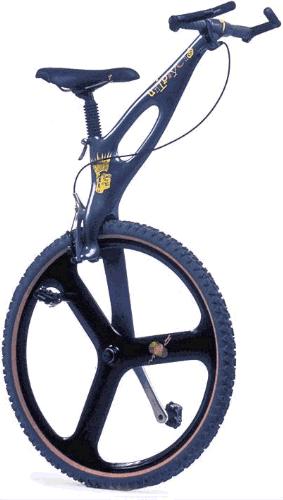
Almost. I’m trying to imitate that, but with a real bike. The original chain and pedals are still on it. No pedals attached to the wheel.
It would be pretty cool if could get a real uni-wheel and put it on.
Note that I have only been unicycling for a short while and I started on this when I had to replace the cranks and my uni was out of commission.
I’m open to suggestions as to what to do next.
Tried riding it??
Also why not try something like this??
Sorry if it’s not how you want it. 

I have no “real” plan made for it. I’m just experimenting.
It was a mix between the two pics you posted that was in my head.
The farthest I’ve gone on mine so far has been about two meters.
1) Oh ok, fair enough.
2) I would go with the 1st for commuting and the 2nd for trials.
3) ![]() Sweeeeet!!!
Sweeeeet!!! ![]()
Building your own
WOW!
Thats a direction I’ve not considered going. A recumbant unicycle. I suggest a seat similar to a “real” one that will allow you to use your thighs to help turn it may also give you more stability. I don’t know about the wheel. You might be able to spot weld the free wheel so it doesn’t free wheel. The bearings will probably die on you though becasue of weight not to mention the axle which is only about 3/8 of an inch in diameter. I’ve got a wheel like that in my spare parts bin and will take a look at it to see how to weld the free wheel if you can. I’ll also take a look at converting to some common flange bearings. maybe thats too much advice and help??
still WOW and it looks like a cool idea as well as the photo HAZMAT came up with. I dont know that I’m going to convert from my designs though. I’m getting too old… well brittle.
Neat idea!!
hmm
that mountain bike thing won’t work if you make the back wheel solid.
the chain tensioner has too little tension and will flex…
now for a little speculation:
you can weld one bearing, the other has strength the way it is, so you only have to lock one bearing to make a solid wheel, that is, if you do it well
Can be made to work if you remove the freewheel (got a freewheel remover?), clean the hub’s freewheel threads very well with solvent. Using the wheel as lever with the chain wrapped in the bike’s frame around the bottom bracket, screw on a track cog very tight with lots of red locktite. Then add a bottom bracket lockring, again tight and with red locktite, this is the ring on the left side of the BB on old 10 speeds/cheap mtb’s, though you may have to try a few of them to find one that fits well. (Got a bb lockring tool?). And once done give it a few days to harden well before using.
The track cog has to be the type with wide threads on it, the cheapies made of stamped steel are too thin, it can strip the threads off your hub.
http://www.jensonusa.com/store/product/CS408D00-Shimano+Dura-Ace+Track+Cog.aspx
The lockrings they sell on that page are for track hubs though, they’re not the kind that’s needed to screw onto freewheel threadings, needs to be one off a BB.
Or, you could buy a track hub, cog & lockring, build a wheel out of what you have… (got a spoke wrench?)
Once you’ve settled the wheel part, then you’ll need to cut the chain to size (got a chain tool?), and adjust tension by moving your wheel back & forward in the semi-horizontal dropouts. You may have to play with wheel dishing a bit to get a good chainline.
It looks like you’re doing what thread about it
Does anybody know if he had the back wheel locked, or did he use the brake?
Im pretty sure he just controlled with the brake, so perhaps you could learn to do that?
Yeah, that is basically what I am going for. I have been practicing wheelies on my mountain bike to try get used to it, but so far I can not make a wheelie last more than five seconds.
I also have to figure out a way to make the handlebars stay inside the tube. I took off the forks, so now it has nothing to hold it in. The only thing I am thinking of trying is cutting the forks off with a hacksaw and attaching the base of it to the handlebars through the shaft. I am not sure if I want to do that yet.
(Grah… my darn apostrophe button isn’t work- wait… there is)
shiftable
So… What you do (or me for that matter) is take two sproket clusters with free wheels from the same make wheels. cut off the side of the wheel/axle that does not have the sproket cluster then mate the two sproket clusters together so they make a full axle with spoke flanges. You have a wheel with sproket cluster on each side and the clusters free wheel in opposite directions. Now make another axle with drive sprokets, one on each side with cranks and peddles. Like on a giraff. Take two chains and derailures and chain up each sproket cluster. One deraiure will shift one side the other derailure the other side at the same time. So, we have a chain driven uni, a very short giraff if you will that is shiftable and is controlable like a straight uni. If we used peddle sprokets the same size as the middle sprokets on the clusters we coudl have two high gears for speed and two low gears for hills and such. I think I’ll make one and see if it works. For now I think I’ll have another beer.
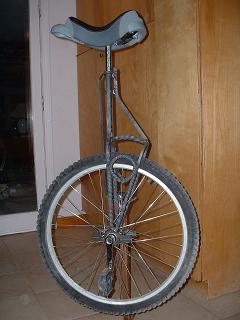
my latest
MY latest uni. I’m trying to be a hobby blacksmith and I thought I would combine two of my hobbies. I’m not very good at either but I have fun!! I just finished this and I had to post it.
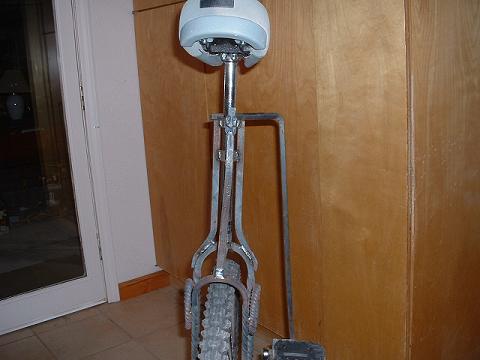
That looks like some heavy beast you got there!
It looks like it’s going to snap/bend/break the moment you freemount the sucker. 
Not that demanding
I’ve not that active a rider to notice weight. I’m to the age where I’m trying to stay in shape so any added weight might be a help aerobic wise. The maine support structure, the one in line with the seat of 1/2" square stock so I really don’t think it’s going to bust. The important welds were Vee’d to get full penetarion Not just layed down on top of a seam. Got to go to work see you. I’ve ridden it and it goes!!! For a guy with my uni cycling ambitions that’s enough. I’m not going cross country with it I’v got my other heavies for that. by for now.
Give him a break, I think his english is fine. It just lacks one important word.