Fitting a Roach cover on a Miyata seat

Alright, after extensive searching of the forums and nights upon nights of picture analysis I’ve come to the conclusion I need to start a new thread, asking for help.

I got a Roach seat cover from uni.com a week or so ago and waited with much anticipation to get it on my Miyata saddle(and may I take the time to mention my shipment arrived in 4 days. Note the fact that I live in Canada! I was amazed at the shipping speed. Thanks to the wonderful folks from Marietta!). I tried the bolts, got a friend’s Dremel Tool and let the buggers see the light, so to say. Anyhow, I fiddled with the seat cover, experimenting with the dogbone pillow and the original Miyata foam, unable to fit both in the cover comfortably, at least not when I got around to sticking the saddle base in. I think I may have too much air in the pillow, as John Childs was able to fit this combination in just fine, see this comment:

John, by your description it would seem you have one of the “new” Roach covers (lycra bottom, four little loops, etc. – see all Diagrams). Did you trim your original foam down any, as I’m finding it hard to fit it well. Did you ever run into an issue of the foam not fitting at the top of the cover?

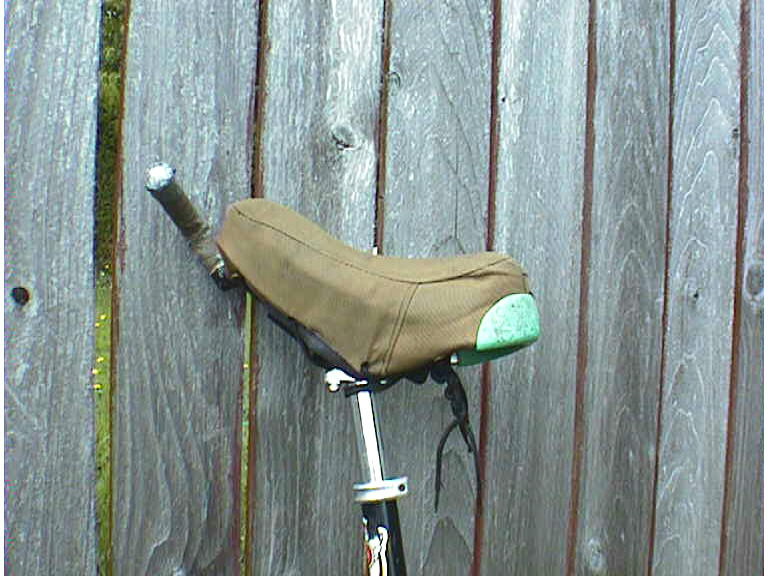
This is really a small matter and I can play with the amount of air and the size of the tube to make things fit. My huge (and currently insurmountable) problem is the fitting of the cover on the seat (hence the title of the thread… imagine that). My problem lies in the positioning of the front two little loops (see Diagram 3) and how they interact with the front bumper/handle. I was able to melt holes in the lycra bottom (Diagram 3, little white holes) for the bolts and was able to secure the seat post and rear bumper with little problem – the front bumper is altogether a different story. I have as of yet been unable to fit the cover on the seat bottom so the front two loops are anywhere near out of the way of where the front bumper needs to go (the bumper won’t fit comfortably on top of the loops). I know it is possible to arrange it so things fit together with ample room to spare (see Diagrams 1 and 2) but for some reason it isn’t evident to me how this is done.

The front loops on my seat cover are as in Diagram 3, pretty much at the front corners of the cover. If I find this method of holding the seat cover on to be insufficient, I will get grommets/eyelets installed, but for now I’d like to get this system working. There was one person who also said they just cut off the lycra and used the original saddle clips. Have there been others who have done this? Has it worked well for you? Do you have any issue with the front loops?

It’s been about 15°C here for the last couple of days and the trails are starting to dry up… I need to get riding. Thanks to anyone who may be able to help.

Later,
Eli.

Diagram 1 (from this post):

Diagram 2 (original image):

Diagram 3:

I did have to trim the Miyata foam to get it to fit in the top of the Roach cover. I trimmed a little bit off the front of the foam.

My style of air seat works in either the old or new Roach cover. What it needs is a high volume cover like the Roach design.

I’ve been meaning to take pictures and document how I put my air seats together. I’ve just been incredibly lazy about actually doing it. I’ll make that a priority project for tomorrow. I’ll try to have documentation for the process up on the web by Wednesday. Ah, a due date. Now I might actually get it done.

way to much air,my 1st air seat was like that… look at the pic,TO MUCH AIR!!!

I had a really hard job getting my cover on aswell.
I got mine off roger (unicycle.uk.com).

I put some pics in my gallery, and how i made it… (CLICK HERE)
Hope it is usefull

Joe,

p.s - it was worth the bother. Its SO nice to ride on!

I didn’t like the brick Miyata put in the saddle in place of a foam pad, so I replaced it with some foam cut from a camping mattress from MEC. Just trace the pad and cut with scissors; you can even cut out the centre to make more room for ‘plumbing’.

That gave me a softer foam pad and fit in the stock seat cover with a tube. With a Roach cover you could use a couple of layers of that foam and experiment with different cutout patterns.

I have to agree with Joe - it was a pain, but well worth the trouble!

Tim

John and Joe, thanks for your replies – I’ll look into carving up the foam if I think I need it.

Jag, the problem is I don’t have any air at all in it. None.

It seems everyone addressed the issue of stuffing, which unfortunately was my smaller problem. The big brick wall I’ve been kicking for the past three days is that even without anything in the cover at all (no padding, no air pillow), I still can’t get the thing on.

I’ll restate my problem: see those four little loops at the front of the cover (Diagrams 1 and 2)? Well, the front pair aren’t where they are in Diagrams 1 and 2. They’re further forward, where the arrow on each picture is pointing, thus getting in the way of the front handle – see Diagram 3 and look at the position of the loops compared to the position of the bolt holes. That’s how they are… in the way. I’d have to put it down over the loops, but when I try this the bolts won’t reach through the handle as it’s raised up but the extra material (the loops) under it. I haven’t been able to arrange the cover in any fashion so they resemble the two in the diagrams (nor the picture on unicycle.com). Perhaps if someone from unicycle.com is reading this, have you ever found an issue with the “new” covers as I describe?

I hate to whine, but if anyone has any advice whatsoever, I would be so entirely, completely grateful for your sharing it, I’d be hard pressed to express my gratitude with words. I’m already stressed with exams and unicycling is normally my stress-release. Without a functional seat, not only can it not relieve my stress, but it’s contributing to it as well be getting me mad :).

Anyhow, I hope there’s an angel out there waiting to help me.

Later,
Eli.

Eli,
If you like you could mail your cover to me and I will modify it to the correct specifications for where the loops should go. You can ask Darren Bedford about what I have made recently. You can email me at rocksma@shaw.ca and we go from there. I will do me best to get the cover back to you straight away so that your riding in the saddle again and stress free.

The front set of loops are not necessary. If the front loops are not in the right position you can cut them off. The back set of loops will be enough to keep the seat cover on.

I got pictures of my air seat today so I’ll have something up on the web about the makings of my airseat tomorrow.

sounds like you may have gotten a factory second,you could either cut off the loops like JC said or send it back for another.

Mike,

Thanks for the offer, but I think if I want to go that far I’ll get a grommet kit and go the lace route. Darren was telling me about your covers (well, not much more than that he thought they were better than the Roach covers and that he’d given one to Jeff Groves for testing) – I look forward to getting one at some point.

Yeah, I’ve emailed unicycle.com and referred them to this thread (smile, you’re on candid camera!). I’ll see what they have to say but I may very well end up lopping off the loops.

Many thanks for everyone’s advice. It was very useful and I’m feeling much better about the whole thing now.

Later,
Eli.