Does anyone know what I could use as a boom that is pre-made and inexpensive?
I, too, was wondering this. A reason why I made this thread.
Handles
Here is another option from a cross-the USA rider.
I made a handle setup I call the JC Coker Handle. There are pictures and links in my Miscellaneous Stuff gallery. The links go to a couple of RSU threads that describe the handle and the components.
I have shortened the boom from what was pictured in JC Coker Handle Beta 3. I ditched the water bottle idea. The weight of a full water bottle out on the boom like that affected handling of the unicycle. It was like swinging a weight around when turning. I have found it is better to carry the water in a hydration backpack or hydration bum bag (waist mounted pack). The boom extension is now about the length it was in JC Coker Handle Beta 2.
The seatpost rack was another idea that I thought would work out better than it did. Again it was a problem of the extra weight on a boom affecting the handling of the unicycle. For a flat ride that doesn’t require a lot of maneuvering the rack and trunk bag works well. But for climbing and maneuvering the weight of the bag makes the riding less fun.
Anyways, the cost for parts for just the JC Coker Handle are going to be $100+. I got most of the parts from a local bike shop that sells recycled bicycle parts and I got the stoker stem from eBay. Buying all the parts at full retail would make it even more expensive. If you get creative you can find used parts and put something similar together for less. A nice feature of the JC Coker Handle design is that there is no welding involved so even those of us with no welding skills can put something like it together.
If I was starting over I’d likely get a Wallis Design V-Grip Handle along with the under the saddle brake mount. It’s a nifty handle and suits the way that I typically ride. I usually ride with my right hand holding the handle on the front of the saddle and my left hand holding one of the barends on the JC Coker Handle.
One advantage to the JC Coker Handle design is that I have the cycle computer mounted up forward where it is very easy to read while riding. I wouldn’t be able to put the cycle computer in the same position with a V-Grip handle. I’m not sure where you could put a cycle computer on a V-Grip setup where the cycle computer would be easily readable while riding.
What exactly is a Stoker Stem? I saw the picture of it in your Gallery, but what is it used for on the tandem bike? Also, is one better over another? Are there different sizes so I won’t need shims? Thanks.
Mike
The captain is the front rider of a standard tandem and the stoker is the rear rider. A stoker stem holds the handlebars that the stoker holds on to. The stoker stem attaches to the captain’s seatpost. An adjustable stoker stem has an adjustable length so the stoker can position the handlebars at a comfortable distance for his body size.
On my JC Coker Handle I’m only using half of the adjustable stoker stem. The other half (the half that holds the handlebars) got discarded.
There are different sizes but the size choices are limited. You’ll likely need to fashion some sort of shim to fit the stoker stem to your frame or seatpost.
There are different styles and designs for adjustable stoker stems. I used one that looks like this. The boom slides in where the handlebar mount fits in. Handy and convenient that it turned out that way and that the diameter happened to be good for a 28.6mm boom. 28.6mm just happens to be a standard stem size so I was able to fit a standard bicycle stem on the boom.
Haven’t got a picture, but there’s a guy who rides with Lunis in London who has a very funny and cheap way to make a handle.
It’s a bit that clamps onto the seatpost, which I think is just a bike stem cut in half.
This has a hole inside it, and he puts a big piece of wood into it, which is I think a cut down broomstick handle.
You can lean on the handle when riding along. If you’re not using it you can just pull it out of the hole and pop it in your bag. It doesn’t weigh as much as a full on metal handle.
It does look very funny though.
Joe
I just purchased this stoker stem. I now plan on a cut-off handlebar and climbing pegs, like JC has.
I’m hoping the handlebar clamp (already part of the stem) will work to directly hold the handlebar, instead of the boom and additional clamp used in JC’s beta 2 handlebar.
I’m also hoping the seatpost attachment clamp is designed to go on the stem and not the seatpost, because I’m short and have no extra room on the seatpost, but there is room on the stem.
Maybe too much hoping, but experimentation will tell.
I looked at that stoker stem and thought the exact same thing… what if I could just put my handles on the clamp that is already part of the stem? Post some pictures so I can see how that stem works… maybe I will buy one.
There are a couple more like the one I got (aluminum, 37 deg.) and another kind (Cromo, 45 deg.) the same seller is offering.
I saw the Cromo one with the 45 deg. on it. I liked the long neck to it, but I’m not sure if it would work or not.
So this stem came in the mail and it’s light and sweet. It won’t work, however on my Radial 360.
The part that clamps onto the frame under the seat post area is too wide and does not allow the seat post clamp to slide all the way onto the frame. Not to mention the clamp needs a shim to work anyway.
If the Radial’s frame accomodated the tandem stem’s clamp, the extension rod would still be too short to work as a handlebar, so the boom is still necessary, it would seem.
Well, this tandem stem does fit around the frame, not the post. But it’s too big top to bottom.
So the top-to-bottom measurement of the clamp is too big to fit on the frame? Post some pictures to explain it please.
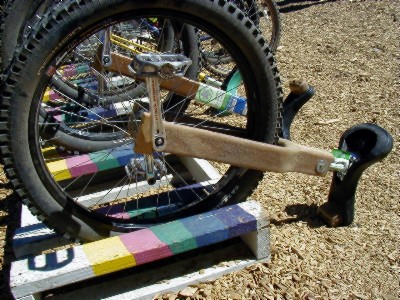
As someone without experience or equipment to do welding, I wondered how to create some kind of extended handle for my 36er, as others seem to do.
I think Joe’s comment about broomsticks was what I needed after lots of hacksawing and attempted bolting on of pieces of steel wheelchair from my trailer project. Metalwork without welding is just hard work.
So I came up with this:
It was first tried at the races in Warwick in September, where I managed to smash part of it by falling off. The design was rather an evolution, which explains the odd shape. I didn’t quite know how/if it would work, so I put the pieces together slightly oddly.
It works fine though! It weighs very little (broomsticks seem to be similar in weight to some very thin aluminium tubing I have (from window-washing poles) of a similar size, but much stronger/stiffer), and although a bit off-centre, it doesn’t actually rub. Possibly the nicest thing is that I can now see my speedometer (though still not wise to look down at speed).
Admittedly, it does go ‘creak’ a bit when under stress, and doesn’t put the brake lever in the ideal place. But it is unique and probably cost less than £3. 
Sam
you have a wooden seatpost!?
I can’t believe this thread is back… It’s from so long ago…
Anyways, it does look like it’s a wooden seatpost… thats odd, but kind of neat…
That new Nimbus handle looks cool, but seems like it would be rather expensive and a little heavy. Any comments?
Sweet! Engineering breakthroughs like that just don’t show up every day. I think you need to pair your handle design with the Stoltzfus Wooden Muni for a true Flintstones riding experience.
That looks super heavy! That is pretty cool, cause me dad is good at woodworking.
I have a rusty seatpost. It’s the knurled 22mm one with my Quax 36 - ideal for attracting the rust in the pattern. I drilled through it with a standard drill bit - the slightly funny angle of the handle could be blamed on getting the holes a bit wonky.
Sam