>Now that is pretty hardcore. Those are about £150 here. Do you >actually use the software much, are you doing serious training >with it or something?
I do like to train hard when I ride by myself or when I am racing. You definetley get more out of the ride (exercise) with it then w/o it. I live at altitude 8000’, so allot of my rides go as high as 12,000’. Therefore, it comes in handy even more. I use some of the software, but probably not as much as a triathelte would. I paid $180 usdollar about a year ago on Ebay.
Bummer. They have the Schwinn computer at the Renton Washington Wal*Mart. I just got two of them (one for my soon to be new and improved Coker and one for my MTB). For less than $10 (USD) each, Wow!
Here is the computer on Schwinn’s site
<Mountain Bikes, Road Bikes, E-Bikes, and More | Schwinn;
You should be able to find a suitable computer at your local bike shop. They should be willing to let you look at the manual to see if it will let you enter a Coker sized wheel (2770mm to 2850mm) and look at the magnet to see if it will fit a Coker size spoke. It’s going to be more than $10 though.
I did find one shop on the web selling the older Sting-Ray version of the computer.
<http://www.getawaybikes.com/Detail.cfm?CategoryID=64&BrandID=16&ProductID=776&=tid102>
I paid about $20 for my Sting-Ray computer a little over a year ago. I don’t see any differences between the Sting-Ray version and the newer Schwinn version at WalMart other than the price and that the Sting-Ray version was sold at bike shops and the Schwinn version is now sold at WalMart.
The proper way to do it is to take any bike computer and check the calibration. If the calibration of your Coker is bigger then the highest calibration of the computer, take an extra magnet (any will do but try to get another bike magnet, they’re easy to adjust) count 9 spokes, for a 36 spoke pattern, and put on the magnet. This is the most important step,forget the set up let the computer do the work .
I was actually looking at te Cateye comp today for my coker, we put it on and everything, with a single spoke magnet which they gave me, but i guess i didnt read enough of it to see that you can calibrate for a larger wheel. So you guys are saying I can just calibrate it to fit the 36 inch coker with no problems???
My Enduro II is set for 280cm, which is what I determined by rollout, seated, with 60 psi (I think). Since the idealistic number is 287cm, this is about what you should have. Use wheel setting B because we are slower than bikes for the most part.
That number is way off the paper chart but well within the stated Enduro II max of 300 cm.
Of course, you should do the rollout thing yourself to get the best accuracy.
John: I’m not sure if you’ve tried the setup yet with one of your new Schwinns. I purchased the WalMart model, and in installing today, the magnet unit definitely doesn’t fit over the spoke. What my current intended solution is will be to pry the groove on the magnet unit wide enough it that it can fit far enough over the spoke to show metal on the other side, then superglue a small metal washer or some other flat piece to hold it on. If you’ve already solved the problem in some more elegant fashion, would love a tip.
Question regarding the wheel measurement. In one of the early posts on this thread, you listed settings for the coker wheel, but also advised riding it out to get super accurate. How close to the rim is the magnet placed in those figures? In going off the manual’s recommendation for getting the magnet within 1/6" of the sensor, I’m actually mounting the magnet in about the middle of the spoke, which makes it closer to approximating a 26" wheel with the magnet mounted out near the rim. Has anybody found a similar situation, or have you just mounted it as far out on the spoke as it will go?
Dear Tom,
The computer has no idea where the magnet/sensor are mounted, nor does it matter. It can be near the rim or very close to the hub. All the computer knows is to count 1 revolution each time the magnet goes past the sensor. It then calculates your distance and speed from the exact number, in millimeters, that you entered in the computer when you initially set it up for your tire.
What does matter is that the sensor to magnet distance is about 1/6", so the sensor can tell when the magnet passes by it each time. But again, where you locate them along the spoke length makes no difference whatsoever. Hope that helps. If not, I’m sure someone else will explain it much better. --chirokid–
Actually, that helped immensely. I wasn’t halfway through reading the first sentence of your reply when the roar of a gigantic DUH! started building underneath my desk. Clearly I should have taken fewer trips out into the woods before my high school science classes. I can’t believe I asked such a stupid question…
Thanks for the reality check…I’m going to go try my superglue and washer setup.
Actually, the position does matter, but in a way that may not be relevant. The position inboard/outboard determines the width of the electrical pulse generated by the sensor at a given speed. The computer electronics are designed to handle a certain sense of what “pulse” is. We can’t know exactly what that is because we haven’t been given the information with the computer. The optimum placement for the magnet/sensor, then, is the place which would make it most closely match the bicycle setup for which it was designed, because this would match the range of pulse widths most closely. To complicate things, the instruction manual doesn’t state where on the bicycle wheel the sensor should be placed. However, there are some limitations due to sensor wire length which govern the magnet’s placement. On the Enduro II, though, there is an internal setting “B” which makes slower speeds, such as mountain bikes would encounter, more accurate. Presumably this changes the computer’s expectation of what a pulse will look like, perhaps by changing the sampling rate, or one of many other possible adjustments to the signal processing.
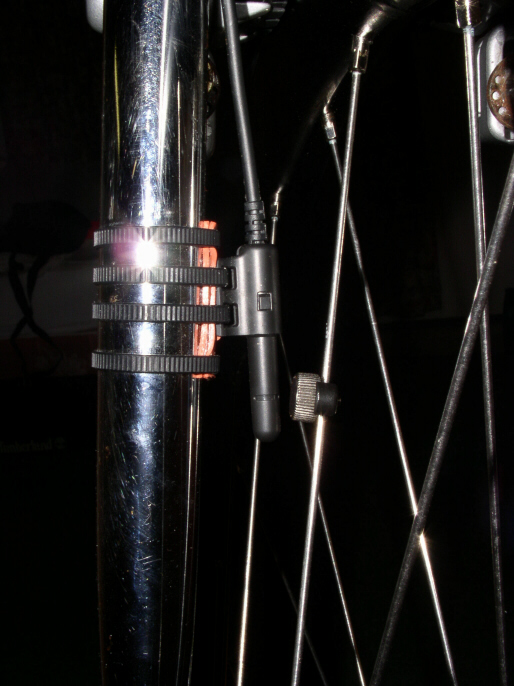
In short, I’d put the sensor a little farther out than on a mountain bike, and use the “B” setting. Here’s a pic of a sensor on a Coker, shimmed-out to meet the spokes at the optimal distance.
Placing the sensor at the hub, although a) impossible due to the default sensor wire length limitation, and b) theoretically counting 1 revolution like any other location, is not desirable simply because it would lengthen the electrical pulse put out by the sensor so much that the computer readout most likely would be unreliable. It would make an interesting experiment to perform, just to see what happened!
You are correct there. The slot in the magnet is not wide enough to fit around the Coker spoke. I just removed the magnet off my Coker to see what I had done to make it fit. I can see that I had filed the slot to make the slot wider. I don’t have a metal file that thin so I must have used a fingernail file (emory board) to file it. It’s soft metal so it files easily.
It’s a bummer that the magnet doesn’t fit the fat Coker spoke without modifications. One strike against an otherwise excellent low cost cycle computer for the Coker. I don’t remember having to file the slot wider, but obviously I had done so. The obvious file markings on the magnet are evidence enough.
I went with U-Turn’s reccomendation (thanks) and got the Cateye Enduro II. It went on beautifully with no modifactions at all, just like the above photo. I didn’t know about advantages of using the “B” setting, I just set it up with the “A”. I used the # I got from a seated roll-out. It’s been working great. It adds a nice bonus motivation factor to “Cokering”.
The wire is a heavy-duty one and, as I mentioned earlier in the thread, it only cost 16.99 through Performance Bikes.
The distance from the magnet to the receiver has to be less then a quarter of an inch.
The way it works is the receiver is a magnetic switch, which means that every time it passes a magnet it closes, it then closes a circuit. The computer DOSEN’T measure the speed the magnet passes the receiver it’s just a switch. The computer counts how many circuits, or spins, it makes in a specific time frame. The problem with that is how dose the computer know how big every spin is? For that they made the calibration system, you put in how many millimeters you wheel goes on every spin, the switch tells the computer every time it spins once, the computer times the amount of time in between, and out comes the speed. So the truth is that it doesn’t make a difference where on the spoke you put the magnet since every time the wheel goes around once the spoke goes around once.
Now most computers don’t have the calibration input for the size wheel a Coker has, so the solution to that is to tell the computer the total distance on every spin by dividing up the spin. Meaning you put in half the rollout distance and put 2 magnets so the computer counts the distance twice which at half the rollout value is the right speed.
Now to make things simple
Step 1. Buy any computer.
Step 2. Rollout you wheel at proper inflation.
Step 3. Check if you computer goes that high
If it does
Step 4. Set the computer
Step 5. Attach the computer
Step 6. Attach the magnet
Note. The computer and magnet could be at any height.
If not
Step 4. Set the computer at half the rollout distance
Step 5. Attach the computer
Step 6. Attach 2 magnets across from each other (9 spokes)
Note. Always make sure the magnet passes the receiver.