I have read with some interest the problems encountered with converting the new Miyata seats to air seats. I wanted to mount one on the Steve Howard MUni that I have so I had to remove the seat post from one to mount one of Steve’s rail adapters to go to a 27mm post. Even those carriage bolts stripped. I realized I had to take the whole thing apart just to get the post off so I figured I would do the conversion.
First, I noticed that whoever made the seat used the wrong size square punch for the carriage bolt holes in the steel plate. They are, however, the perfect size for 1/4" carriage bolts so I chucked all of the useless metric hardware. That’s why the ones in the steel plate rotate…they’re the wrong size. The ones in the plastic (front bolt on front bumper and both back bumper bolts) strip for more obvious reasons.
I made two bolt plates with broached 1/4" square holes. One was for the two back bumper carriage bolts made from 0.030 steel sheet, 1" by 3" and 2-7/16" center to center for the broached holes. The other was a tab for the single front bolt that sits in plastic for some assinine reason. The new tab rests between the two other front bumper bolts to keep it from rotating. It adds no noticeable height. It’s made from 0.030 steel sheet, 1" by 1-1/4" with the broached hole inset 3/8". All of the corners on both plates were radiused to the max to prevent snagging and puncturing. The plates will keep the carriage bolts from ever rotating again. A square punch and die set on a turret punch would have been infinitely easier but ours didn’t have one.
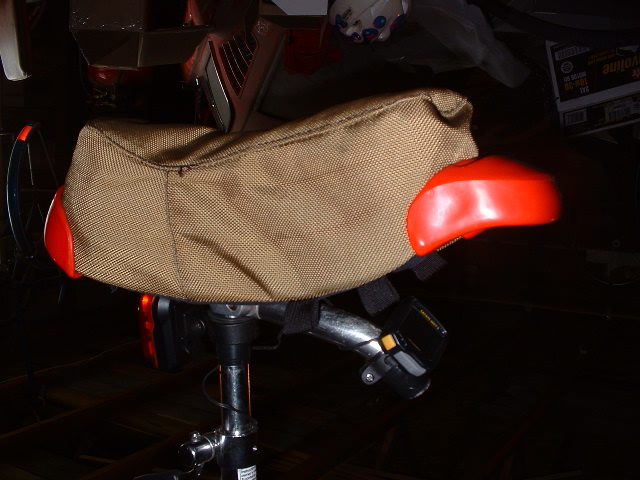
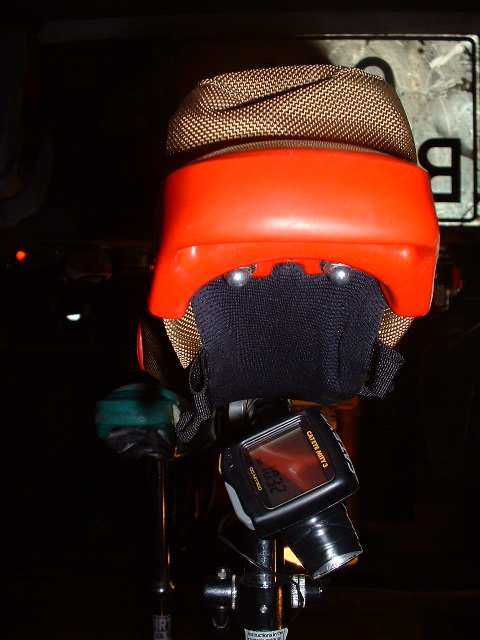
I did the Roach conversion and found that there was NO WAY the cover would fit correctly doing it the way my Gemcrest vinyl one was done. I tried several iterations and ended up with the unsatisfactory configuration where I inserted the plastic seat frame into the Roach bag. I couldn’t stretch it to get the Miyata clamps to hold it when I set it on the outside of the seat as I THOUGHT it should go. Did I do it wrong?
Anyway, I can torque to my heart’s content with the bolt plates, 1/4" carriage bolts, washers, lockwashers, and, on the bumper handle, locknuts to prevent loosening and protect the fingers from otherwise exposed threads.
I just did the Roach conversion on a new Miyata. I didn’t have any trouble, but I thought it was funny that you have to poke holes in the underside of the cover for your bumper bolts. Joe in Iowa
So the cover does have to have holes poked in it? I also cut some of the bottom cover away for space for the rail adapter that Steve made.
Mine looks pretty much like Mojoe’s. I think the front is kind of loose. I think more loops for tie cords should be added at the back to stabilize it.
Yeah, I whine about no photos and then what do I do? My wife was gone and had the digital camera. My dog ate my homework. The check is in the mail. My wallet is in my other pants.
I asked Karen to take the camera out of the car. I’ll try to take the converted seat apart and get some photos of the bolt plates and assembly.
Yep, I had to poke holes in the under-skirting, then hold it just right while positioning the bumpers over the bolts. I can see how it would be a hassle with the rail adapter, as the skirting covers the most of the bottom of the seat.
Being in Australia, I found it more than a little difficult getting a Miyata
seat, let alone a roach cover. When my Miyata seat finally did arrive, the
first thing I thought wanted to do an airseat conversion of sorts.
First thing I did was look on my shelf for a bike tube. I found a 20" tube
and thought it should be OK. I tried to fold it in all sorts of funny shapes
and put the cover back on, but it wouldnt fit with the foam, so the foam
went in the bin. I folded the tube how I thought it should be abd
gaffe-taped it up. I drilled an 8mm hole in the seat base and that was it!
Put the cover back on and its just fine.
Went for a 10km full offroad ride on the weekend, and not a hint of pain.
That included a bit of fast singletrack and a bit of very technical
singletrack downhill stuff that Ive seen a lot of mountain bikers walk down.
Mine has been fantastic so far! I’ll borrow a camera from work next week and
post them on my site. Stay tuned!
Leo,
Sydney Australia
“harper” <harper.5v4gz@timelimit.unicyclist.com> wrote in message news:harper.5v4gz@timelimit.unicyclist.com…
>
> I have read with some interest the problems encountered with converting
> the new Miyata seats to air seats. I wanted to mount one on the Steve
> Howard MUni that I have so I had to remove the seat post from one to
> mount one of Steve’s rail adapters to go to a 27mm post. Even those
> carriage bolts stripped. I realized I had to take the whole thing apart
> just to get the post off so I figured I would do the conversion.
>
> First, I noticed that whoever made the seat used the wrong size square
> punch for the carriage bolt holes in the steel plate. They are, however,
> the perfect size for 1/4" carriage bolts so I chucked all of the useless
> metric hardware. That’s why the ones in the steel plate rotate…they’re
> the wrong size. The ones in the plastic (front bolt on front bumper and
> both back bumper bolts) strip for more obvious reasons.
>
> I made two bolt plates with broached 1/4" square holes. One was for the
> two back bumper carriage bolts made from 0.030 steel sheet, 1" by 3" and
> 2-7/16" center to center for the broached holes. The other was a tab for
> the single front bolt that sits in plastic for some assinine reason. The
> new tab rests between the two other front bumper bolts to keep it from
> rotating. It adds no noticeable height. It’s made from 0.030 steel
> sheet, 1" by 1-1/4" with the broached hole inset 3/8". All of the
> corners on both plates were radiused to the max to prevent snagging and
> puncturing. The plates will keep the carriage bolts from ever rotating
> again. A square punch and die set on a turret punch would have been
> infinitely easier but ours didn’t have one.
>
> I did the Roach conversion and found that there was NO WAY the cover
> would fit correctly doing it the way my Gemcrest vinyl one was done. I
> tried several iterations and ended up with the unsatisfactory
> configuration where I inserted the plastic seat frame into the Roach
> bag. I couldn’t stretch it to get the Miyata clamps to hold it when I
> set it on the outside of the seat as I THOUGHT it should go. Did I do
> it wrong?
>
> Anyway, I can torque to my heart’s content with the bolt plates, 1/4"
> carriage bolts, washers, lockwashers, and, on the bumper handle,
> locknuts to prevent loosening and protect the fingers from otherwise
> exposed threads.
>
>
> –
> harper - Gearhead
>
> -Greg Harper
>
> The best quotes are always taken out of context:
>
> “I don’t know what you are talking about.” -Lewis W. Beard
>
> ------------------------------------------------------------------------
> harper’s Profile: http://www.unicyclist.com/profile/426
> View this thread: http://www.unicyclist.com/thread/18568
>